Knitting Project : Washcloths

I’m the first to admit that knitting a washcloth sounds a touch absurd, especially since you can go out and buy a dozen lickety split. But don’t knock it until you’ve tried it. Washcloths are the perfect canvas for trying out new stitches. They’re quick to knit and make the perfect gift, especially when paired with a bar of fancy soap. The only downside? Knitting with cotton yarn can be a bit rough as it doesn’t have the same stretch as wool.

Today we’re sharing ideas for five washcloths including the full pattern for this cute-as-a-button lamb. Pick up the supplies this weekend and you’ll have plenty of time to knit a few lambs for Easter baskets!

liveseasoned_spring2014_lamb_wm

Continue reading

Rosemary Room Spray

Rosemary is our ingredient of the season. Today we’re stepping out of the kitchen and using rosemary oil to create a room spray that will leave your whole house smelling fantastic!  If you follow this link, you’ll see some of our other favorite uses for essential oils. 

Hey readers, it’s been a fun week around here, hasn’t it? Did you check out Sarah’s profile of Connie Zamorano Tuesday afternoon? Now I’m obsessed with getting one of those cicada prints on my wall!

If the bugs left you squirming in your seat, you can channel that energy into this super simple project: homemade rosemary, mint and eucalyptus room spray. Have you tried store bought room sprays? I have a few, and I have to admit that I love them at first, but find that they can be a bit overpowering in their staying power and/or they just smell chemically over time. I don’t have either problem when I make my own. As for complexity, it’s going to take you longer to read this post than it will to mix up your spray.

liveseasoned_spring2014_roomspray_oils_wm

Continue reading

Potato Stamp Tutorial

If you’ve never transformed a vegetable into a stamp now’s your chance.  It’s a quick and disposable option for those days when you want to create something without too much preparation and effort.  Potatoes are cheap and it’s likely that you have a couple living in your kitchen right now.  Sliced in half, potatoes are a perfectly blank canvas just waiting to be customized.  Cheap, easy and customizable means a perfect craft for groups so test out this tutorial at summer camp, in the classroom or on a rainy day.  We love stamping so much here at Live Seasoned that this is just the first post in a Stamping Series.  From time to time we’ll be back to teach you how to make stamps from just about anything from Styrofoam takeout containers to pencil erasers.  For now grab your spuds and let’s get starchy.

Supplies:

  • Canvas or Cardstock
  • Potato
  • Pen
  • Pairing Knife
  • Paint
  • Exacto Knife (optional)
  • Paper (optional)
  • Stencil (optional)

Instructions:

  • Pick a potato, any potato.  Slice your potato in half and boom, we’re already on our way to making two stamps.
  • First cut the desired letters or shapes out of card stock to create a stencil.  If you’re a confident cutter, by all means skip the stencil step.
  • Stick a stencil on each half of the potato.  The moisture will adhere the paper to the potato; it’s quite convenient.
  • Carve around each stencil, basically tracing its form onto the potato.  I actually did this step with a pen.  I poked it in a little bit and then dragged it along the outside of each stencil.  (I had planned on doing it with the exacto knife, but the pen worked so well and I figured it’s more likely that you have a pen handy.)  If you aren’t using a stencil then carve your chosen shape into the potato using a pen, exacto knife or pairing knife.
  • After your shape is carved into the top of the potato, take your pairing knife and slice into the potato about a quarter to a half-inch.  Drag it all the way around the circumference of the potato making sure not to cut all the way through, which would cut off the design you just created.  Then cut down into the potato on each edge of the design removing any excess potato.
  • You should be left with a raised design, in my case an X and an O.  Clean up the edges of your design with an exacto knife, pairing knife or even your fingernail.
  • Finally make a small mark on the skin of the potato to signify where the top and sides of your design is.  This will help if you want to line up your stamp or space it evenly on your project.
  • Next dip your stamp in paint or brush some directly onto the potato and stamp your heart out.  I found that it worked best to dip my spud in a thin layer of paint rather than a puddle.  Potatoes have a high water content, that mixed with paint can make them slip around on your paper or canvas.  I used an old tin can lid as my paint palette, which worked well as far as pushing around the paint and ensuring only a thin layer was being applied.

Each stamping will look a little different and that’s really the beauty of the potato stamp.  It’s not rigid and formal; it’s unique and playful.  I played around with both repetition and white space.  I could have decorated a dozen canvases, but I only had three.  As you can see, some of the stamps are more opaque than others.  I decided to use a paintbrush on some and others I left alone.  It’s all a matter of personal preference.

I had a great time playing around with these potato stamps and it made me excited to babysit or teach again so that I could pass on the fun.  I’m always looking for cheap and easy household crafts that I can create in a pinch to entertain bored kiddos.  Potato stamps are the perfect solution for creating decorations, invites, or gift wrapping for those random occasions or specific party themes.  I know I’d rather run to my kitchen rather than a craft store whenever I need a simple stamp.  I hope you’ll try this out next time you’re entertaining some art-lovin’ little ones or maybe you’ll throw your first ever ‘Buds and Spuds’ art party.  Be sure to instagram your results and tag @liveseasoned, we’ll love you forever.

*This post contains affiliate links

Vortex : Hat Pattern

I’m sure this winter’s arctic vortex won’t leave our memories anytime soon, but we felt that it was worth commemorating with a new winter hat pattern. Let me introduce Vortex!

liveseasoned_spring2014_newhat_solo_wm

I know not all of our readers are knitters, but if you’re ever given the opportunity or have the motivation to learn, I highly encourage it! There has been a true resurgence in knitting over the past decade, and this has led to awesome local knitting shops, knitting-focused blogs, and amazing pattern independent designers. If you’re new and wondering where to start, a quick google search will return a variety of handy tutorials and knitting guides. Ravelry is the place to start if you to explore knitting patterns and so much more (my username is winterfoliage, let’s be friends!).

I admit that there’s a slight learning curve, but once you grasp the basics, you’ll be pleasantly surprised to see how much you can do with just a few stitches. Plus, you can knit while watching TV! You know what this means, right? You’ll now have something to justify those marathon House of Cards sessions and the past two weeks spent doing nothing but watching the Olympics.


Continue reading

DIY : Touchscreen Compatible Gloves & Supply Giveaway!

I’m one for quality over quantity, but sometimes I run into the problem that the quality items just won’t wear out so that I can get the shiny new version with extra features. Take gloves. Being the winter walker I am, having a good pair of gloves is essential. I have a pair that work fine in every way: warm, give me plenty of dexterity for wiping runny noises and picking up the {ahem} dog poop, and above all else, they magically stay together as a pair. You’ll notice that they look well worn in the photos, please excuse their pilled rough and tumble appearance.  Unfortunately, they are not touch screen compatible, which leaves a few fingers out in the cold when I want to use my phone for anything from taking pictures to making calls. Lucky for me (and you!), with the right materials this is a surprisingly easy problem to fix.


Our smart phones have capacitive touchscreens, which require the flow of electrons between our fingers and screens to function. Unless you already have touchscreen compatible gloves, you’re like me: making this connection requires taking off your gloves. BUT we can easily complete that circuit with just a bit of conductive thread!

Buying conductive thread is not as hard as it used to be. There are a variety of threads and other materials available on Amazon. When I converted my first pair of mittens a few years ago, I remember there being only a few suppliers, and I had ordered a sample pack from Silverell.  Sparkfun is another supplier that’s been around for a while and sells a variety of materials for similar crafty projects. Now, the sky’s the limit and you probably already have supplies in your house to make your own!

That said, if you want to dip your toes in the water but don’t want to order or make your own conductive thread, we’re giving some away! The details are at the bottom of this post.
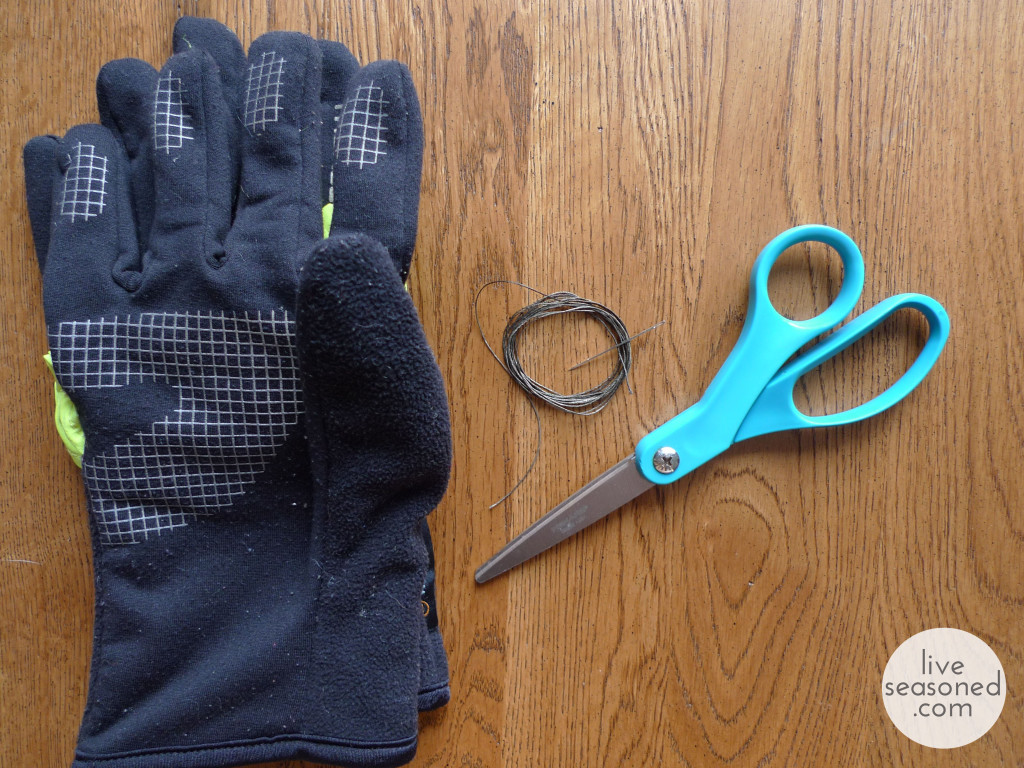
liveseasoned_spring2014_touchscreengloves_supplies_wm 

Materials:

  • conductive thread
  • sewing needle
  • gloves

Instructions:

  • Mark your contact hotspot. Put on your glove, pick up your phone, and swipe the screen as if you’re going to use it. Mark the area on your finger or thumb tip that makes contact with the screen – this is where you’ll want to make your stitches, and often it’s not directly in the middle of your glove’s finger tips, where your instinct may tell you to add the thread.
  • Stitch your marked area! Make a number of overlapping stitches where you marked your glove. *Notice the way I weave the needle in and out of the thumb tip from the outside, it makes your sewing much easier than having to reach into the glove for the needle.* After a few stitches, double check to make sure that the thread is clearly exposed to your thumb on the inside of the glove and the screen on the outside. If it is, continue stitching until you cover the full area of the glove that was making contact between your thumb and the screen.
  • Check your work. Put on your glove and use your phone. Does it work? If it works, great, you’re done! If not, read my first tip below and try again. If you’re still having trouble, add a few more stitches in the same area. The more thread that’s there, the more opportunity the electrons have to will flow!

And we couldn’t help ourselves, we had to show a little action clip of the glove at work! If you have a sharp eye, you’ll notice that we took that footage on Tuesday, during the latest storm, and Calder’s texting me to say that he shoveled the driveway (usually my job), but that the snow already covered it up again. There couldn’t have been a more appropriate text for this post!

gloves

This is one of those updates that is so easy that you’ll wish you did it back in November before suffering through the Arctic Vortex.  Back when you could still feel your fingertips and were greeting each day’s snow with a smile because you were going to make the best of this cold!

Has anyone out there attempted a similar conversion? What type of conductive thread did you use? Have any tips to share?

Notes and Tips:

  • I often find that these gloves are not as perfect as our ungloved hand. They work fairly well when I’m doing a big slide motion (like unlocking my phone), but are not as successful with tap motions. Tap performance can be improved if you add a very slight slide at the same time, so often I will slide across the button I want to tap, and that does the trick.
  • The thread I’m using is sold as “sewing thread” and I get the impression that it is meant to be used for machine sewing to stitch two pieces of fabric together. As such, it’s a combination of fabric and conductive material, and the connection is not as strong as it could be using a purely conductive material, but, it does work!
  • If I were knitting a pair of gloves or mittens, I would hold my conductive thread with my yarn when knitting the thumb and finger tips that I want active. Depending upon how well this works, you could then go back over the a specific point on your finger tips, just like the project above, to enhance the conductivity.
  • In the last picture, my stitches look like a big lump, but they are truly not noticeable. This might be more of a problem if your gloves are fitted. If anything, I found that having a slight bump can be helpful in giving you a good sense of where to touch the phone.

Now, about that giveaway ~

We want to share the love and encourage some simple DIY action. The first five commenters on this post will be gifted enough conductive thread to pimp out your own gloves. What do you say, want to give it a try? Let us know!

Woven Valentine Tutorial

liveseasoned_DIYwovenvalentines-1024x882 copy

Today we’re sharing the simple instructions and templates to make a woven Valentine’s Day card. This is an especially convenient craft because the materials are probably stashed away somewhere in your home. While weaving paper sounds simple (and it is!), you’ll see that with a bit of creativity it produces a card with big impact. After you’ve finished this project,  you can flex your creative muscles and use this technique for a variety of holidays and occasions! Additionally, If you have little kiddos at home weaving paper is a really simple, yet fun, way for them to work on their developing coordination and dexterity.

We’ve provided printable templates at the bottom of this post, making the project even easier by eliminating the need to do any measuring or sketching.  Of course, if you’re comfortable with a ruler or you don’t have access to a printer then follow our written instructions.    

liveseasoned_DIYwovenvalentines6

Materials & Tools:

  • Card stock or any colored paper
  • Printer (optional)
  • Ruler
  • Exacto Knife
  • Scissors
  • Pen
  • Tape
  • Cutting Mat or old magazine

Cost $1

These instructions will create a 5.6 by 5.2 inch heart centered on a 7.6 by 7.2 inch piece of card stock.

  • Choose your base paper. If you aren’t using a template, you’ll begin by preparing the white base paper that the colored strips will be woven into. Our heart is going to be centered on the paper, so it will have a 1 inch border on all four sides. Having the nice wide border makes it easier to weave, and your finished work will look cleaner.  If you’re using a different sized paper, subtract 5.6 inches from your paper’s width and 5.2 inches from your paper’s length, divide by two and that will determine your respective borders.  

liveseasoned_DIYwovenvalentines9


liveseasoned_DIYwovenvalentines8

  • Draw and cut vertical lines on your base paper. Begin by marking dots where the vertical lines will fall. Starting an inch (or your given border length) from the left and top edges of the base paper, measure and mark every 3/8th of an inch working across your paper until you reach the right border area.  So your first dot should be 1 and 3/8th inches in.  Simply mark a little dot every 3/8th of an inch until you have a total of 16 dots.  Repeat this process again an inch up from the bottom of the paper.  Remember your first dot will be at 1 and 3/8th. Stop once you have 16 dots.  Now place your ruler from top to bottom on the paper and draw a straight line to connect the first dot on the top to the first dot on the bottom.  The line should measure 5.2 inches.  Continue drawing straight lines from the dots on the top to the dots on the bottom of the paper.  You should have a total of 16 lines.  Now place your paper on a cutting mat or if you’re like me and don’t own one, on an old magazine.  Take your time and carefully use an exacto knife to cut each line, making 16 slits in the paper.

liveseasoned_DIYwovenvalentines10

  • Cut the colored strips for weaving. Cut 14 strips of paper that are each 3/8th inches wide and at least 7 inches long. You can do this with your exacto knife or scissors, but it’s even easier if you have a straight edge paper cutter. 

liveseasoned_DIYwovenvalentines11

liveseasoned_DIYwovenvalentines12

  • It’s time to weave!  On the backside of your base paper (the side with the pen markings) follow our template to mark the heart area. We marked the backside of our paper with the x’s you see above. If you’re using the template, the printed side is the back of your paper.  When you’re weaving, you will covered the x’s with your colored paper (producing a white heart). When you turn your paper over, BAM! your colored heart will be nice and crisp without any of the markings used for measuring and planning. You can add a highlight on the heart if you desire.  I found that nifty highlight idea here.
  • Finish your card. Secure each strip with a tiny piece of clear tape and then trim the ends. Glue your woven heart to a piece of colored paper to make a postcard or to the front of a folded piece of card stock.  I made both versions, but I can’t decide which I prefer.  Put a stack of books on your finished cards to ensure that they dry nice and flat before sending them off in the mail.

Now that you get the general idea, feel free to run wild with this technique.  The only rule is to keep the width of the strips and the width of the slits consistent. It’s always helpful to sketch up a new idea before you cut and measure.  Measure twice, cut once, right? For me it’s more like do the math three times, measure twice, and sketch once more.

Here are templates for the Small Woven Heart Tutorial, the Large Woven Heart Valentine Tutorial and the camouflaged Love Card Template.  Print page one on a piece of colorful card stock (this will be your background) and page two will be your strips, so find a color that will look nice with whatever you chose for the background.   If you want to spell something else, you can find a pixel alphabet here, which should help with planning.  Let us know how it goes!