Two Bits

Each Friday we share some tidbits from our week.  We want to break down these internet barriers and invite you into our lives and we’re hoping you’ll do the same.  You are welcome to share a bit of your week or day in the comments, or if they’re better represented by a photo, tag us on instagram @liveseasoned

Katie here :

Weren’t Sarah’s photo tips from yesterday great? I’m still trying to figure out how to put them into practice with a running toddler. I place him in that nice big shady spot and he runs towards the sun! So over the past week I’ve taken plenty of blurry shots with speckles of bright sun and shade covering the little guy’s face. Hopefully we’ll get a few great pictures tomorrow and Saturday while he’s wearing his yet-to-be-completed Halloween costumes. I know, I had all week!

And I hate to admit this, but I may have been procrastinating with the costumes because I spent way too much time this week thinking about (and scanning Pinterest for) Christmas and decorations. I’m excited to add some toddler-friendly decorations to the mix, and I’m starting to realize that the sooner I can work on them the better. You know what I’ll be doing with my 25% off coupon at Joann’s this week.

Sarah here:

mario-1-2

Sounds like Kate and I have had similarly productive weeks.  I made numerous trips to the craft store this week and last night I spent three hours playing around with fondant.  I made Super Mario inspired characters to adorn cupcakes for my man’s birthday this coming Saturday.  He is turning 25, but he’s really 9 at heart.

I’ve also made very little progress on my Cleopatra Halloween costume. I was making progress in the beginning of October..  I ordered a wig two weeks ago and it still hasn’t come in.  I’ve been holding off buying one just hoping that I’d wake up and it would be on my doorstep, but as of 1:10 a.m. on October 31st, I’m officially giving up hope.  I plan on going to a beauty supply store tomorrow and picking one up.  I still need to add beads and adornments to the wig; I’m inspired by this image of Elizabeth Taylor.   So far, I have gathered an old gold prom dress that I’ll be wearing along with lots of chunky gold jewelry and these amazing metallic temporary tattoos!  I’m tempted to find a curved staff stick in the woods and spray paint it gold tomorrow, but we’ll see, maybe this empress doesn’t need a staff.

Happy Halloween everyone! This is quite possibly my favorite holiday of the year! How are you celebrating? Giving out candy? Dressing up? Partying the weekend away? Sippin’ on some cider in your everyday clothes and sayin’ bah humbug or would it be booooo?

Simple Twig Wreath

liveseasoned_fall14_twigwreath-5

Happy Fall! This foraged twig wreath screams autumn and the best part about it is it encourages you to go outside and prance around in the woods.  You’ll need to gather a bunch of twigs and sticks, which is really easy at this time of year.  The forest should be full of dry kindling waiting to be collected.  I wanted to create a natural looking decoration that was quick and easy, but also cheap.  This wreath ended up costing me nothing but time (most of which I spent looking for my glue gun) since I already owned the other materials.  I made a pretty big wreath because I wanted it to be the center of attention on my tiny shed wall.  First things first, think about where you’d like to hang your wreath and measure or eye it up so that you have a general idea of how big you’d like your finished product to be.

Supplies:

  • thick cardboard
  • pen
  • scissors
  • tape
  • twine
  • glue gun
  • big ol’ pile of twigs

Steps:

  • Step 1: Draw a donut onto some scrap cardboard (I traced a random jar, but it doesn’t have to be perfect) and cut it out.  My cardboard seemed flimsy so I cut two identical donuts and taped them together with masking tape.
  • Step 2: Dispense a line of glue on one side of your donut. Press the twine into it and wrap it neatly around the donut.  Continue dispensing glue (on what will be the back side of your donut) and wrapping twine until you cover the entire donut.  Cut a length of twine (mine was about 4 inches) and tie it in a loop around your donut so you can hang it up later.
  • Step 3: Now it’s time to place the twigs.  This is where you can let your creativity come through.  Do you want a wreath of all tiny twigs? Bigger sticks? Bark or no bark? That’s all up to you.  I wanted something that looked really rustic so I strived for lots of variation in both size and color.  Start by placing the 12 o’clock and three o’clock sticks, but don’t glue them down yet.  Choose sticks to fill in the space between 12 and 3.  Once you have a quarter of your wreath laid out, you can begin hot gluing the sticks to the donut.  Don’t rush this process, glue each stick individually and pay attention to how they are arranged in the center of the donut. You will want the center to resemble a star when you’re finished.
  • Step 4: After you have filled in 12 o’clock to 3 o’clock section, place the 6 o’clock stick on the donut and repeat the process.  Continue until your entire donut is covered and your wreath is complete.
  • Because my wreath is so large, I wanted to create an additional layer of smaller twigs to add some depth.  I did this by repeating steps 1-3 and simple gluing my smaller wreath onto the larger one.

I had  a great time creating this project because there really is no way you can screw it up. It was a stress free craft project, which kind of equates to meditation for me.  I hate sitting idle, but sometimes I don’t feel like concentrating too hard on a project.  It’s also perfect for kiddos.  They can search for twigs and lay them out to their liking while a parent glues them to the donut.  Another reason I’m keen on this twig wreath, it gives me something to photograph in all seasons.  Have you ever taken the same photo over and over during each season?  It’s nice to have a single object that remains unchanged yet altered by whatever is going on in the shot (rain, sleet, snow).  I’m excited to see how this simple craft holds up this year and how pretty it will look with a dusting of snow 🙂


Two Bits

Each Friday we share some tidbits from our week.  We want to break down these internet barriers and invite you into our lives and we’re hoping you’ll do the same.  You are welcome to share a bit of your week or day in the comments, or if they’re better represented by a photo, tag us on instagram @liveseasoned

Sarah Here:

liveseasoned_fall14_twobits-1

I had a fantastic fall week!  I took a road trip to Asheville, NC and I camped creekside for a couple days.  The weather was actually a bit cooler than I anticipated, but it was nice warming up near the campfire each night.  Kevin, Cash the dog, and I spent our days winding along the Blue Ridge Parkway and visiting tiny towns and hiking trails in the Blue Mountains.  We spent our evenings eating out in Asheville, which was a welcome treat for the both of us.  If you’re headed to Asheville anytime soon, head to Over Easy Cafe for breakfast and Farm Burger for lunch or dinner.  Also, hit up Wicked Weed or one of the other dozen breweries for a buzz.  We wished we had more time to explore, but the little bit that we saw we enjoyed so much.  I had about a dozen more shops and restaurants on my to-visit list so I know I’ll be back.  I’m actually thinking that Asheville is the next stop on my home tour and Farm Burger is definitely helping the case as far as Kevin is concerned!

My other bit is the satisfaction of packing up a whole lotta bits.. I’m packed up and ready to move out! At noon today I’m going to pick up at 16 foot box truck, just imagine that while you’re on your lunch break 😉 I’m moving into an apartment with high ceilings and a big backyard. It’s actually smaller than the place I’m renting now, but the outdoor space makes up for it. I can’t wait to film my inaugural house tour! Hope your Friday is a bit more relaxing than mine, but just as exciting 🙂

Fall Cheese Trifecta

While apples may be our ingredient of the season, cheese is definitely our snack of the season. So far we’ve spent more time exploring condiments to pair with our favorite cheese rather than the vast world of cheese varieties, but we’re ok with that, because these combinations are top notch!

liveseasoned_fall2014_cheese_applebutter6_wm

With today’s combination, I’m not sure who’s the star. Our delicious homemade apple butter? Carr’s hearty whole wheat crackers biscuits? Or the ever reliable bite of Cabot’s Extra Sharp cheddar? I do know that when you put the combination together you create a hearty snack that evokes the flavors of season and will satisfy the hunger you build up while outside on these crisp fall days.

liveseasoned_fall2014_cheese_applebutter5_wm

If you haven’t had a Carr’s whole wheat cracker yet, add them to your next grocery list. You’ll find them to be much more substantial than a typical cracker. The whole wheat really fills you up, but they also have a touch of sweetness that makes it seem like you’re eating more of a cookie than a cracker. It’s hard to explain, but I know that I can eat two or three with a cup of tea and consider it the perfect mid-morning snack. 

liveseasoned_fall2014_cheese_applebutter1_wm
liveseasoned_fall2014_cheese_applebutter3_wm

We’ve already raved about our love of apple butter in this post, so there’s not much more to say there. Other than to remind you to pick up a sack of apples and get yourself a jar.

Then there’s the cheese. Do you have a favorite cheddar? Whenever I want a basic, not too expensive cheddar that has that perfectly sharp bite, I look for Cabot’s Extra Sharp. The description on their site says it best, the cheese is “creamy white in color with an almost crumbly texture and has a sophisticated, citrusy tang”.

liveseasoned_fall2014_cheese_applebutter7_wm

Cheddar gets its name from an extra step in the cheese-making process called cheddaring where loaves of curds are allowed to set until they reach a certain acidity, they are then cut into loaves, stacked, and turned every 10 minutes until further acidity points are reached. While changing the acidity, this process adds flavor and creates the crumbly texture that cheddars are known for. After the batch has been cheddared and salted, the curds are placed into cheese molds and aged for anywhere from 1 month to over 10 years, depending upon the type of cheddar being made. The Cabot Extra Sharp is aged for anywhere from 9 to 14 months (whereas their mild cheddar is aged for just 2 to 3 months).

liveseasoned_fall2014_cheese_applebutter8_wm

Want a few more fun cheddar facts?

  • It’s the second most popular cheese in the US behind mozzarella
  • Our average annual consumption is 10 lbs per person!… my personal consumption is more like 20 lbs (minimum)
  • The cheese originated in the English village of Cheddar in the 12th century
  • Easy Cheese is not cheddar
  • A single 1 oz serving gives you 20% of your daily calcium requirements
  • And what do you call the hunk of cheddar sitting in my fridge? Nacho cheese! ha!

A Bewitching Window!

Other than decorating our mantel, my Halloween preparations have been totally stalled, but with Halloween so close I really wanted to do something at the front of our house. We have a small porch area and a single window that faces the sidewalk. I was extra motivated to make this happen because we’re also close to the mailbox cluster, so a lot of neighbors pass by, and I wanted them to see something fun. I haven’t made any progress on the ghosts I mentioned, but while walking the Halloween isles I came up with an idea for the window : create a fabric panel with a witch silhouette! 


I know that they sell window silhouettes, and some look like they’re great (a full-window design with a translucent background), but others are just the silhouette, so if you don’t have translucent shades or a curtain, the silhouette won’t have as much of an impact because peepers will be distracted by everything else in your window (know what I mean?). Plus, I thought it would be a creative challenge, and if it worked I would be able to re-use it for years!

I’m going to share my general how-to and materials, but not a specific pattern. This is such a simple project that you should be able to easily tailor it to your window and decoration theme (bats! ghosts! ghouls!).

liveseasoned_fall2014_halloweenwitch1_wm

Materials & Tools

  • thin white or creme colored fabric measured an inch wider and at least two to three inches longer than your window. It will be enough to cover your window with a half inch seam along the two sides and bottom and a to sew a wider “hem” in the top for a tension rod.
  • black fabric large enough for your design
  • Heat’n’Bond large enough for your design. I accidentally bought the thin version that you can sew through, but you should buy the thicker stuff that doesn’t require sewing (note, I still didn’t sew mine, but I’m worried that it might not bond as well over the long run).
  • pencil
  • ruler (optional)
  • scissors
  • sewing machine and thread

liveseasoned_fall2014_halloweenwitch10_wm

How-to

  • pre-wash and iron all fabrics
  • Sew the seams around your white panel.
  • Iron the Heat’n’Bond to one side of your black fabric (it comes with instructions for iron temp and timing).
  • Draw your design on the paper of the Heat’n’Bond (This panel works when turned either way, so you don’t have to worry about your design coming out backwards – you just flip the curtain, but if you include words, then one side of your window will always read them backwards).
  • Cut out your design – cutting through the Heat’n’Bond paper and your black fabric.
  • Remove the paper backing from the Heat’n’Bond, place your silhouettes on your white panel. Iron the silhouettes following the Heat’n’Bond instructions.
  • Hang your curtain and settle in for a spooky night!

Tips & Tricks

  • I Googled “witch silhouette” and found the image that I very closely followed for this project. If you’re looking for ideas just search for “halloween silhouette” and you’re sure to find something perfect.
  • Once I had my image, I free-handed the drawing. To help with this process, I began by putting references points on the paper (for example, points where I wanted the top and brim of the hat to be, others for the hands and face, etc.). You can see them in the image above to the left. I then stood back and looked at those points to make sure that I liked the proportion and placement of my witch.
  • With those points in place I sketched a witch. I did this relatively quickly (5-10 minutes max), I didn’t go back and erase lines, and I didn’t aim for perfection. I always believe that if you give people the impression of an image they can fill in the details and overlook slight imperfections (our brother will whole-heartedly disagree with me). For example, is the bump at the back of her head a bun (my intention) or a wonky ear? You decide, but either way, you may not have focused on it until I brought it to your attention.
  • Finally, as well as giving you a paper to draw on, having the Heat’n’Bond stiffens your fabric so it also makes cutting and placing your silhouette so easy!

For being a random idea, I really love how this project turned out! It looks great in our window during both day and night. We hung the side with the silhouette facing out. So during the day, we get to see a shadowy silhouette image inside the house as the sunlight shines through, while everyone outside still sees the witch (I don’t think their view would be as good during the day if we hung it the other way around). You’ll get the same shadowy effect at night if there’s a street or porch light outside of your window. And one last hanging tip – Alex loves looking out of this window during the day, so I just use a couple of binder clips to secure the bottom of the panel to the top; it’s folded in half and we can see out of the bottom half of the window.

liveseasoned_fall2014_halloweenwitch11_wm

**Costume update: C and I felt the costume pressure when we realized that the little guy has no less than 3 costume parties to attend! So we had a brainstorming session tonight and came up with some fun ideas!

Easiest Caramel Dip

liveseasoned_fall14_carmeldip-5

As you know, apples are our ingredient of the season and with that in mind, I decided to make a childhood favorite of mine, caramel dip.  Over the years, my tastes for sweets has drastically decreased.  I’m now a dark chocolate lover and I tend to gravitate towards salty snacks, but when October rolls around I always think of my mom’s caramel dip.  She used to whip up a batch for friendly gatherings, holiday dessert tables and if my memory serves me correctly, the soccer concession stand.

This recipe is dubbed ‘the easiest caramel dip’ because you’re not actually making the caramels, you’re simply melting them and adding a couple other ingredients to achieve the right taste and consistency.  Its simple preparation (no knives involved!) makes it a great recipe for the kiddos to help with.  It can also be made a day or two ahead if you have a big party approaching and in my opinion, those are the best types of party foods.

The original recipe, which was dictated to me by my mom earlier this afternoon calls for Cool Whip.  My mom mentioned that she didn’t really know why the Cool Whip was added (since it’s mainly just oil) and that I could probably find a substitution for it, but that she never bothered.  Raising four kids, working full time, and constantly cooking for us, I can understand why she didn’t want to mess with a hit like her simple caramel dip.  Can you imagine the moans and groans we would have attacked her with if the dip didn’t taste right?  Anyway, after I went grocery shopping and snapped the first shot of the ingredients I realized I don’t have four kids and thus I could manage to experiment without any repercussions and such, this recipe contains Cool Whip no more! I opted to use a couple spoonfuls of coconut oil instead and to my delight, it turned out perfectly and you can’t taste the coconut one single bit.

Ingredients:

  • 1 bag of Kraft caramel
  • 1 package of cream cheese
  • 2 TBSP coconut oil (or more to achieve desired consistency)

Easiest Instructions:

  • Unwrap all the caramels and put them in a small sauce pot along with the cream cheese.
  • Stir continuously on medium low heat until the caramels and cream cheese are completely melted and combined.
  • Stir in two tablespoons of coconut oil.  If you like a thinner dip, add a bit more coconut oil until the desired consistency is reached.
  • Remove from heat. Transfer to a small bowl and serve with sliced apples.

Along with sliced apples, I also dripped some of the caramel dip onto plain, unsalted popcorn and roasted, unsalted peanuts. It made for a sweet and crunchy treat.

Just so you know…

  • I’m moving in a few days and I had already packed up my kitchen so finding utensils, bowls and serving pieces for this post was the most challenging part!
  • The handle of my pot broke off (the screw came loose and slipped out) when I picked up the pot to transfer the caramel to a bowl. It slammed down on the stove and hot caramel splattered everywhere..
  • I almost spelled caramel, carmel for the entire post because I grew up next to Mount Carmel so naturally that’s how I’ve been spelling the sweet treat my entire life.  I never understood why some people pronounced caramel with three syllables, but now I get it.

Colorado Hike: Flatirons 1 & 2

liveseasoned_fall14_flatironshike-1

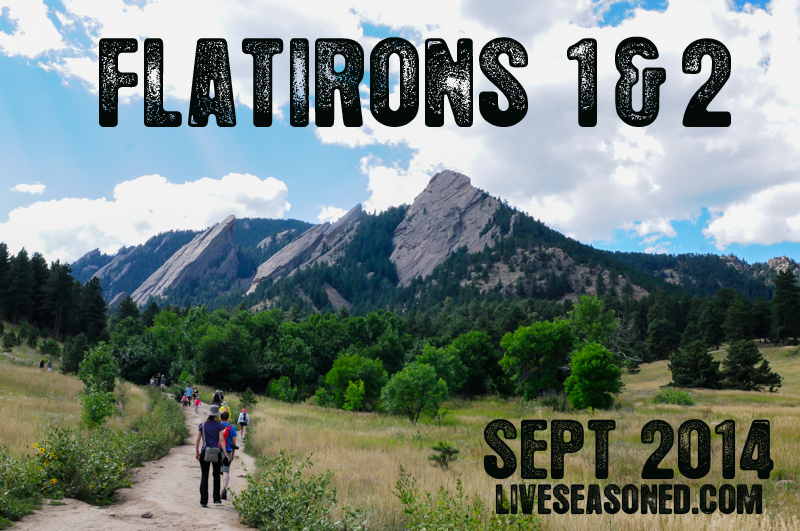
About a month ago, Katie, Jeff (our brother) and I hiked the Flatirons 1 & 2 trail.  I’ve been meaning to write this post for some time since it was one of the most scenic hikes in Boulder, CO, so here goes:

liveseasoned_fall14_flatironshike-1-2

The hike starts at the Chautauqua Park trailhead.  Parking in the lot can be pretty tricky, especially on the weekends, but you can find additional parking on Baseline Road.  That being said, the trail is extremely crowded.  You won’t have the views to yourself, but hey, at least there is no chance of getting lost. After you find a parking spot, continue to the Chautauqua Park trailhead where the trail takes you through a lovely green meadow.  (Note that if you’re hiking right after a rainstorm, it will be pretty muddy since the trail is basically a path for runoff water. ) The Chautauqua trail connects with the Flatirons 1&2 trail and the signage is very clear as is the flow of people flocking to the Flatirons 😉

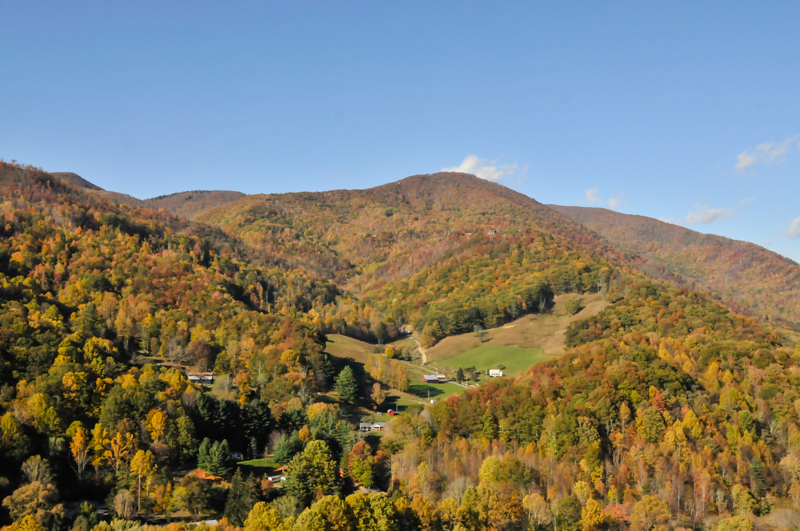
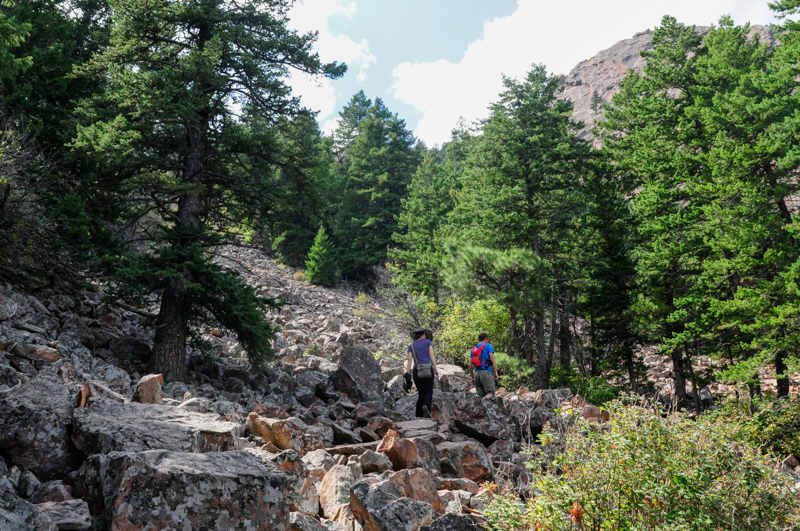
Over the course of this relatively short hike (about 2.5 miles), you will climb 1,400 feet in elevation.  Flatiron 1 is approximately 7,100 ft high, which makes for stunning views.  As you hike up the trail, there are plenty of outcroppings that are perfect for taking a break and enjoying the vistas.  The Flatiron trail is mainly switchbacks through thick forests of ponderosa pine that cut around enormous boulders.  Along the way, there are also several rock climbing access points.  Speaking of climbing, there is a very short section of the trail (about 15 feet) where you have to climb up a boulder.  There are footholds and handholds worn into the rock making it easy for adults, but I wouldn’t recommend taking children on this hike.  I would also turn back immediately if it starts to rain because the rocks will become slippery making a large portion of this trail fairly dangerous.

Once you finally wind up, up and up, the views are spectacular.  There are clear views of the city of Boulder as well as amazing views of Flatiron 3, which is sure to have rock climbers scrambling up it.  The top of the trail is a perfect spot to stop and have a snack or a picnic, but remember to hike all your waste out with you, even banana peels!  The top of the trail is like an adult jungle gym.  You’ll see folks in all different nooks and crannies.  It goes without saying that you should be careful when you’re climbing from boulder to boulder, don’t knock into any rocks that may fall and injure someone at a lower elevation.  After you’ve climbed your heart out and took a bajillion pictures, it’s time to make your way down the ridge.  Be mindful of other hikers who are still making their way up and if they look like they need encouraging remind them that they’re almost there!

Geology Rocks! I say that far too often, but I just can’t resist.  Here’s a quick rundown of some geological properties of the flatirons.  I’m going to give some definitions in case you slept through your geology lab class.

  • A flat iron is a steeply sloping triangular landform created by the differential erosion of a steeply dipping, erosion resistant layer of rock overlying softer strata. Differential erosion is erosion that occurs at varying rates, caused by the differences in the hardness and resistance of surface materials so softer and weaker rocks erode rapidly, while harder rocks remain to form ridges, mountains, or ding, ding, ding, flat irons!  Strata is simply sedimentary rock. Sedimentary rocks are those formed by the deposition of material either on the earth’s surface or in water.   And wouldn’t you know it, the Flatirons of Boulder coined this term, flatiron, in general geology.
  • Now you may be wondering how the Flatirons first got their name, which then coined the geography term. Well, there are two theories: the rock faces close resemblance to old fashioned clothing irons or their resemblance to the Flatiron building in NYC, which was completed in 1902. (It’s a pretty sweet building, but personally, I think it’s more likely they were named after the clothes iron, an object which many more folks were familiar with during the early 1900s)
  • The flatirons are made up of conglomerate sandstone of the Fountain Formation. Conglomerate sandstone basically means there are little clasts (bits of rock particles) mixed into the sandstone (rock comprised mainly of sand-sized minerals or rock grains). I don’t want to wind way down into a geological rabbit hole (for your benefit), but the Fountain Formation is a Pennsylvanian (the subsystem, not the state) bedrock unit found in Colorado and Utah that consists mostly of conglomerate sandstone or arkose.
  • The flatirons are estimated to be 290-296 million years old and they were tilted to their current orientation (the steep dip I referenced earlier) about 35-80 million years ago during the Laramide orogeny. The Laramide orogeny was a period of mountain building in western North America, which created the Rocky Mountains along with many other formations. I won’t go into right now, but it’s definitely interesting; if you like geology and want to learn more, read this.

What to expect:

  • Lots of hikers on the weekend.
  • Dogs both on and off leash.
  • Plenty of wildflowers, various vegetation and trees and beautiful views.
  • Two hours (or more) of hiking.
  • A couple tough climbs over boulders, but mainly a moderately steep and well-maintained trail.


Before of after your hike, be sure to stop by the historic ranger cottage near the parking lot – you can’t miss it.  It has a wealth of information, free maps and dozens of stuffed birds and mammals.  I really enjoyed the station because I gained a better sense of what animals were sharing the forest with me.  It’s especially cool to see the animals you have very little chance of seeing in the wild like mountain lions, coyotes, and bobcats.  If you want a little snack, continue past the ranger station for about a block and you’ll see a little refreshment cottage with homemade hard ice cream and just about everything else.

liveseasoned_fall14_flatironshike-3-5

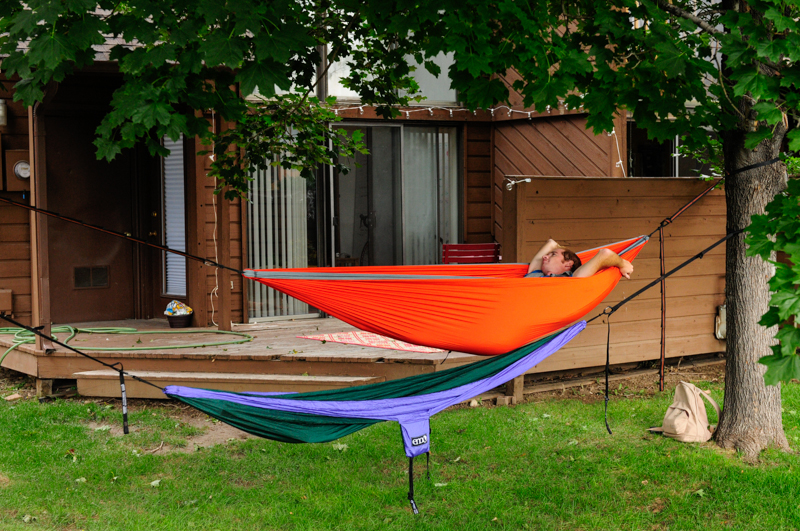
After the hike and the ice cream, you should probably treat yourself to an afternoon snooze! Happy hiking!

Two Bits

Instead of the usual links posts, each Friday we’re going to start sharing some tidbits from our week.  We want to break down these internet barriers and invite you into our lives and we’re hoping you’ll do the same.  You are welcome to share your a bit of your week or day in the comments, or if they’re better represented by a photo, tag us on instagram @liveseasoned

Sarah here:

liveseasoned_fall14_twobits-1

This week I had two firsts!  Last night I went to the North Carolina State Fair and the night before I successfully canned a batch of caramelized onions. Simple pleasures, right?  The canning was actually easier than I expected.  I helped with a few canning projects in the past, but this was the first time doing it all by myself, with no instruction and in my own ill-prepared kitchen.  Cutting nine pounds of yellow onions by hand was a bit of a challenge tear fest.  Besides a food processor, my kitchen is also lacking large pots.  This made the whole process a little more time consuming, but nonetheless I ended up with ten half pints of delicious caramelized onions!  If you have a seasonal recipe I should try, please let me know 🙂

The NC State Fair was an equally awesome first.  I’m a big fan of fairs and festivals and this one didn’t disappoint.  It was much bigger than past fairs I’ve frequented, which meant more livestock, crafts, food and games.  I love winding my way through the exhibit halls and seeing the largest pumpkin or most prettiest cross-stitch.  I was a little disappointed in my appetite though.  I only had room for one order of mozzarella sticks! I replaced my time allotted for eating towards playing games.  I couldn’t find the bingo tent (it wasn’t listed on the map-can you believe that?!), but I did throw a few darts and toss a couple ping pong balls.  K even won three gold fish!  We named them Peppy, Grumpy & Stooge.

Katie here:

liveseasoned_fall2014_oct17

Late for the second week in a row, I know! For me this week seems to have been all about food and moments of startitis.

On the food front, I can’t help but talk about our CSA yet again, because it’s so amazing how getting a box of vegetables delivered to you each week influences your eating, cooking, and recipe searches (and I know we’ve had a CSA before, but when you take a break and then start again, it’s BAM! vegetables in your face, fridge, and dreams). I could spend my whole day looking up new recipes and experimenting, but I don’t have that time at the moment, so I squeeze it in between moments of work and trips to the playground. This weekend I have plans to make a salsa verde with tomatillos that arrived last night and a cabbage-filled savory hand pie with a recipe from the original Moosewood Cookbook. The photo above is from my night of experimenting with new toppings for my favorite roasted veggie soup – more on that soon!

On my terrible case of startitis, this week has been a particularly slow work week, which is fantastic, but I realized that I should be taking advantage of the lull and working on every idea I’ve ever had. Which leads to finishing almost nothing! I started a new sweater for Alex, picked out a pattern for a sweater for me, dug into my fabric stash for a new halloween decoration idea (will share the details next week if it works), cheesecloth is sitting in the middle of the floor because I wanted to make ghosts for the front porch, and that’s next to a pile of yarn tagged for new winter hats for Calder and me. Let’s hope I accomplish one or two of those projects before my motivation wanes!

Little A’s New Winter Hat

Two months ago I shared some of the projects sitting in my knitting basket. Since then there’s been a bit of progress made on almost everything in that post. The socks have doubled in length. I’ve repaired a few of the moth-eaten hats (going to share some of that soon!). I gave you a detailed update about the sweater and am working on a second post in that series. Today, I’m sharing the pattern for Alex’s little hat, which doesn’t look anything like it did in the previous post. All in all not bad work considering those long winter knitting and TV evenings are just getting started!

liveseasoned_fall2014_littleahat5_wm

I tried Alex’s hat on his big head before the last post, and thought it was a bit snug, but didn’t want to admit it to myself. Trying it on him again last week, which involved wrestling that little 18 month old to the ground for a tickle-fest, confirmed my worries that he would quickly outgrow it. Over the weekend I finally ripped out the original hat and started again. A small sacrifice for that little cutie.

liveseasoned_fall2014_littleahat6_wm

In the process I scrapped the tire track pattern for something that was more detailed, would cover the whole hat, and that included at least one traditional motif.  This hat is knit from the bottom up, and I developed the patterns as I went, completing one row of color before thinking about what to do next. A quick Google image search for “fair isle knitting” turned up this sample (shown below) and I decided to use the bottom snowflake for the lowest band on Alex’s hat. I knew I wanted to incorporate a heart somewhere (because how many more years do I have to knit hearts into his clothes), so why not a whole band of hearts? Then I finished the top with a red circle to keep the color repeats going.

Fair-Isle-Knitting-Design-Idea

I’m sharing the pattern here for the exact hat that I knit. I haven’t put any work into up- or downsizing this pattern, but I do think that it would be a fun experiment to knit it with bright chunky yarn and big needles to create an adult-sized hat (just a different version of the simple fair isle hat I knit for our sister Kristin a few Christmases ago).

liveseasoned_fall2014_littleahat1_wm

Pattern

Yarn : Malabrigo worsted in two colors, I will refer to the color that you use for the patterns as the contrast color

Needles : US 7, 4.5 mm

Pattern Chart : Charts are  below, but you can also download a PDF of the charts by clicking here.

  • Using your contrast color cast on 96 stitches. Use your preferred stretchy cast-on method (I like the long-tail method).
  • Row 1: Begin a K2 P2 rib using the contrast color.
  • Rows 2-9: Switch to your primary color and continue the K2 P2 ribbing for 8 more rounds.
  • Rows 10-15 : Using the primary color, knit in stockinette for 5 rounds (knit all stitches).
  • Rows 16-29 : Snowflake pattern. Repeat Chart 1 six times around each row (you should read the chart from right to left and bottom to top, with the dark squares representing stitches knit with the contrast yarn).
  • Rows 30-35 : Using the primary color, knit in stockinette for 5 rounds.
  • Rows  36-43 : Heart pattern. Repeat Chart 2 six times around each row.
  • Rows 44-51 : Using the primary color, knit in stockinette.
  • Row 52 : Decrease row. *K2 K2tog*, repeat ** for the entire row. 72 stitches remaining.
  • Row 53 : Knit all stitches.
  • Row 54 : Switch to the contrast color. Knit all stitches.
  • Row 55 : Decrease row. *K1 K2tog*, repeat ** for the entire row. 48 stitches remaining.
  • Row 56 : Knit all stitches.
  • Rows 57 & 58 : Decrease rows. *K2tog*, repeat ** for both rows. 12 stitches remain.
  • Finish off the hat by cutting your working yarn, weaving it through the active loops, tightening and weaving in all ends.

charts2
 All in all it’s a super simple hat that will keep any Colorado kid’s head warm with its double layering of yarn from the fair isle knitting. I love it, but I think if I were to knit another one, I might add more little color flourishes between the rows of pattern. Who knows. I do know that I still have yarn left on both of these balls – possibly enough to knit a baby hat for Little A’s little bro!


Crockpot Apple Butter

Apples are our ingredient of the season, so far we’ve covered a variety of baking and drinking recipes. Today it’s all about the condiment!

Have you tried apple butter yet? Apple butter is a more concentrated form of apple sauce, taking all of fall’s best flavors and turning them into the perfect little condiment. It was originally developed as a form of preserved apples that would last longer than apple sauce because of its higher sugar content. If you’ve never had it, it may be because it’s more of a regional food. Apple butter was developed in Germany and the Netherlands, making it a more popular condiment in regions of the US that were settled by people from those countries, particularly the Amish. If you haven’t had it, I encourage you to seek out a jar (or jump in with both feet and make our version below) ~ it’s soooooo good! Stumped on how to eat it? The spread is often eaten with bread, but I’ll share a few more fun ideas below.

I have to admit, two weeks ago when I was making this batch of apple butter, I was exhausted and little A was squawking because he wanted to go outside, making me question why I wasn’t just running to the store to pick up a commercial jar. But I quickly had a change of heart. Other than the hour of peeling and chopping, this butter required so little work, that I’m solidly convinced it’s worth the effort, especially since I can tailor the recipe to my wants, being sure to buy organic apples, lowering the sugar, and upping the spices. Plus, the concentrated apple and spice flavor is such a perfect condiment for the season, and that’s what we’re all about!

I have made apple butter many times, and never the exact same way, but every time it turns out delicious. I’ve made batches that started with 40 lbs of apples all the way down to this measly batch that started with 4.5 lbs. I’ve also made it in an electric roaster, an electric frying pan, and a crockpot. I’ve found the crockpot to be the easiest, but use what you have! That’s all to say – this particular condiment is so forgiving. As long as you start with a big pile of apples and allow them to cook down slowly with a touch of spices, liquid, and sugar, you’ll end up with something delicious. I promise.

liveseasoned_fall2014_applebutter2_wm

 Ingredients

Recipe makes approximately 5 cups of apple butter.
  • 4.5 pounds of McIntosh Apples, peeled, cored, and chopped
  • 1 cup brown sugar
  • 1 tbsp ground cinnamon
  • 1/2 tsp ground nutmeg
  • 1/4 tsp ground cloves
  • 1/4 tsp salt
  • 1.5 cups water (or you could substitute apple cider for half or all of the water)
liveseasoned_fall2014_applebutter3_wm

How-to

  • Mix all ingredients together in your slow cooker and put the lid on, but leave it slightly ajar to allow steam to escape.
  • Turn it on high for 3 hours, at the end of three hours give it a good stir and assess the pot. If there’s a lot of liquid, you could keep it on high for another couple of hours before turning it to low. If the apple butter is more concentrated, you can turn it to low immediately and let it cook for an additional 4-5 hours (or longer) until you reach your desired apple butter consistency. You can even remove the lid in the last few hours of cooking if you want to let more steam out, but as your butter nears the end, be careful to stir it and watch for any signs of burning (this is less of an issue if the lid is partially on, slowing the evaporation).
  • When your butter is done cooking, let it cool. I do this with the lid off to allow for that final dose of evaporation and concentration. Transfer it to a container and refrigerate.

Tips and Tricks

  • Use a wire whisk for all of your stirring. It’s a great way to break up the apples and get a smoother consistency than if you use a spoon.
  • If you have to leave the pot for while at work, just start with the crockpot on low for that time. Similarly, some people will start their butter at night and let it cook on low while they sleep. After 8 or so hours, give it a good stir and then you can always turn it up to high for a few hours if there’s still a bit of liquid in the pot (I’ve made apple butter while at work and it’s always turned out fine).
  • If you’re unsure about when it’s finished, you can scoop out a bit on a spoon and pour it onto a plate – if it holds its shape and doesn’t become a pool of liquid, then it may be done.
  • If you feel like the liquid is evaporating too fast and your apples aren’t cooking down and creating that caramelized brown color, then you can always add more liquid! This was the case for me when I was making big batches in the electric roaster, with such a large opening, it would let out a lot of steam (unless I had the lid positioned just right). Just add a cup at a time, stir it in well, and let the mixture continue to cook.
  • As I said, I’m prone to using less sugar and more spices than other recipes may call for. Feel free to adjust those levels as you see fit. There really is so much wiggle room ~ I’ve really never had a bad batch!
liveseasoned_fall2014_applebutter10_wm

Serving Suggestions

This batch made 5 cups of apple butter. We’re currently down to about 2.5 cups, so yes, we have plenty of serving suggestions!

  • As I mentioned, it’s common to spread apple butter on bread. As with my jam, I like to spread on a layer of butter first and then the apple butter. It’s particularly good on bagels.
  • A very common way to serve apple butter in Amish communities is with cottage cheese. This is one of my favorite ways to eat it (and Alex’s too!). If you’ve ever eaten at a salad bar in the area around Lancaster, PA, it’s very common to see cottage cheese and apple butter next to each other in the salad bar (and now you know why!).
  • Similar to cottage cheese, I like to stir some into plain yogurt.
  • Last weekend we added a spread of apple butter to our Saturday morning crepes with ham and cheddar cheese (Calder’s figured out a super easy way to use Bisquick for crepe-making, we’ll have to share the recipe soon!).
  • When we had some dinner guests last week, I added a ramekin of apple butter to the cheese plate. It was delicious spread on baguette with either brie or cheddar!
liveseasoned_fall2014_applebutter7_wm