Alex’s Bedroom

Hey there! If you’ve been following along, you may know that Calder and I bought a house in March and moved in a week or so before little Luc was born. It could have been a crazy and hectic time, but all in all, it wasn’t that bad (really!). We were lucky that our new house was in great shape did not require any major work. In fact, the only thing I want to change about the house are the colors of the walls. The walls are painted shades of beige. It’s nice enough that we can live with them for a while, but eventually I would love to brighten everything up and paint most rooms white.

liveseasoned_fall15_alexroommakeover-17

To give you an idea of where I’m going: between the mountain views outside our windows, the wooden trim and furniture, and eventual white walls, I’m feeling inspired my many of the elements common to Scandinavian design. I want to add pops of color with the artwork on the walls, the furniture and other elements that can easily be changed within the rooms. That said, we took a big risk and added a huge mural across one wall in Alex’s room. Luckily it turned out great! Today I’m going to share snapshots from his room and in a follow-up post I’ll provide a more detailed tutorial and tips about how we painted the mural.

Continue reading

Lemon Foot Scrub

Lemon is our ingredient of the season! So far we’ve used it in a bucklein barsin a savory pasta, and in the shower. Oh, and there are a couple of lemon popsicle recipes! This is also one of our many essential oil posts.

Hands down, one of our favorite perks at the beach is the outdoor shower. We love it for clearing away the sand after a day at the beach, but we also love to bring sand INTO the shower in the form of scrubs. Today’s lemon, sugar, and sand scrub is the perfect zesty indulgence as we’re looking to make the most of these late summer days.

liveseasoned_summer2015_lemonfootscrub1

Continue reading

Cheap Oversized Photo Art

_DSC7790

How many times have you google searched cheap prints? I have a  l o t. Pretty much every time I have a show or event.  I’m always trying to figure out the best way to produce LARGE photographs inexpensively.  Katie recently introduced me to a new method: Engineer Prints.  Engineer prints reproduce line drawings and graphics with high definition and contrast, but they’re also really great for making large black and white photography prints.  Engineer prints are the perfect low-cost option when you’re looking for a statement piece without the price tag.  Since these prints range from only a buck to $10, the quality is obviously not fit for The Louvre, but they’re definitely awesome enough for a wall in your home or as a focal point at your next art show.

In addition to sharing our love of engineer prints, we also wanted to show you a simple way to add some structure to your print before hanging it. This will help to turn the image from something that looks like a poster into a more substantial piece of art.

Continue reading

Making a Space for Native Bees

Happy Earth Day (again)! We’re excited to check in this afternoon with a second post, especially one about making a space for native bees in your backyard!

You may not be aware, but the honey bees that we all know and love for the pollination services and delicious honey are not native to North America. The bees arrived in North America by Europeans in the 17th century, and they are such efficient pollinators that over time our agriculture became dependent upon the insects. This dependency is due in part to honey bees living in such large colonies that we are able to easily move from field to field in portable hives. I love the idea of fostering different habitats in our backyard for a variety of animals from birds to insects to mammals; especially since observing these animals in our backyard is such a simple way to introduce and connect Alex and Luc to nature. As such, one day I would love to have a colony of honeybees in my backyard, but I know that requires time that I don’t have right now to learn about their care and monitor the hives throughout the year, not to mention the work that would be required to collect the honey. Meanwhile, our native bees are really interesting insects that receive relatively little attention yet are the perfect guests for a low maintenance backyard! Knowing that, we thought Earth Day was the perfect time to encourage everyone to invite these gentle creatures into your yard!

Osmia_cornifrons.5.1.08.w

Today when discussing native bees, we’re referring specifically to Mason Bees, of which, there are over 100 species in North America. Unlike honey bees that live in large colonies, Mason bees are solitary insects and they do not produce honey. Another difference between the two types of bees is that Mason bees do not sting unless squeezed or stepped on. For that reason and for their interesting nesting habits (read more below!), they are a great bee to encourage to nest in your backyard; kids will enjoy watching them create their nests without the threat of being stung!

Continue reading

DIY Macrame Plant Hangers

liveseasoned_sp15_plant hangers-57

liveseasoned_sp15_plant hangers-1

Macrame has long been my favorite fiber art.  Although there are some crazy complex macrame pieces out there, when it comes down to it, you’re just tying knots!  Making macrame plant hangers are similar to making friendship bracelets except on a slightly larger scale and at the end of the summer you don’t have to cut them off.  This project is great for beginngers and advanced fiber artists alike (yes, you’ll be a fiber artist if you create one of these plant hangers 😉 ) because you can tie a couple familiar knots or mess around with complex combinations of knots – it’s totally up to you.  I’m basically giving you an outline of how to make a plant hanger, but I want you to flex your creative muscles and make it your own unique macrame piece.  I wouldn’t mind seeing a few of the finished pieces either, so feel free to tag us.

liveseasoned_squareknot

Continue reading

Super Simple and Natural Orange Cleaner

Oranges our our ingredient of the season. We have big plans for a winter of zesty recipes and sweet crafts.

liveseasoned_winter2014_orangecleaner

Hey Spring Cleaners! Ok, I know it’s a little early for that. Hey, conscious cleaners! (How was that?) Do you buy green cleaning products for your home? Ones that aren’t so harsh and better for your kids, pet, waters and earth? I hope you do! I currently use Green Legacy garbage bags because they’re big, tough and biodegradable and for cleaning I use Legacy of Clean products. Personally, I cannot use Clorox or any other really smelly cleaners. I quickly develop a really big headache that just doesn’t go away. It’s probably because the chemicals are poisoning my brain or because I’m really sensitive to smells, who knows, I’m no doctor.

Anyway, if you don’t use natural cleansers, you can always start now with this easy natural orange cleaner.  You just need a couple of items and a little bit of time to brew a batch. It’s super simple and you might even enjoy the smell of your cleaning products! This concoction uses white vinegar which is high effective at killing mold, bacteria, mildew and other household germs. If you don’t have a big jug of vinegar, go grab one! Vinegar is cheap and you get to leave the harmful fumes and toxic counterparts of other cleaners at the store. Vinegar is also biodegradable so you can wash it down drains and toilets without adding more chemicals to our water system.

liveseasoned_winter2014_orangecleaner3

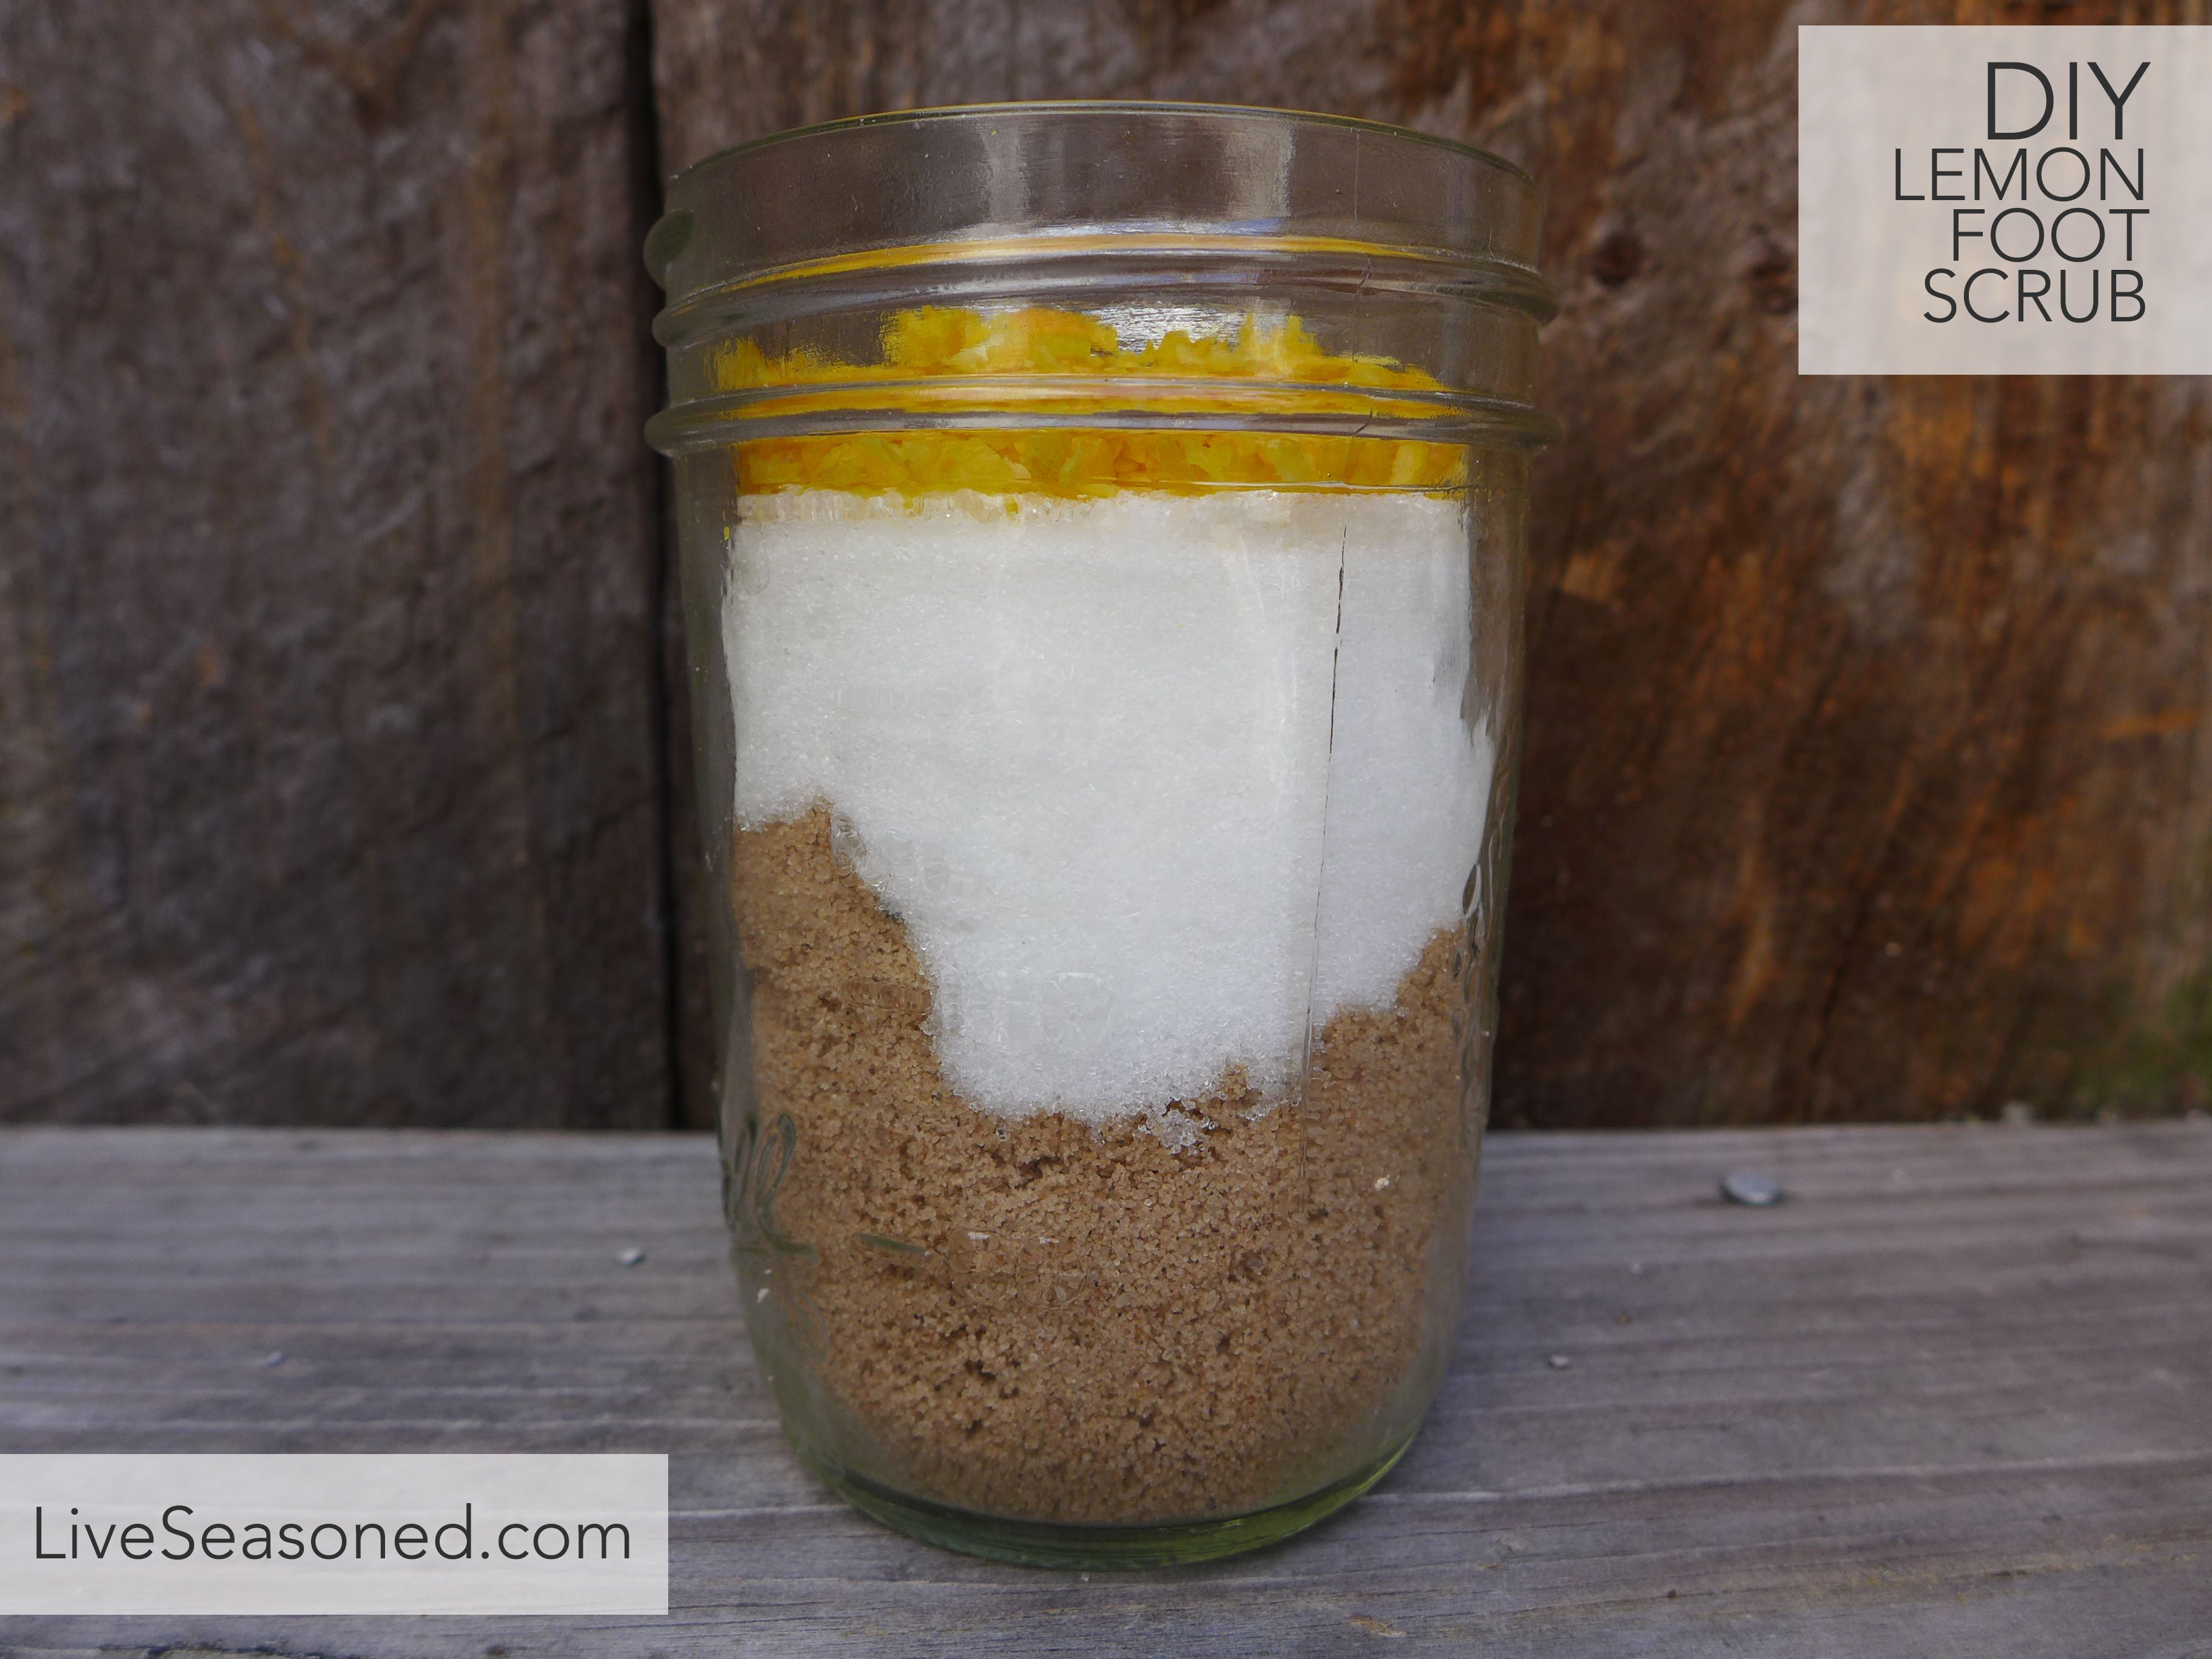
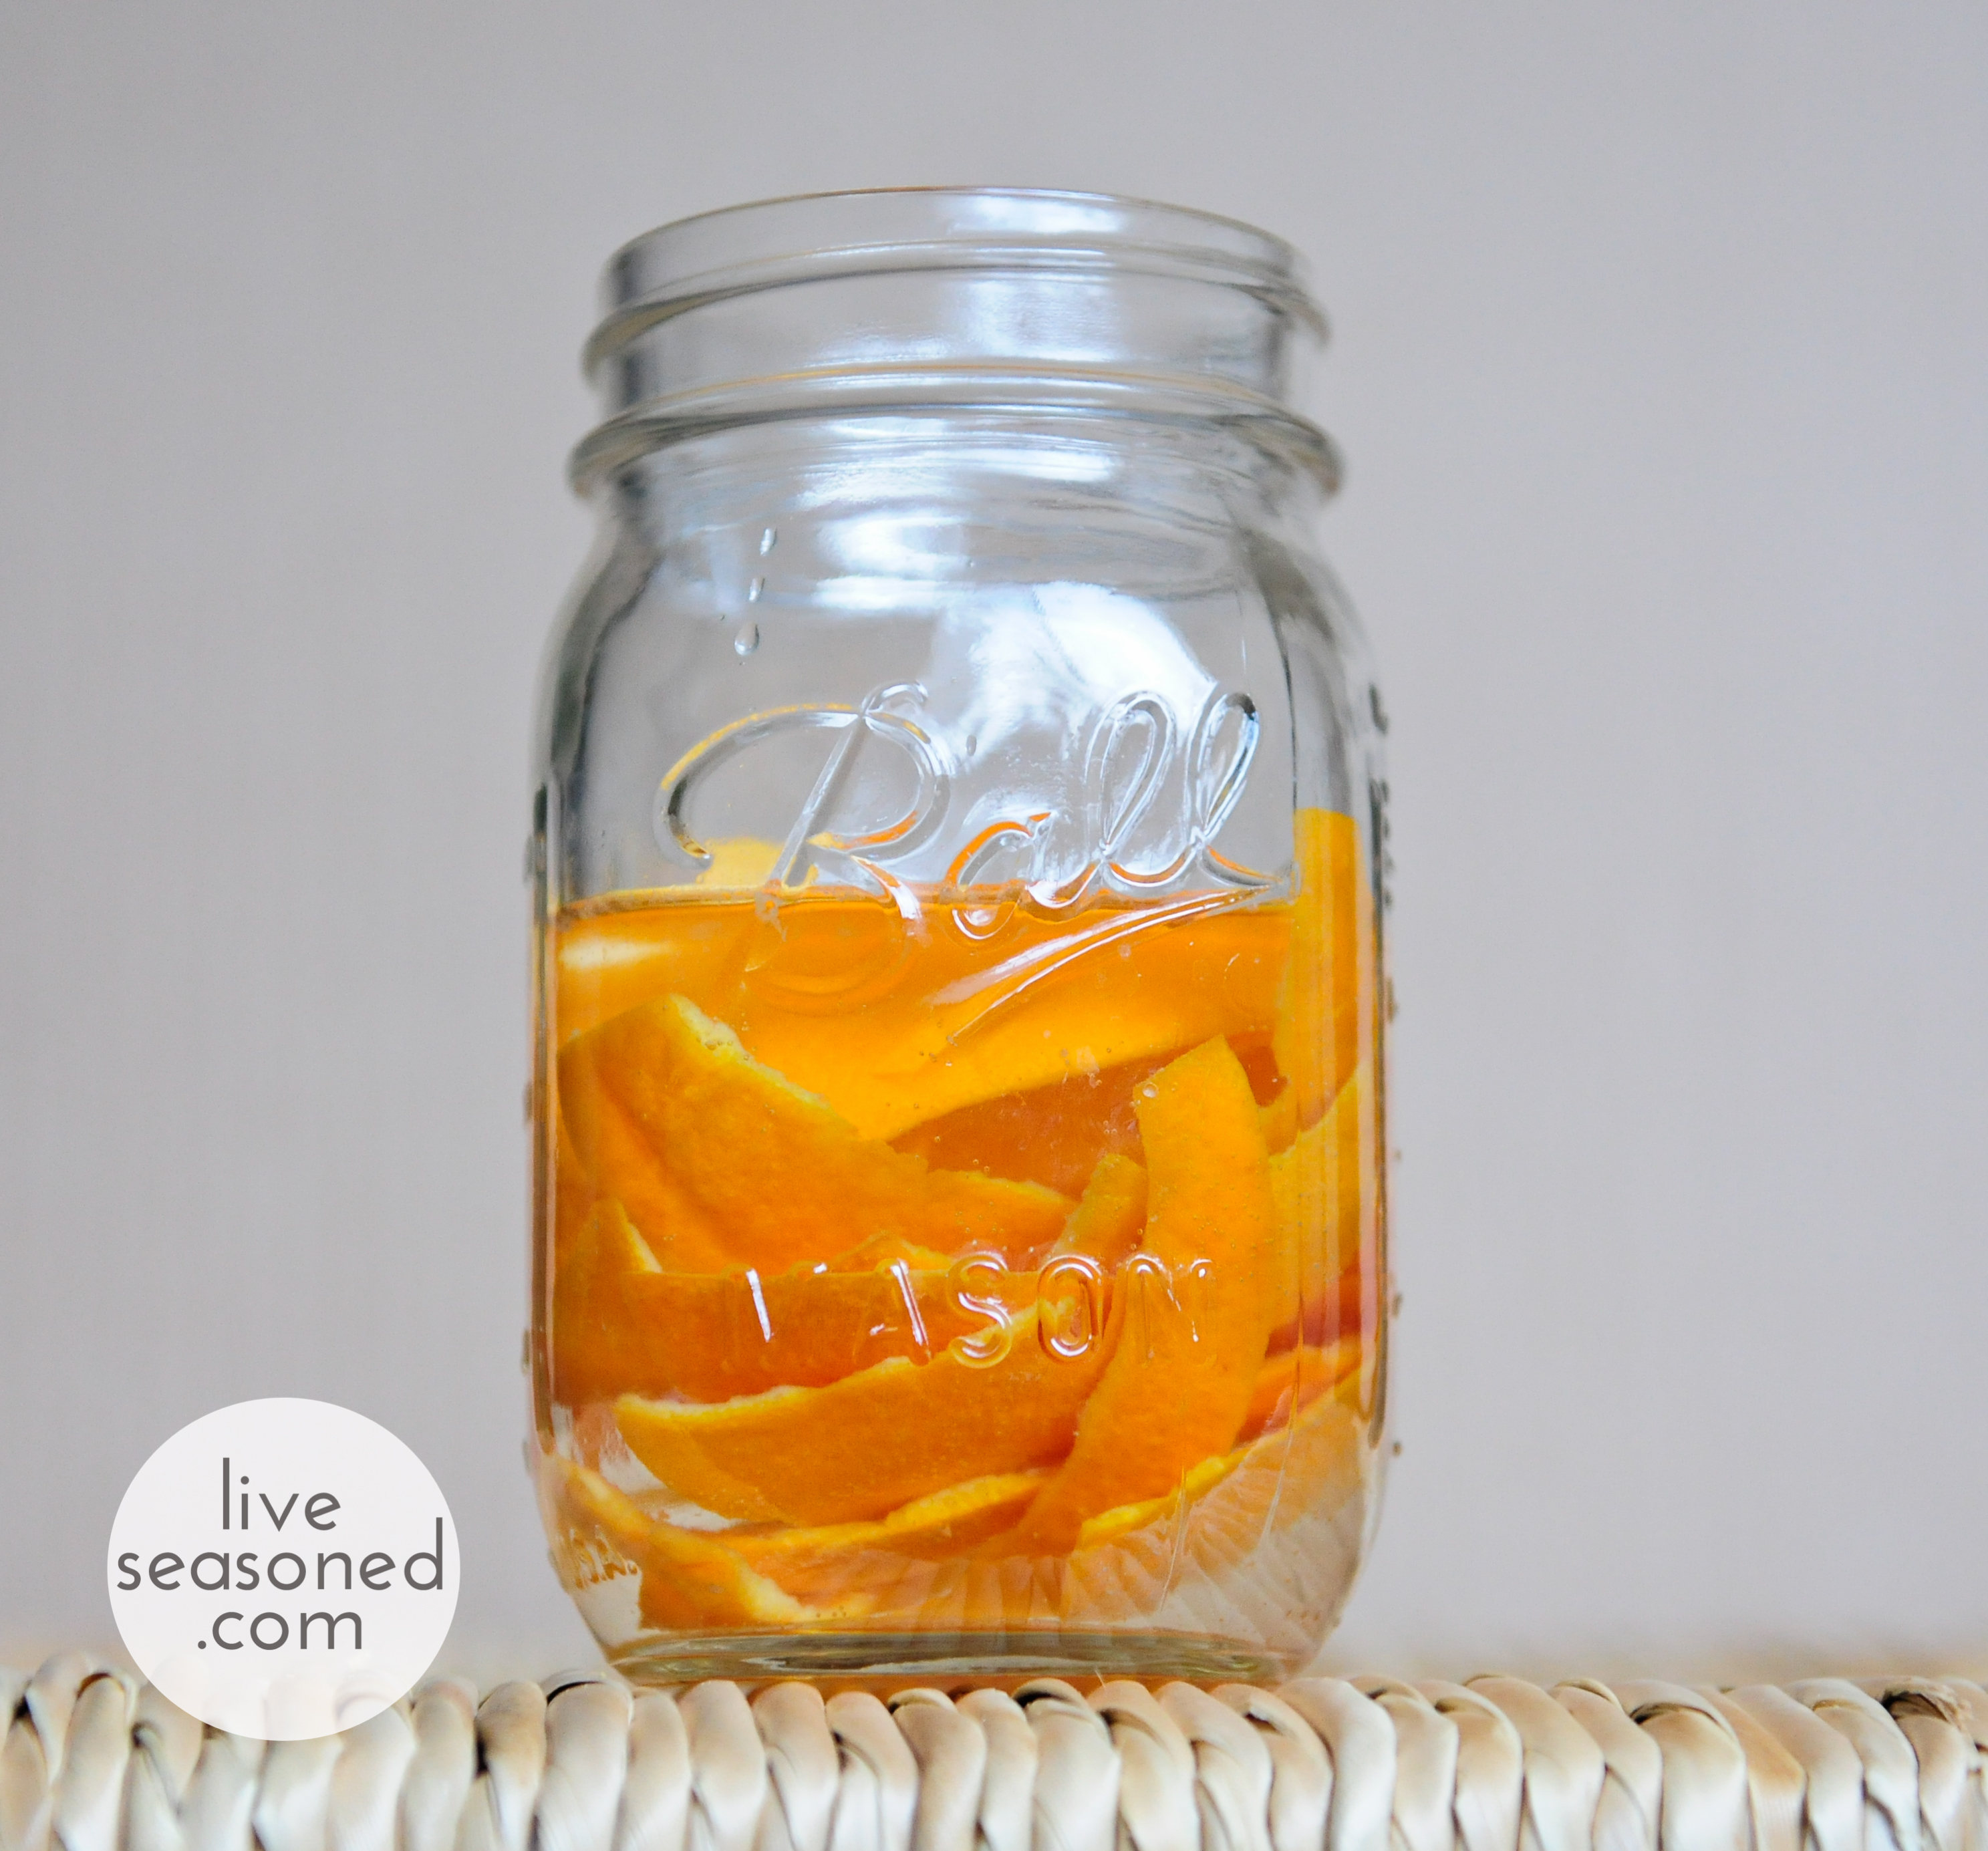
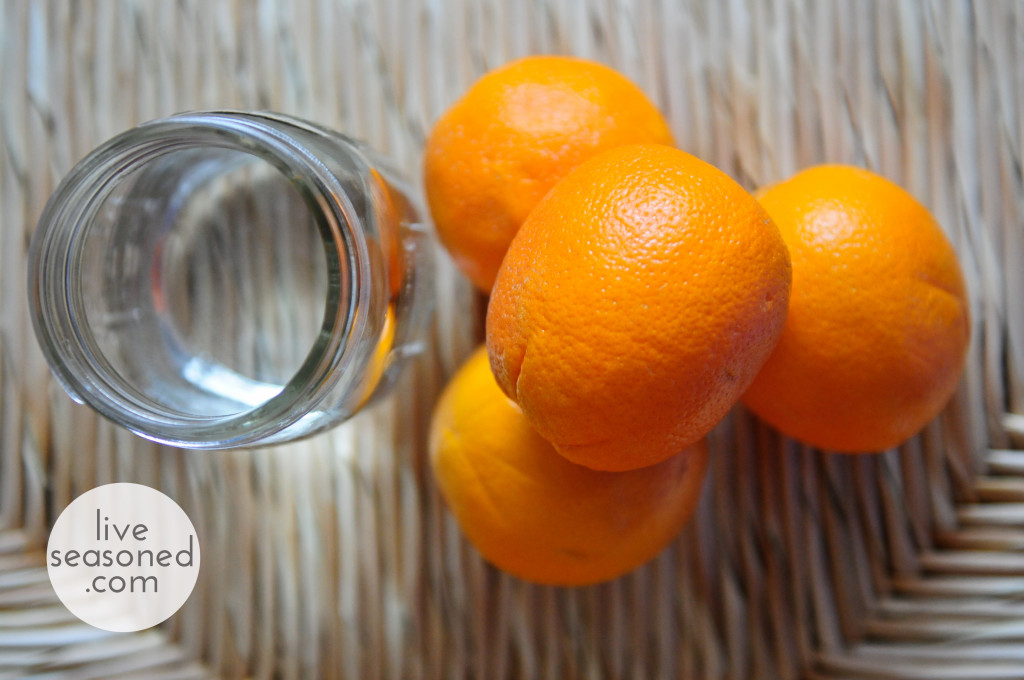
 Natural Orange Cleaner Ingredients:

  • 1 16-ounce jar (or any glass container with a lid)
  • a heap of orange peals (I used about three oranges worth)
  • vinegar to cover

 Natural Orange Cleaner Instructions:

  • Eat a few oranges. Place the peels inside of your empty glass jar.
  • Cover with vinegar. Screw the lid on and place in a dark, cool spot for a couple of weeks.
  • After a few weeks (or a few months – if you forgot it like I did) strain the concoction so you’re left with only the vinegar.  I like to add one part orange vinegar + one part water to a spray bottle for general cleaning.

Katie here: if you want to make a cleaner that you can use immediately, a quick and dirty trick is to use orange essential oil rather than soaking the fresh peels. Make a mixture of 1/2 cup vinegar and 1/4 teaspoon orange essential oil, then you can further dilute it with water as Sarah does. 

I’ve used this mix on everything in my kitchen, bathroom and living room.  Counters, tables, floors, sinks, molding, walls, etc. and it has always worked like a charm. Like I said, I dilute my mixture by 50% with water to tone it down a bit.  I also always finish cleaning by wiping each surface with water so there’s no vinegar left sitting on my wood floors and other sensitive areas.  I have read that vinegar is capable of deteriorating exposed window seals, dishwasher gaskets, and unsealed grout over time, so these surfaces should be rinsed with water after they are cleaned.  Like any cleaning product warning, I suggest test cleaning on inconspicuous areas first to make sure this product is safe for your purposes.  You could also google the specific materials you’ll be cleaning to see if there’s any information on how vinegar will react to them.  So far I’ve only had positive results and lucky for me, this product keeps me headache free!

Balsa Christmas Trees

Happy Monday! How was your weekend? Did you get your tree? We had a disappointing, but funny, experience at a local tree “farm”. In more uplifting news, I was excited to realize that we’re almost done with the Christmas shopping! Unbelievable, right? Of course, there’s still a bit of Christmas crafting to do, but I’m feeling confident that it will get done. As a result, I had time to work on some of the decorations that have been on my list. First up ~ some super simple and quick Christmas trees for our mantel.

liveseasoned_w2015_balsatrees14_wm

As I mentioned in my Elving post a couple of weeks ago, browsing Pinterest provided the inspiration for many of my Christmas decorations this year, including these simple Christmas trees. It started when I found an image from this post. I liked the simplicity of those trees and that they were made using balsa wood (no power tools or hard cutting required). I wasn’t as excited about how they were put together – mainly using glue to hold the pieces together. Having also come across this wooden tree post, I knew there was an easier way to build the same tree. And really, between those two posts, you have all the information you need for this project, but I’m happy to share my process photos below. And again I want to stress how quick these trees were to make – with all of the materials on hand, it took me less than an hour and a half to make the five trees from first cut to last dash of glitter!

liveseasoned_w2015_balsatrees13_wm

liveseasoned_w2015_balsatrees1_wm

Materials & Tools

  • balsa wood
  • Mod Podge
  • glitter
  • Exacto knife
  • ruler
  • cutting mat or board

About the wood : You can find balsa wood at many crafts stores, but not all (some Joann’s and some Michael’s carry it, but not all). If you’ve never worked with it, balsa wood is extremely soft and very easy to cut with an exacto or craft knife. It comes is a variety of thicknesses and widths, and there is no strict rules as to what you should buy for this project.  I picked up two 36” long and 1/8” thick balsa boards; one was 3” wide and the other was 4” wide.

liveseasoned_w2015_balsatrees3_wm

Process

  • Cut two isosceles triangles of the same size. I found that it was easy to do this without using a pen or pencil. Just mark the height of your triangle with a small cut, noting with a poke of your knife where the middle point of the board is width-wise. For example, the tree I’m cutting in the photo above is going to be 5” tall on the 3” wide board. The middle top point of the triangle is at the 31” mark on the ruler above. To cut the sides of the triangle, just place your ruler on the board, so that the ruler’s edge is at a diagonal from one of the bottom triangle points to the top middle point (as I did in the photo above). Make a cut along the ruler, and then follow this same process to cut the other side of the triangle.

liveseasoned_w2015_balsatrees4_wm


liveseasoned_w2015_balsatrees5_wm

  • Following the image above, cut the slits that will be used to fit your triangles together. You want to cut a slit in each triangle that is as wide as the width of your wood (1/8” in my case). One piece will have a slit that runs from the top middle of the triangle halfway down the height of the tree. The other triangle will have a slit that runs from the bottom middle of the triangle halfway up the height of the tree.

liveseasoned_w2015_balsatrees6_wm

  • Put your tree together! Placing the triangles perpendicular to each other, slide the piece with the bottom cut down over the piece with the top cut. You’ll produce a free-standing tree that looks like the photo above.

liveseasoned_w2015_balsatrees8_wm

  • Decorate your tree! I put a layer of Mod Podge on the upper portion of my trees, and then sprinkled iridescent and gold glitters over the surface. Do what you want: you could leave your trees natural, add glitter, or paint!

liveseasoned_w2015_balsatrees9_wm

  • Repeat the process making trees of different heights. From the 3” wide board I made two trees that are 6” high and one that is 5” high. From the 4” board I made two 8” high trees.

liveseasoned_w2015_balsatrees13_wm

I used these trees for simple forest scene on the mantel ~ pairing them with a cute little wooden tree from Michael’s and a couple of old glass trees that were once candy dishes (they have an opening on the bottom, but without their lids, they’re just glass trees). In addition to the trees, I added a few beeswax candles that were leftover from our wedding. You can read about how we made the candles (choosing your wick is key) and cut the green bottles here and here.

liveseasoned_w2015_balsatrees10_wm

It’s so much fun to see the trees sparkle in the candlelight and to see their shadows on the wall. Calder mentioned that they also look like mountain peaks, which I think is really true when they are grouped together creating overlapping shadows!

liveseasoned_w2015_balsatrees12_wm


DIY Advent Calendar


liveseasoned_winter14_adventcalendar-10

It’s time guys! You can finally start singing Christmas carols and hanging holiday wreaths!  I spent this past week with my dearest friend who is also on the ‘no Christmas cheer until Thanksgiving is here’ train so it wasn’t until Saturday night that I crafted this little advent calendar. It is the sweetest little addition to a bookshelf or mantle.  There is nothing more childlike than counting down the days until Christmas, but really, if we didn’t count them they would just fly right by.  Advent calendars remind me to crank up the Christmas tunes, send out those glittery cards and craft gifts for my friends and family.

liveseasoned_winter14_adventcalendar-9

This sweet miniature advent calendar is easy to make and pretty perfect for the wee ones to create. No exacto knives or blowtorches involved here.  The fun doesn’t end with the making of this little advent chest either, then you must fill it with tiny treasures and on Christmas eve you have to unscramble the secret picture!  Put on a Christmas record pandora and pour yourself some eggnog mudslides.

liveseasoned_winter14_adventcalendar-1

Supplies:

  • 24 mini match boxes
  • Tacky glue
  • Paint brushes
  • Paints
  • Ribbon
  • Card stock or construction paper

Steps:

  • Glue 8 matchboxes together vertically. Repeat two times so that you have 3 tall stacks each with 8 matchboxes each. Glue the three stacks together side-by-side like shown.
  • Once the chest is securely glued, about 15 minutes, remove all the matches from the boxes and set aside for another project or that horrid moment when your power goes out while you are cooking dinner or washing your hair.
  • Paint a holiday design on the chest.  I choose to paint a reindeer. Some other ideas are a tree, an ornament, a candy cane, a toy soldier, santa or maybe a kitty wearing a santa hat (I wish I had that kind of skill). Allow the design to dry completely.
  • Remove each drawer and randomly number them 1-24. You can use acrylic paint or a marker.
  • Attach a small ribbon loop to the bottom of each drawer on the numbered side.  Simply squeeze a dab of glue, press one end of the ribbon onto it and then squeeze another dab of glue and press the other end onto it forming a loop.  Allow each drawer to dry completely.
  • Place the drawers back into the chest. You can place them in order or randomly, either way the painted design on the back should be scrambled.
  • Finally, cut a piece of card stock or paper to cover the top and sides of the advent calendar.  I cut a strip of red card stock and dabbed a few dots of white paint to make some snowflake inspired swirls.
  • Fill the drawers with little candies, notes, event tickets or even jewelry.
  • As each day passes, open the drawers and put them in backwards so the painted design side is now facing forward.  On Christmas even you’ll be left with a mini puzzle picture to unscramble, good luck!

liveseasoned_winter14_adventcalendar-11

Think you’ll give this quick Christmas craft a try? I had a bunch of fun creating this advent calendar because it is cheap and disposable. There wasn’t a ton of pressure to paint the perfect reindeer or perfectly align the $1 match boxes, it was merely a little project to jumpstart my holiday crafting sessions and an excuse to eat a few peanut butter M&Ms every day until Christmas. Cheers!


Simple Twig Wreath

liveseasoned_fall14_twigwreath-5

Happy Fall! This foraged twig wreath screams autumn and the best part about it is it encourages you to go outside and prance around in the woods.  You’ll need to gather a bunch of twigs and sticks, which is really easy at this time of year.  The forest should be full of dry kindling waiting to be collected.  I wanted to create a natural looking decoration that was quick and easy, but also cheap.  This wreath ended up costing me nothing but time (most of which I spent looking for my glue gun) since I already owned the other materials.  I made a pretty big wreath because I wanted it to be the center of attention on my tiny shed wall.  First things first, think about where you’d like to hang your wreath and measure or eye it up so that you have a general idea of how big you’d like your finished product to be.

Supplies:

  • thick cardboard
  • pen
  • scissors
  • tape
  • twine
  • glue gun
  • big ol’ pile of twigs

Steps:

  • Step 1: Draw a donut onto some scrap cardboard (I traced a random jar, but it doesn’t have to be perfect) and cut it out.  My cardboard seemed flimsy so I cut two identical donuts and taped them together with masking tape.
  • Step 2: Dispense a line of glue on one side of your donut. Press the twine into it and wrap it neatly around the donut.  Continue dispensing glue (on what will be the back side of your donut) and wrapping twine until you cover the entire donut.  Cut a length of twine (mine was about 4 inches) and tie it in a loop around your donut so you can hang it up later.
  • Step 3: Now it’s time to place the twigs.  This is where you can let your creativity come through.  Do you want a wreath of all tiny twigs? Bigger sticks? Bark or no bark? That’s all up to you.  I wanted something that looked really rustic so I strived for lots of variation in both size and color.  Start by placing the 12 o’clock and three o’clock sticks, but don’t glue them down yet.  Choose sticks to fill in the space between 12 and 3.  Once you have a quarter of your wreath laid out, you can begin hot gluing the sticks to the donut.  Don’t rush this process, glue each stick individually and pay attention to how they are arranged in the center of the donut. You will want the center to resemble a star when you’re finished.
  • Step 4: After you have filled in 12 o’clock to 3 o’clock section, place the 6 o’clock stick on the donut and repeat the process.  Continue until your entire donut is covered and your wreath is complete.
  • Because my wreath is so large, I wanted to create an additional layer of smaller twigs to add some depth.  I did this by repeating steps 1-3 and simple gluing my smaller wreath onto the larger one.

I had  a great time creating this project because there really is no way you can screw it up. It was a stress free craft project, which kind of equates to meditation for me.  I hate sitting idle, but sometimes I don’t feel like concentrating too hard on a project.  It’s also perfect for kiddos.  They can search for twigs and lay them out to their liking while a parent glues them to the donut.  Another reason I’m keen on this twig wreath, it gives me something to photograph in all seasons.  Have you ever taken the same photo over and over during each season?  It’s nice to have a single object that remains unchanged yet altered by whatever is going on in the shot (rain, sleet, snow).  I’m excited to see how this simple craft holds up this year and how pretty it will look with a dusting of snow 🙂


Little A’s New Winter Hat

Two months ago I shared some of the projects sitting in my knitting basket. Since then there’s been a bit of progress made on almost everything in that post. The socks have doubled in length. I’ve repaired a few of the moth-eaten hats (going to share some of that soon!). I gave you a detailed update about the sweater and am working on a second post in that series. Today, I’m sharing the pattern for Alex’s little hat, which doesn’t look anything like it did in the previous post. All in all not bad work considering those long winter knitting and TV evenings are just getting started!

liveseasoned_fall2014_littleahat5_wm

I tried Alex’s hat on his big head before the last post, and thought it was a bit snug, but didn’t want to admit it to myself. Trying it on him again last week, which involved wrestling that little 18 month old to the ground for a tickle-fest, confirmed my worries that he would quickly outgrow it. Over the weekend I finally ripped out the original hat and started again. A small sacrifice for that little cutie.

liveseasoned_fall2014_littleahat6_wm

In the process I scrapped the tire track pattern for something that was more detailed, would cover the whole hat, and that included at least one traditional motif.  This hat is knit from the bottom up, and I developed the patterns as I went, completing one row of color before thinking about what to do next. A quick Google image search for “fair isle knitting” turned up this sample (shown below) and I decided to use the bottom snowflake for the lowest band on Alex’s hat. I knew I wanted to incorporate a heart somewhere (because how many more years do I have to knit hearts into his clothes), so why not a whole band of hearts? Then I finished the top with a red circle to keep the color repeats going.

Fair-Isle-Knitting-Design-Idea

I’m sharing the pattern here for the exact hat that I knit. I haven’t put any work into up- or downsizing this pattern, but I do think that it would be a fun experiment to knit it with bright chunky yarn and big needles to create an adult-sized hat (just a different version of the simple fair isle hat I knit for our sister Kristin a few Christmases ago).

liveseasoned_fall2014_littleahat1_wm

Pattern

Yarn : Malabrigo worsted in two colors, I will refer to the color that you use for the patterns as the contrast color

Needles : US 7, 4.5 mm

Pattern Chart : Charts are  below, but you can also download a PDF of the charts by clicking here.

  • Using your contrast color cast on 96 stitches. Use your preferred stretchy cast-on method (I like the long-tail method).
  • Row 1: Begin a K2 P2 rib using the contrast color.
  • Rows 2-9: Switch to your primary color and continue the K2 P2 ribbing for 8 more rounds.
  • Rows 10-15 : Using the primary color, knit in stockinette for 5 rounds (knit all stitches).
  • Rows 16-29 : Snowflake pattern. Repeat Chart 1 six times around each row (you should read the chart from right to left and bottom to top, with the dark squares representing stitches knit with the contrast yarn).
  • Rows 30-35 : Using the primary color, knit in stockinette for 5 rounds.
  • Rows  36-43 : Heart pattern. Repeat Chart 2 six times around each row.
  • Rows 44-51 : Using the primary color, knit in stockinette.
  • Row 52 : Decrease row. *K2 K2tog*, repeat ** for the entire row. 72 stitches remaining.
  • Row 53 : Knit all stitches.
  • Row 54 : Switch to the contrast color. Knit all stitches.
  • Row 55 : Decrease row. *K1 K2tog*, repeat ** for the entire row. 48 stitches remaining.
  • Row 56 : Knit all stitches.
  • Rows 57 & 58 : Decrease rows. *K2tog*, repeat ** for both rows. 12 stitches remain.
  • Finish off the hat by cutting your working yarn, weaving it through the active loops, tightening and weaving in all ends.

charts2
 All in all it’s a super simple hat that will keep any Colorado kid’s head warm with its double layering of yarn from the fair isle knitting. I love it, but I think if I were to knit another one, I might add more little color flourishes between the rows of pattern. Who knows. I do know that I still have yarn left on both of these balls – possibly enough to knit a baby hat for Little A’s little bro!