


Macrame has long been my favorite fiber art. Although there are some crazy complex macrame pieces out there, when it comes down to it, you’re just tying knots! Making macrame plant hangers are similar to making friendship bracelets except on a slightly larger scale and at the end of the summer you don’t have to cut them off. This project is great for beginngers and advanced fiber artists alike (yes, you’ll be a fiber artist if you create one of these plant hangers 😉 ) because you can tie a couple familiar knots or mess around with complex combinations of knots – it’s totally up to you. I’m basically giving you an outline of how to make a plant hanger, but I want you to flex your creative muscles and make it your own unique macrame piece. I wouldn’t mind seeing a few of the finished pieces either, so feel free to tag us.
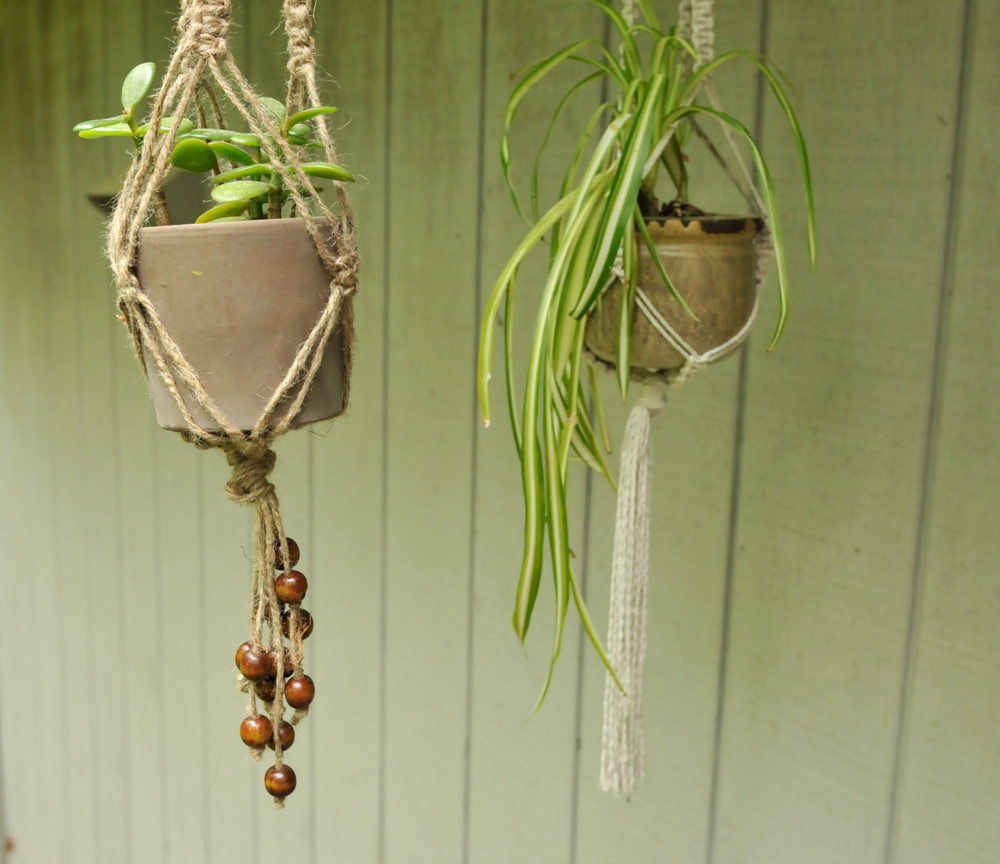
The first step is finding the right fiber for the project. You can use a wide range of materials, really anything that’s resembles rope. I used hemp, jute, cotton cord, fabric strips and embroidery floss for my DIY macrame plant hangers. When thinking about your chosen cord also think about the pot you’d like to display in the hanger. If it’s teensy tiny, you could use a really thin cord to compliment the pot. You could also do the opposite, and use a thick cord to show the dramatic difference between the hanger and the little pot. What color is your pot? What style is it? If you have an adorable teapot with pretty pink flowers planted in it, you might not want to dress it down by making a hemp macrame plant holder. Pick a fiber that will highlight the delicate planter instead. Once you’ve found your chosen cord, you may want to grab some beads or tassels to top it all off!


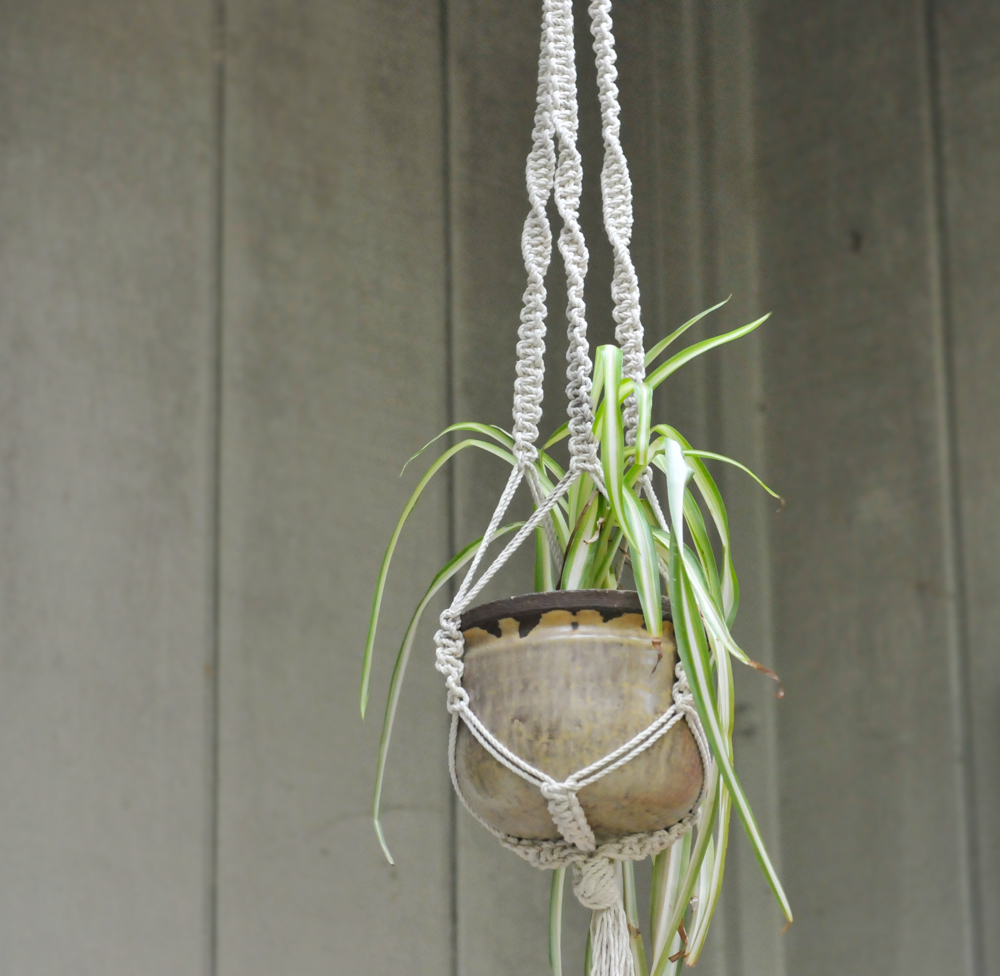
Next you should decide the general style of hanger you’d like to make. A simple hanger only uses three strands of cord and doesn’t involve any square knots. Instead you’ll be making several loop knots. A more advanced hanger employees several square knots and uses six strands of cord. All of the DIY macrame plant hangers in this post are made with six strands except the blue fabric hanger. Also decide if you your macrame plant hanger to have lots of square knots or just a few that will matter when it’s time to measure and cut the cord.


DIY Macrame Plant Hanger Supplies:
- cord
- scissors
- potted plant
- carabeaner or shower curtain ring (optional)
- beads + tassels (optional)


Macrame Plant Hanger Tutorial:
- Decide on the general style of DIY macrame plant hanger you want to make. Will there be three or six strands? Will there be lots of square knots or just a few?
- First cut your lengths of cord. To do this, unwrap some cord and hold it up at arms length to determine how long you want your plant hanger. There’s no right answer here, it’s all up to you. Once you’ve determined the approximate length of your plant hanger, triple the length and cut it off the spool OR if you want plenty of square knots in your final design quadruple the length and cut it off the spool. That’s one strand. You need three or six depending on what type of hanger you’re making.
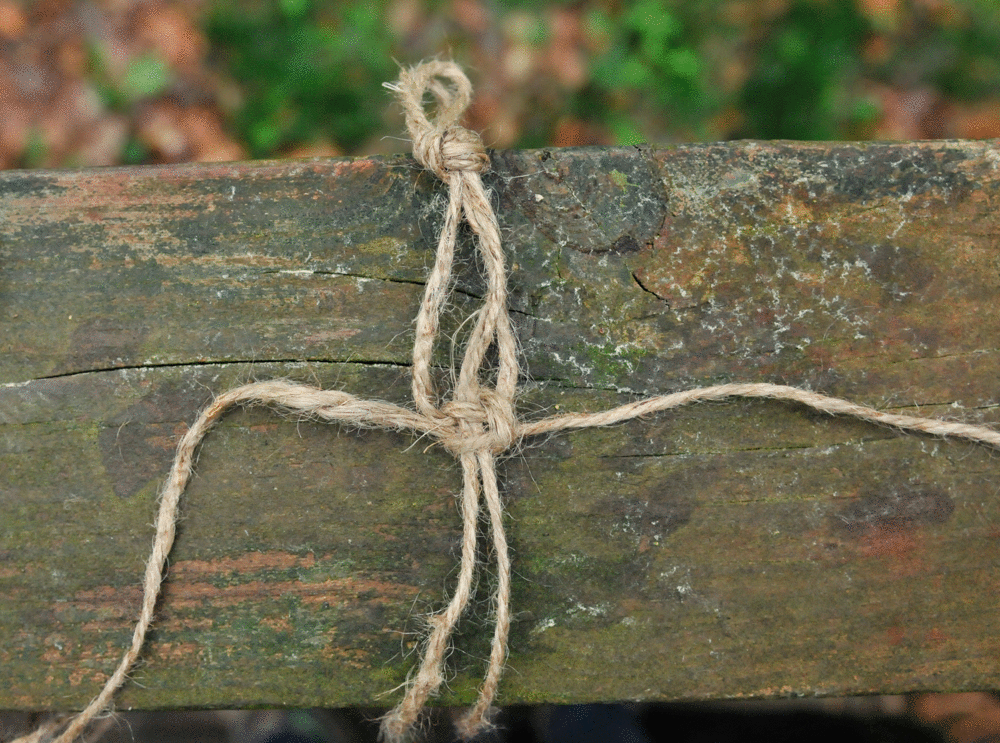
- Even up all your strands, fold in half and tie them all together with a simple loop knot. if you want to make this easy on yourself, use a carabeaner or shower curtain loop and slip your loop knot of cords onto it. Hang the carabeaner from a curtain rod, a rack, a coat hook, something so that it is hanging down like it wood if it were completely finished and in use. This way, you’ll knot everything nice and evenly and you won’t be left with a wonkey plant hanger or a pile of knotted cord.
- All DIY macrame plant hangers follow a basic equation. 1: There are three sets of cords that will make the arms that hang down. Depending on how many strands you have you’ll have three sets of two or three sets of four strands. 2: Below the arms you’ll create the basket section of the hanger. 3: Below that you’ll secure all the strands together to create the bottom of the basket.
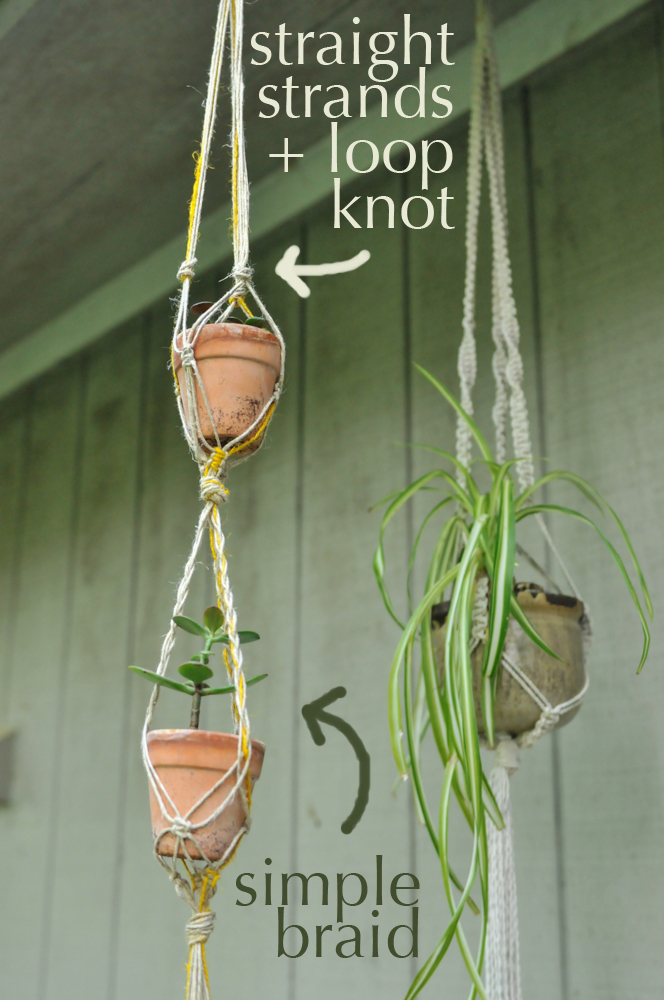
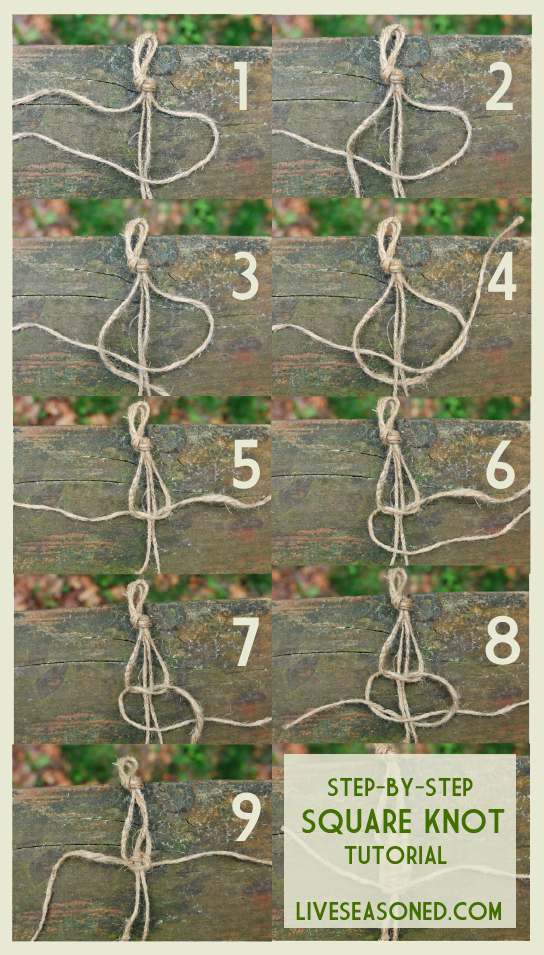
- 1: Decide your arm style. As you can see, I’ve used braids for the arms, I’ve also just let them hang and secured them at the bottom with a loop knot. The most time consuming, but in my opinion beautiful option, is to create square knots down the entire length of the arm. Let’s pretend that’s how we’re making this one. After the three arms of square knots are complete it’s time to craft the basket.
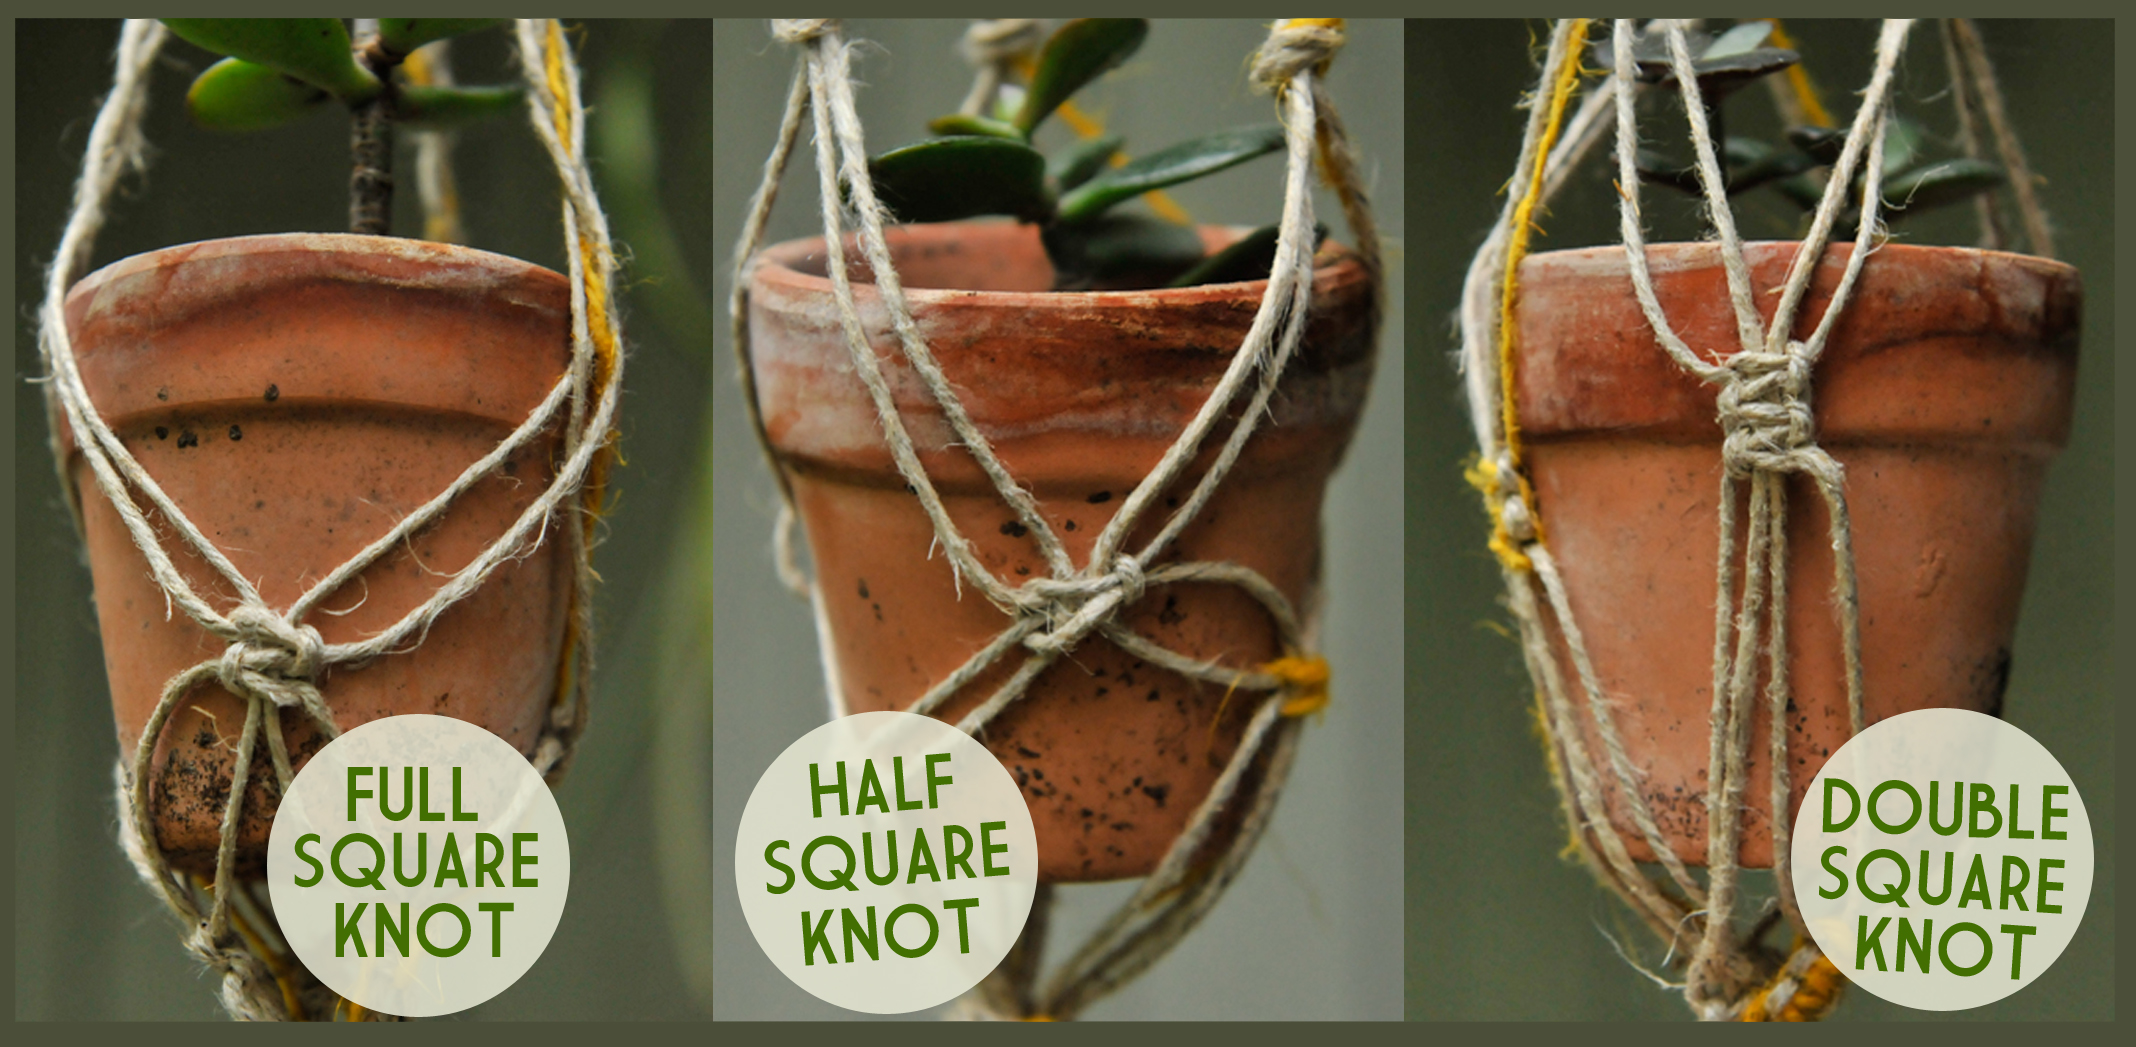
- 2: Divide a group of four strands (one of the arms) in half and join them with two strands from the arm closest to them. Leave an inch or two (an inch if you have a small pot, more if you have a large pot) from the section of square knots and tie the four strands with a square knot. Repeat this action around the circle of arms until you have three groups of square knots about an inch below your three arms. If you’d like you can add more square knots or beads, if not, move once again by halving each group and working adjoining strands into square knots. You should now have two rows of separated square knots resembling a basket. This is a great time to wiggle your plant in there and make sure it fits nicely.
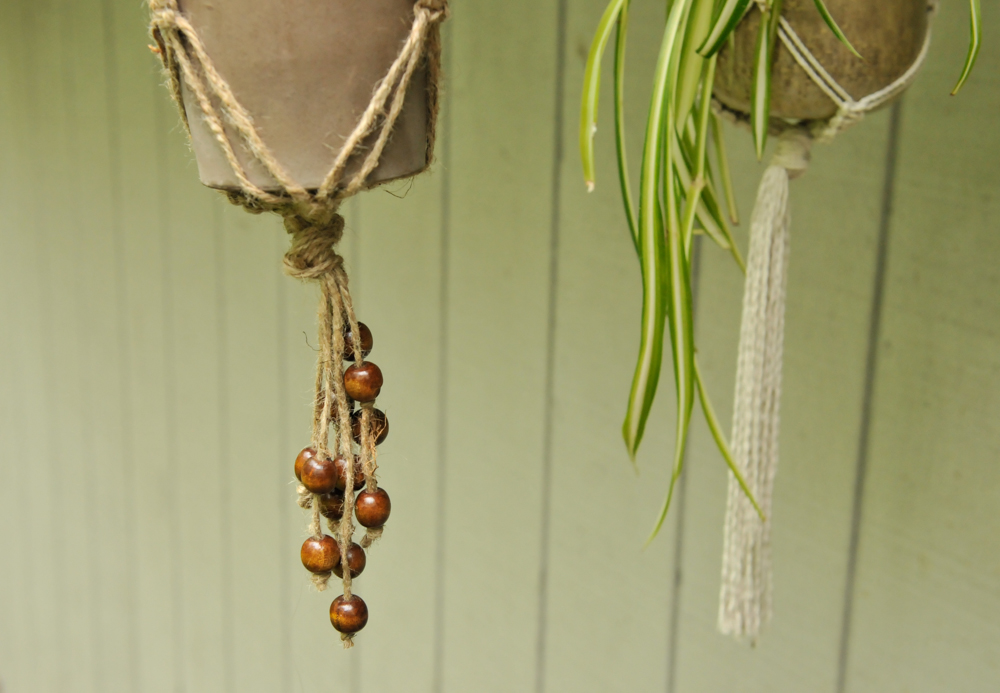
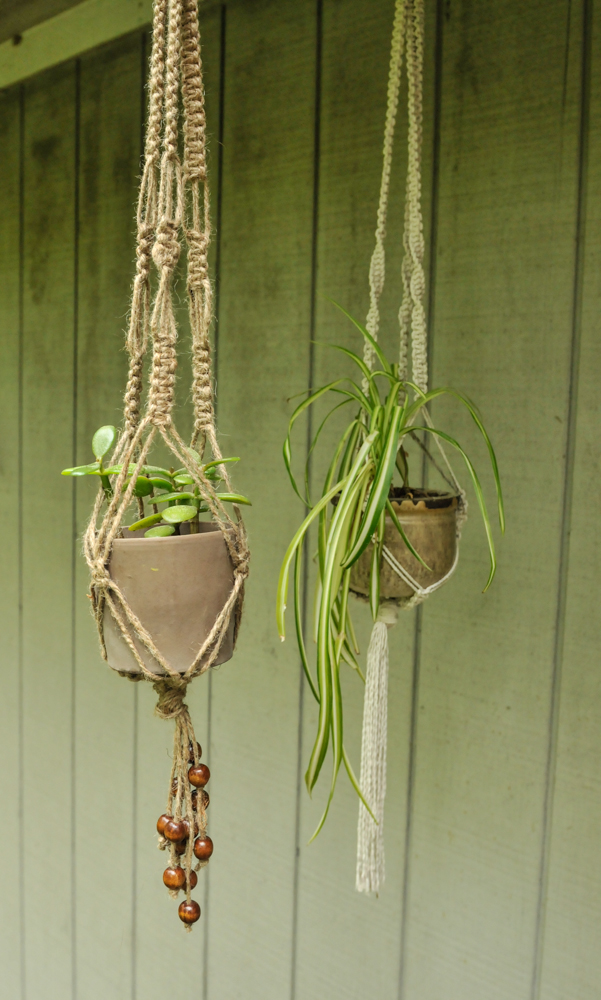
- 3: Now you want to finish off the plant hanger by securing the bottom of the basket. The easiest way is by tying a big loop or a wrap knot. You could also add a bead or a tassle or you could go around the circle and tie each individual strand to each other. It all depends on your personal preference.
- That is simply the equation for DIY macrame plant hangers, it’s up to you to insert your creativity and make it your own! I hope this tutorial isn’t too vague, but really there’s a bunch of ways to do this and I wanted to give you a rough outline of them all.
Do you have a favorite style? Fabric, hemp or cotton? Simple or full of square knots? I’d love to know what you think! Personally, I love macrame that takes me back to the seventies. No neon cord or crazy colors here, hemp all the way 🙂
Hi, in my childhood I did a little macramé at school. Just a couple of months ago I re-discovered it and made a couple of wall hangers en plants hangers. I love in how many various ways this technique can be used, and will have my first workshop this week. (keep my fingers crossed it will be a success 🙂 I’m sure it will be fun)
My favourite material to work with is Katia Cotton Cord in off-white colour, for the wall hangers combined with grey-bleu .
Have a nice day!
Anita
Hi Anita,
It is fun to re-discover old crafts isn’t it?! I remember making a macrame owl wall hanging when I was in girl scouts. I wish I still had it, and now I’m thinking that it would be fun to make a huge hanging of some sort for a big blank wall in our house. The off-white and grey-blue combination sounds fantastic. Thanks for the inspiration! ~ Katie
where can you get white cotton rope?
Hi Hayley,
You should be able to find it at any well-stocked hardware store. Good luck with your project!
I am having so much fun doing macrame.
I suffer allot of depression, anxiety and social phobia
Macrame is very therapeutic for me, it helps me with mindfulness and relaxation. I can do it all day and all night if I want to. The only problem is I don’t know where to hang all the creations I have made.
One thing I thought of is instead of putting a pot plant in the hanger, I get a big round foam ball (you can buy them at any craft store) and wrap it continuously in jute or wool until it is completely covered, put a plastic fern/plant in the top of the ball (just Push the stalk into the foam) and place the ball in my macrame hanger.
mail some of your creations to me! I can’t figure out how to make it work and I have a ton of plants I need to hang
Have you considered selling them online possibly Amazon, Etsy or Ebay?
I have looked around for plant hangers and they are hard to come by.
I have thought about it – maybe this is the push I needed!
I am at a loss. I cut my cord 8 ft., folded in half and hung on a shower hook. I used 3 sets of 4 cords. Made square knots, at this point the cords weren’t even. Took it apart and measured very carefully.
Started again, same thing. some cords were much shorter than others. I didn’t know if that would solve itself, but I followed directions.
Finished 3 arms of square knots. Measure down an inch? Start making sq. knots, alternately (2 cords from one set matched with 2 from the adjoining set). until I have 3 groups of sq. knots about an inch down from the arms.
Move again and start making sq. knots alternatively as before. Now you have a basket, check the size.
Question: I move down 1 inch and then another inch and that makes a basket? By now I have run out of some cord and have way too much other places. And no way do I have a basket. Help! Please.
Pingback: DIY Macrame Plant Holders: A Chic Way to Hang Indoor Plants - DIY CHICKS
If all four of your cords are the same length when you start, the outside cords (one on left and one on right) will continue to get shorter and shorter as they are the ones you’re working with. The two center cords just hang there so they stay the same length as when you started. You should make your two outer cords much longer than center cords to begin with.
Pingback: Macramé Plant Hanger Patterns – Patterns Hub
How long are these 2 hangars when finished? Also how long are strands cut to start with. This making outer strands longer than the insides is something I have never heard of or never had to do. Would love to start making these again. Made a lot years (70s) ago!
Hi Mary! I don’t give a specific cord length, rather, think about how long you’d like your finished piece and then multiply the length by three. Really I just eyeball the length and then double and triple it. I never truly measure anything with a ruler. Making the outer strands longer simply helps reduce waste because the outer strands will be knotted while the center ones run the length of the knot and therefore aren’t ‘used’ as much.
There’s a relatively simple way through the issue of cords (for knotting) getting too short, while the other lengths don’t change at all. Simply switch the function of the cords. Where you’ve made several knots using the outer two cords, bring them to the center (so that all four cords hang straight down) engage a bead or other decorative element, and begin the next section of knots (below the bead) using the (otherwise) outer two cords as the inner cords, and visa versa. That way, the cords maintain (relatively) the same length throughout your project.
Ahhh, what a great tip! Thanks for sharing, xo
Pingback: 21 Free Macrame Plant Hanger Patterns - Ada Mae Designs
Pingback: Gift Ideas for Plant Lovers - Regina Horticultural Society
Pingback: 26 DIY Teen Room Decor Ideas to Personalize Any Space | Shutterfly
Pingback: Hanging Flower Pot Holders • Free Crochet Tutorials
I love all your plant hangers. I learned to macrame in school but that was a long, long time ago. My aunt has been making me plant hangers and I decided I would re-learn how to do it for myself. I really like the fabric (?) one. Any specific way on cutting the strips? (with the grain, like bias etc..) How wide are the strips? Thanks for sharing!
Hi Heidi,
We’re so glad that you’re starting to make your own plant hangers! When it comes to make the strips for the fabric one, we have to admit that this was an ad-hock design. But here’s our advice : You’ll want to cut your strips with the grain (either crosswise or lengthwise will work). Don’t cut on the bias because then the strips will be super stretchy, giving you problems with the strength and length of the final holder. The strips we used were about 1.5 inches wide, but you could play around with that. The fabric will get bunched together at the knots and then spread out in between, so you want something that you can easily knot without too much bulk but it doesn’t have to be too skinny if you want to show off a design on the fabric. Good luck!
Thanks, Katie, this was just what I needed to get my crafting mojo going again!
I learnt to do macramé when I was 8 and my Mum was really into it. We had so many jute plant hangers in the house in the 70s – and spider plants trainling from them! This is the first Christmas since my Mum died and it feels a lovely connection to her to be making plant hangers for my friends using the knots she taught me. Using your guide I’ve made one with recycled fabric yard and one in lime green garden twine.
One tip – If using ‘blank’ spaces between collections of knots, cut a drinking straw to the size of gap you want and slit it up one side. Clip it to your central two strings and it not only stops the next knot cluster from sliding upwards, it means the spaces will be identical on each arm of the hanger. (hope I explained this clearly enough!)
Pingback: 20 Easy DIY Macrame Plant Hanger Designs & A Detailed Tutorial
Pingback: 14 Pretty DIY Macrame Plant Hangers That Even Beginners Can Make
Something that I did is instead of starting with a loop knot I did a square one right off the bat and it worked great. Thank you for this tutorial, I was looking for one with three strands for the longest time and this really helped!
Pingback: Macrame Plant Hanger Patterns - Kids Art & Craft