Roasted Root & Squash Soup

Last week Sarah shared her fantastic recipe for squash soup with a citrus zing. Then we debated: should share another soup recipe this week, especially another one that uses squash? The answer was yes, because for us, it’s most definitely soup season and squash season! I was also jumping at the bit to share this recipe before Thanksgiving because I think it could make a fantastic addition to your feast, but it’s also a great way to use up leftover roasted vegetables, turning them into a completely new dish so you’re not eating the same leftovers for days.

liveseasoned_fall2014_roastedvegsoup14_title

I made up this recipe a few years ago, and I never make it exactly the same way twice. I truly believe that anything goes when it comes to the vegetables. In this post I’m giving you an example of a typical vegetable mix in our house, but you could easily add more vegetables to the mix and subtract the ones you don’t like. The same goes for the garnish. I don’t buy anything special for the garnish and always make a point of using what I have on hand. If you do the same, I’m sure you’ll come up with some pretty surprising and delicious combinations.

liveseasoned_fall2014_roastedvegsoup1_wm

Soup Ingredients

  • olive oil
  • 4 cups vegetable or chicken broth + additional water
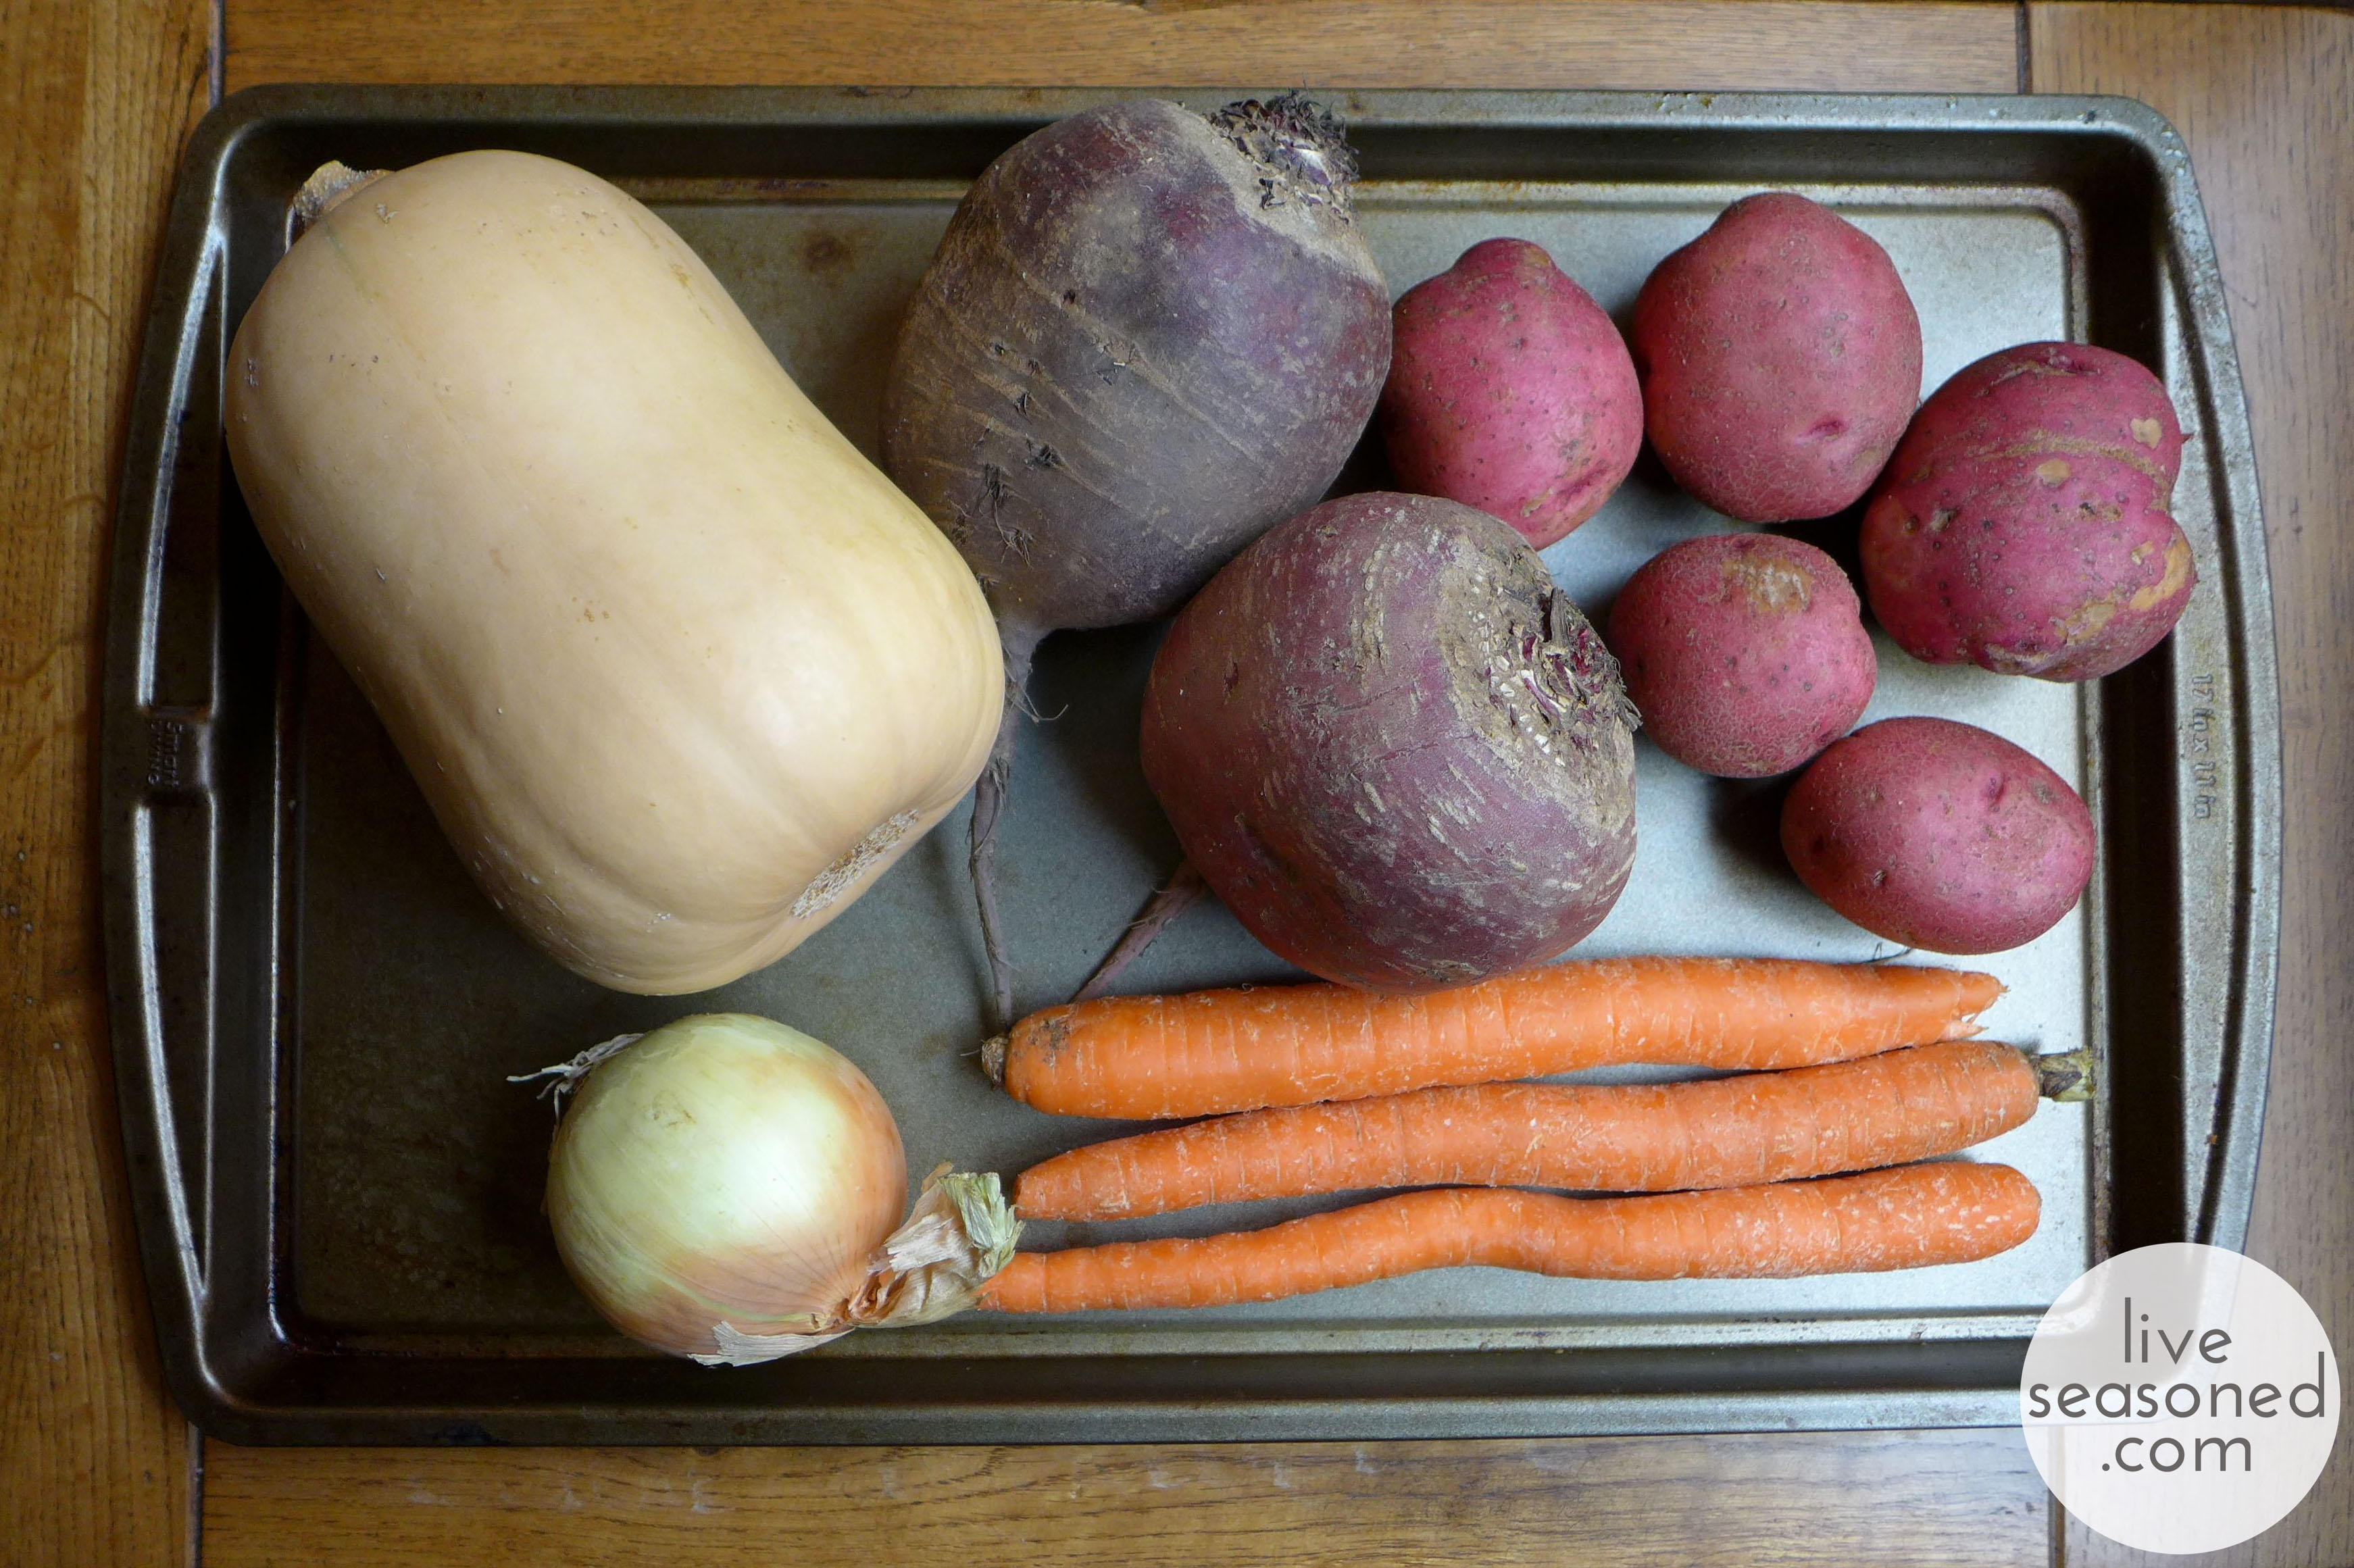
  • 1 medium/large butternut squash
  • 3 large carrots
  • 1 medium/large onion
  • 2 large beets
  • 3-5 medium potatoes

Garnish Suggestions

  • beet or chard greens
  • tuffle oil
  • parmesan cheese
  • sour cream

liveseasoned_fall2014_roastedvegsoup2_wm

 How To

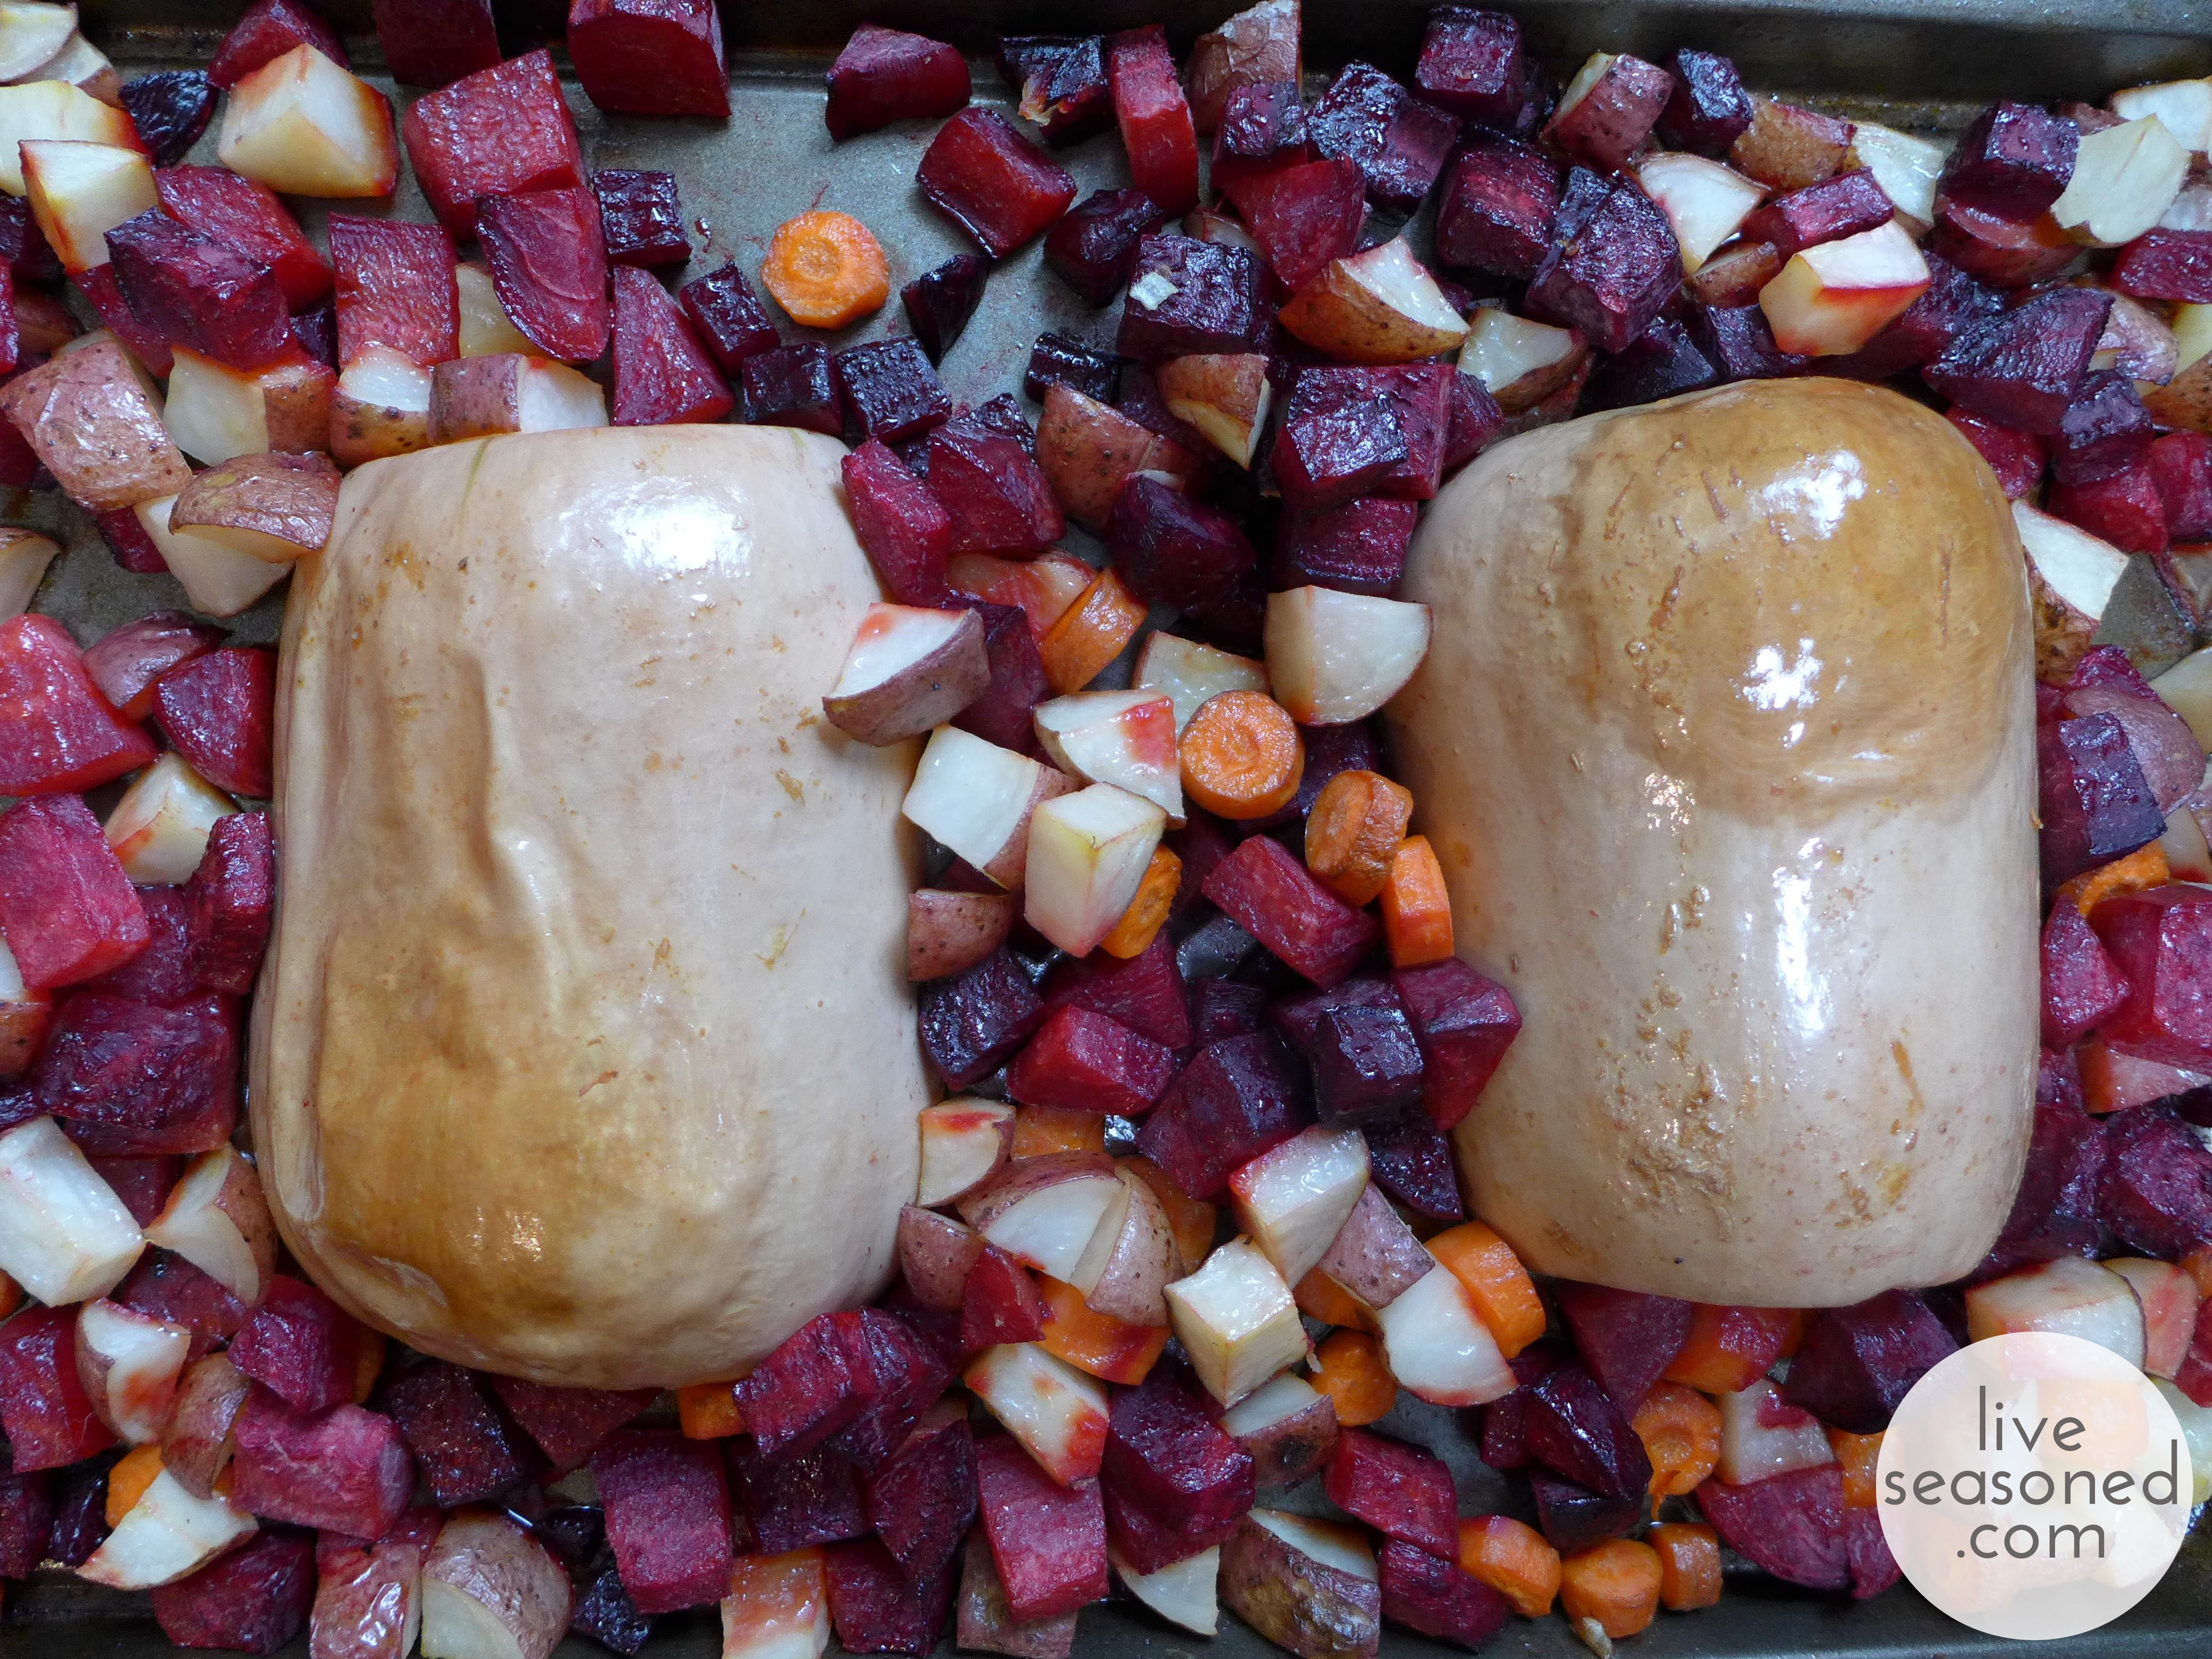
  • Prepare the vegetables for roasting. Cut the squash in half and clean out the seeds. Coarsely chop the beets, potatoes, and two carrots. Place all vegetables on an oiled cooking sheet or baking pan and roast until soft (about one hour), stirring halfway through.
  • While the vegetables are roasting, dice the onion and remaining carrot and saute them in olive oil until the onions are translucent.

liveseasoned_fall2014_roastedvegsoup7_wm

liveseasoned_fall2014_roastedvegsoup9_wm

  •  When the vegetables are done roasting, add them to the soup pot (removing the squash from its rind) with the broth and enough water to reach the top of the vegetables. Bring this mixture to a boil and then turn down to low heat for blending.
  • Carefully puree the soup using either an immersion or upright blender. Return the soup to the pot and bring to a slow simmer. Simmer for about 10 minutes, and then you’re done!
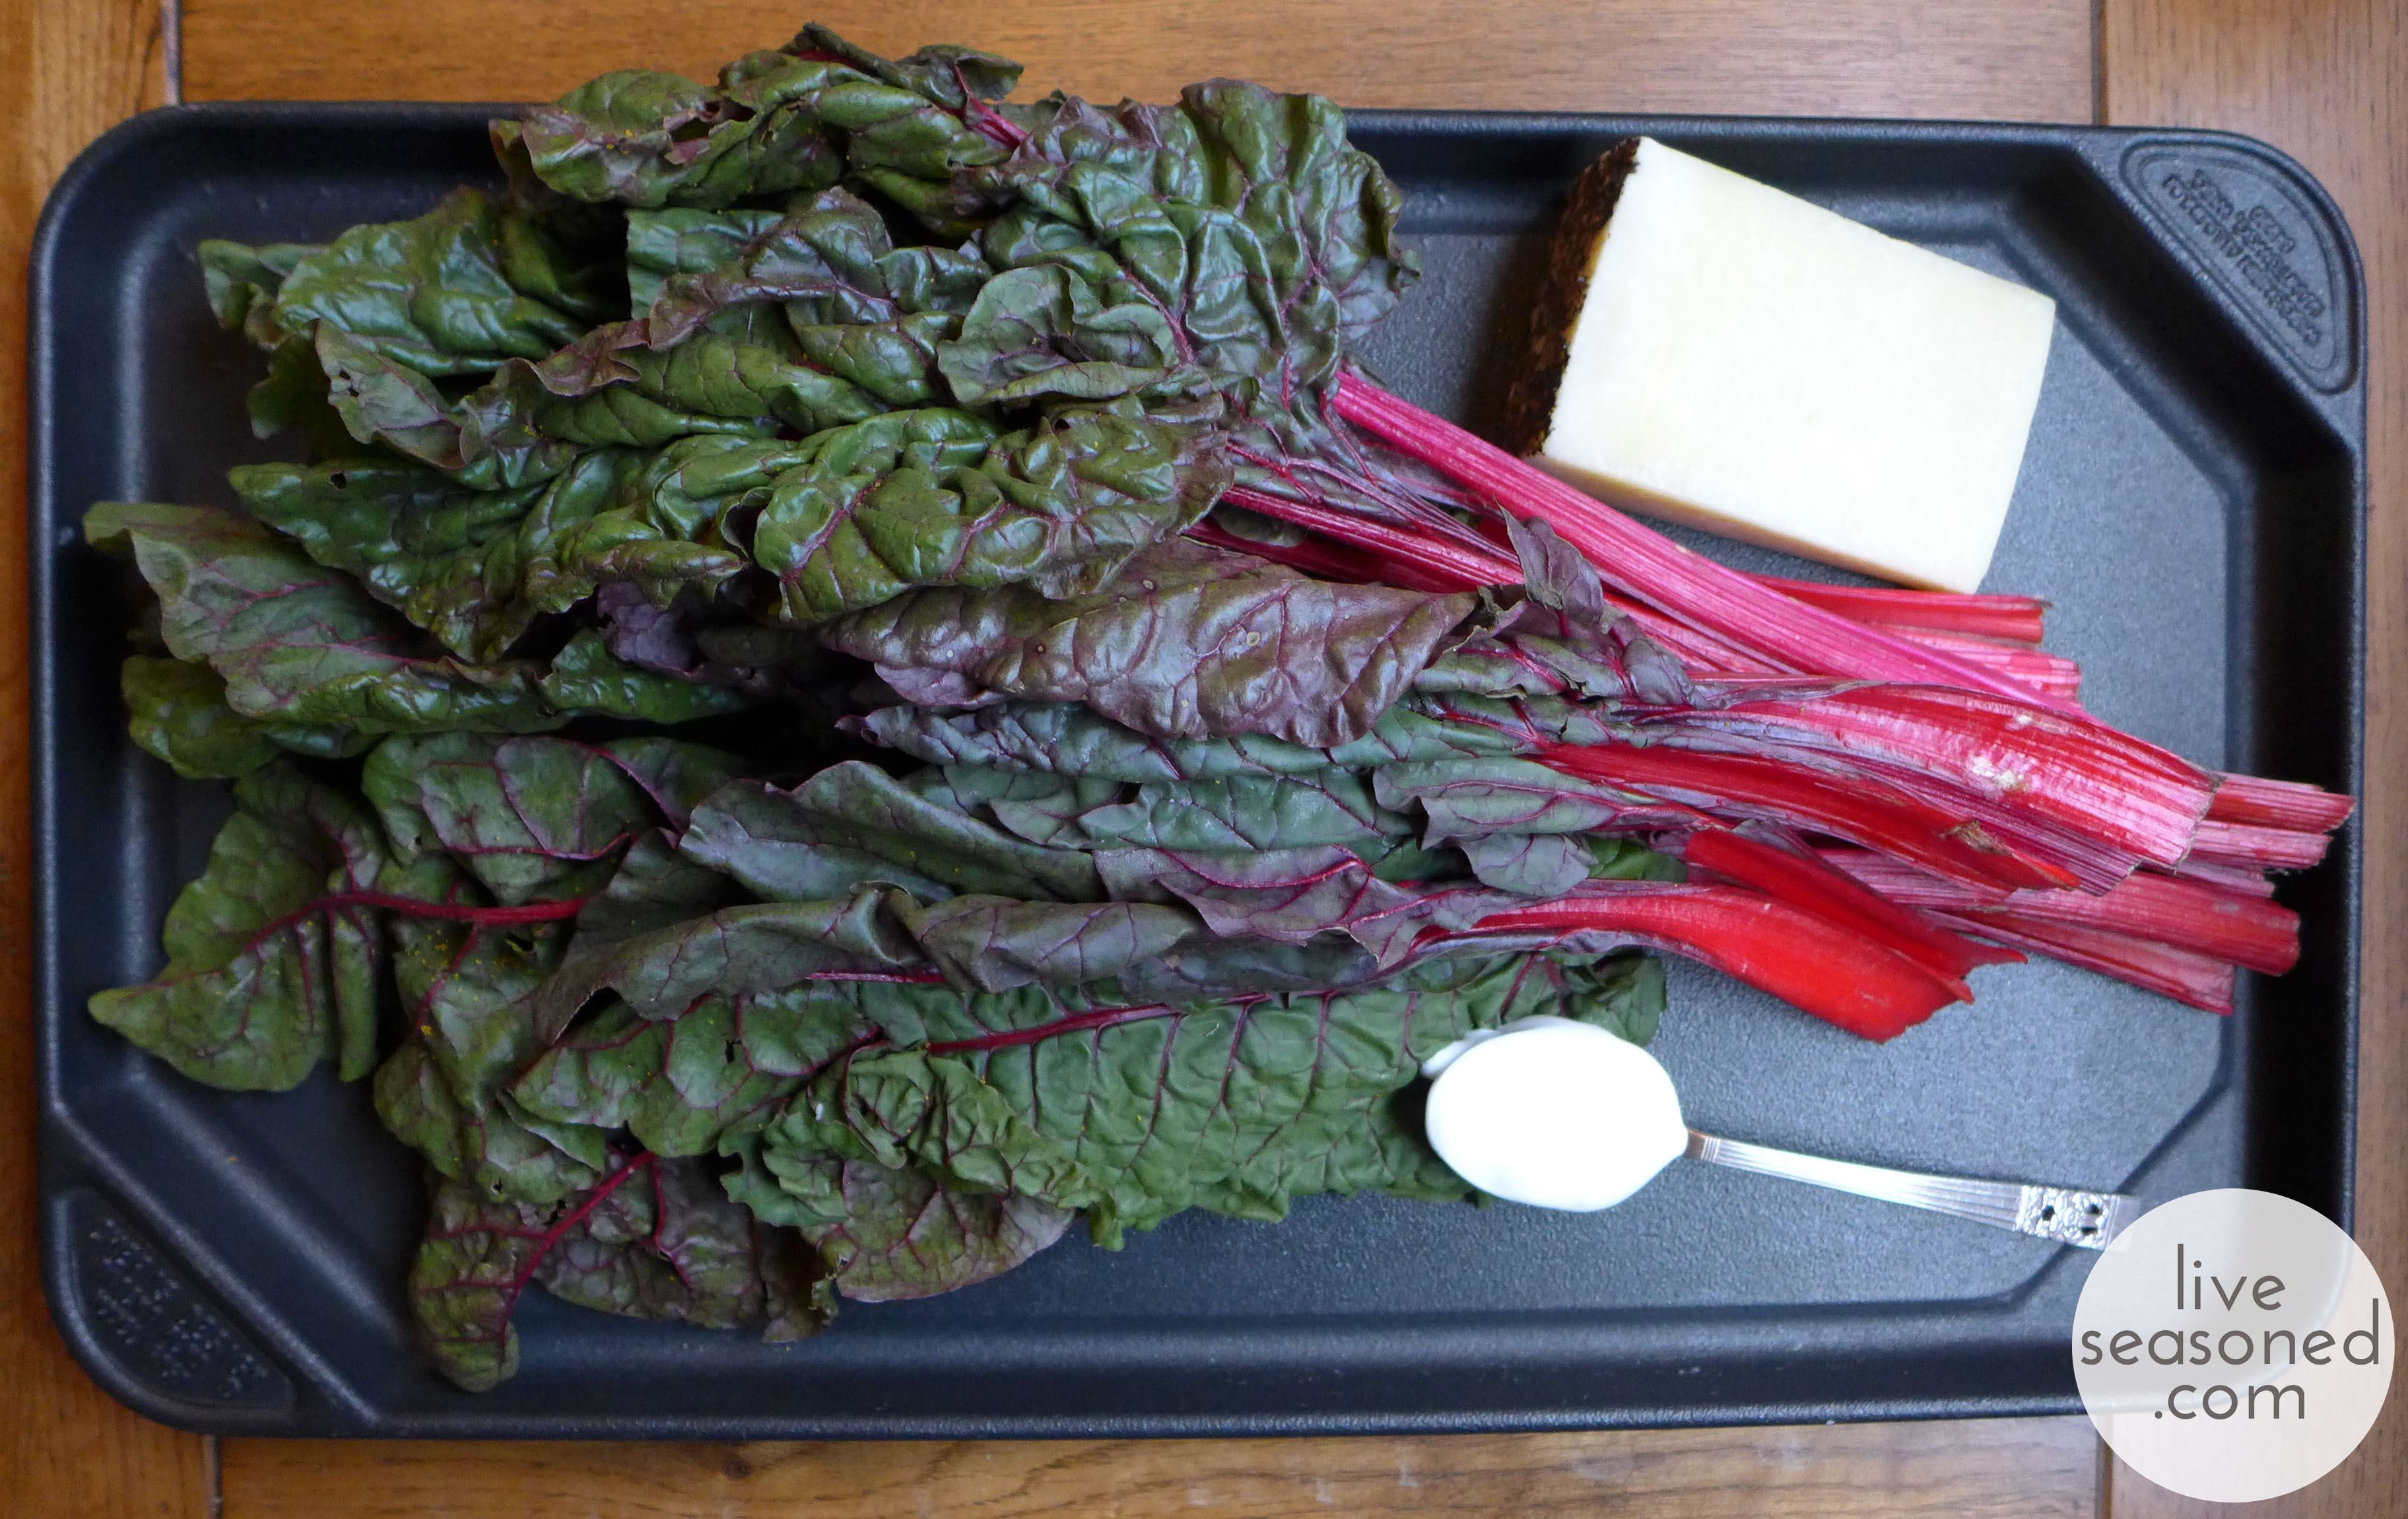
liveseasoned_fall2014_roastedvegsoup5_wm

About the Garnishes

I think garnishes add a special touch to what is otherwise a homogeneous soup (not that that’s a bad thing). As I mentioned, there’s no particular right or wrong when it comes to the garnish, but you may want to think about using things that will add a different color, texture, or flavor to the soup. I often use some cooked greens because they add both color and texture to the smooth, pureed base. I like parmesan or cheddar cheeses for their nutty taste, but the tang of yogurt or sour cream is also a great compliment to the sweet flavor of the vegetables. And, as you know, I love the taste of truffles, and a dash of truffle oil works really well on this soup.

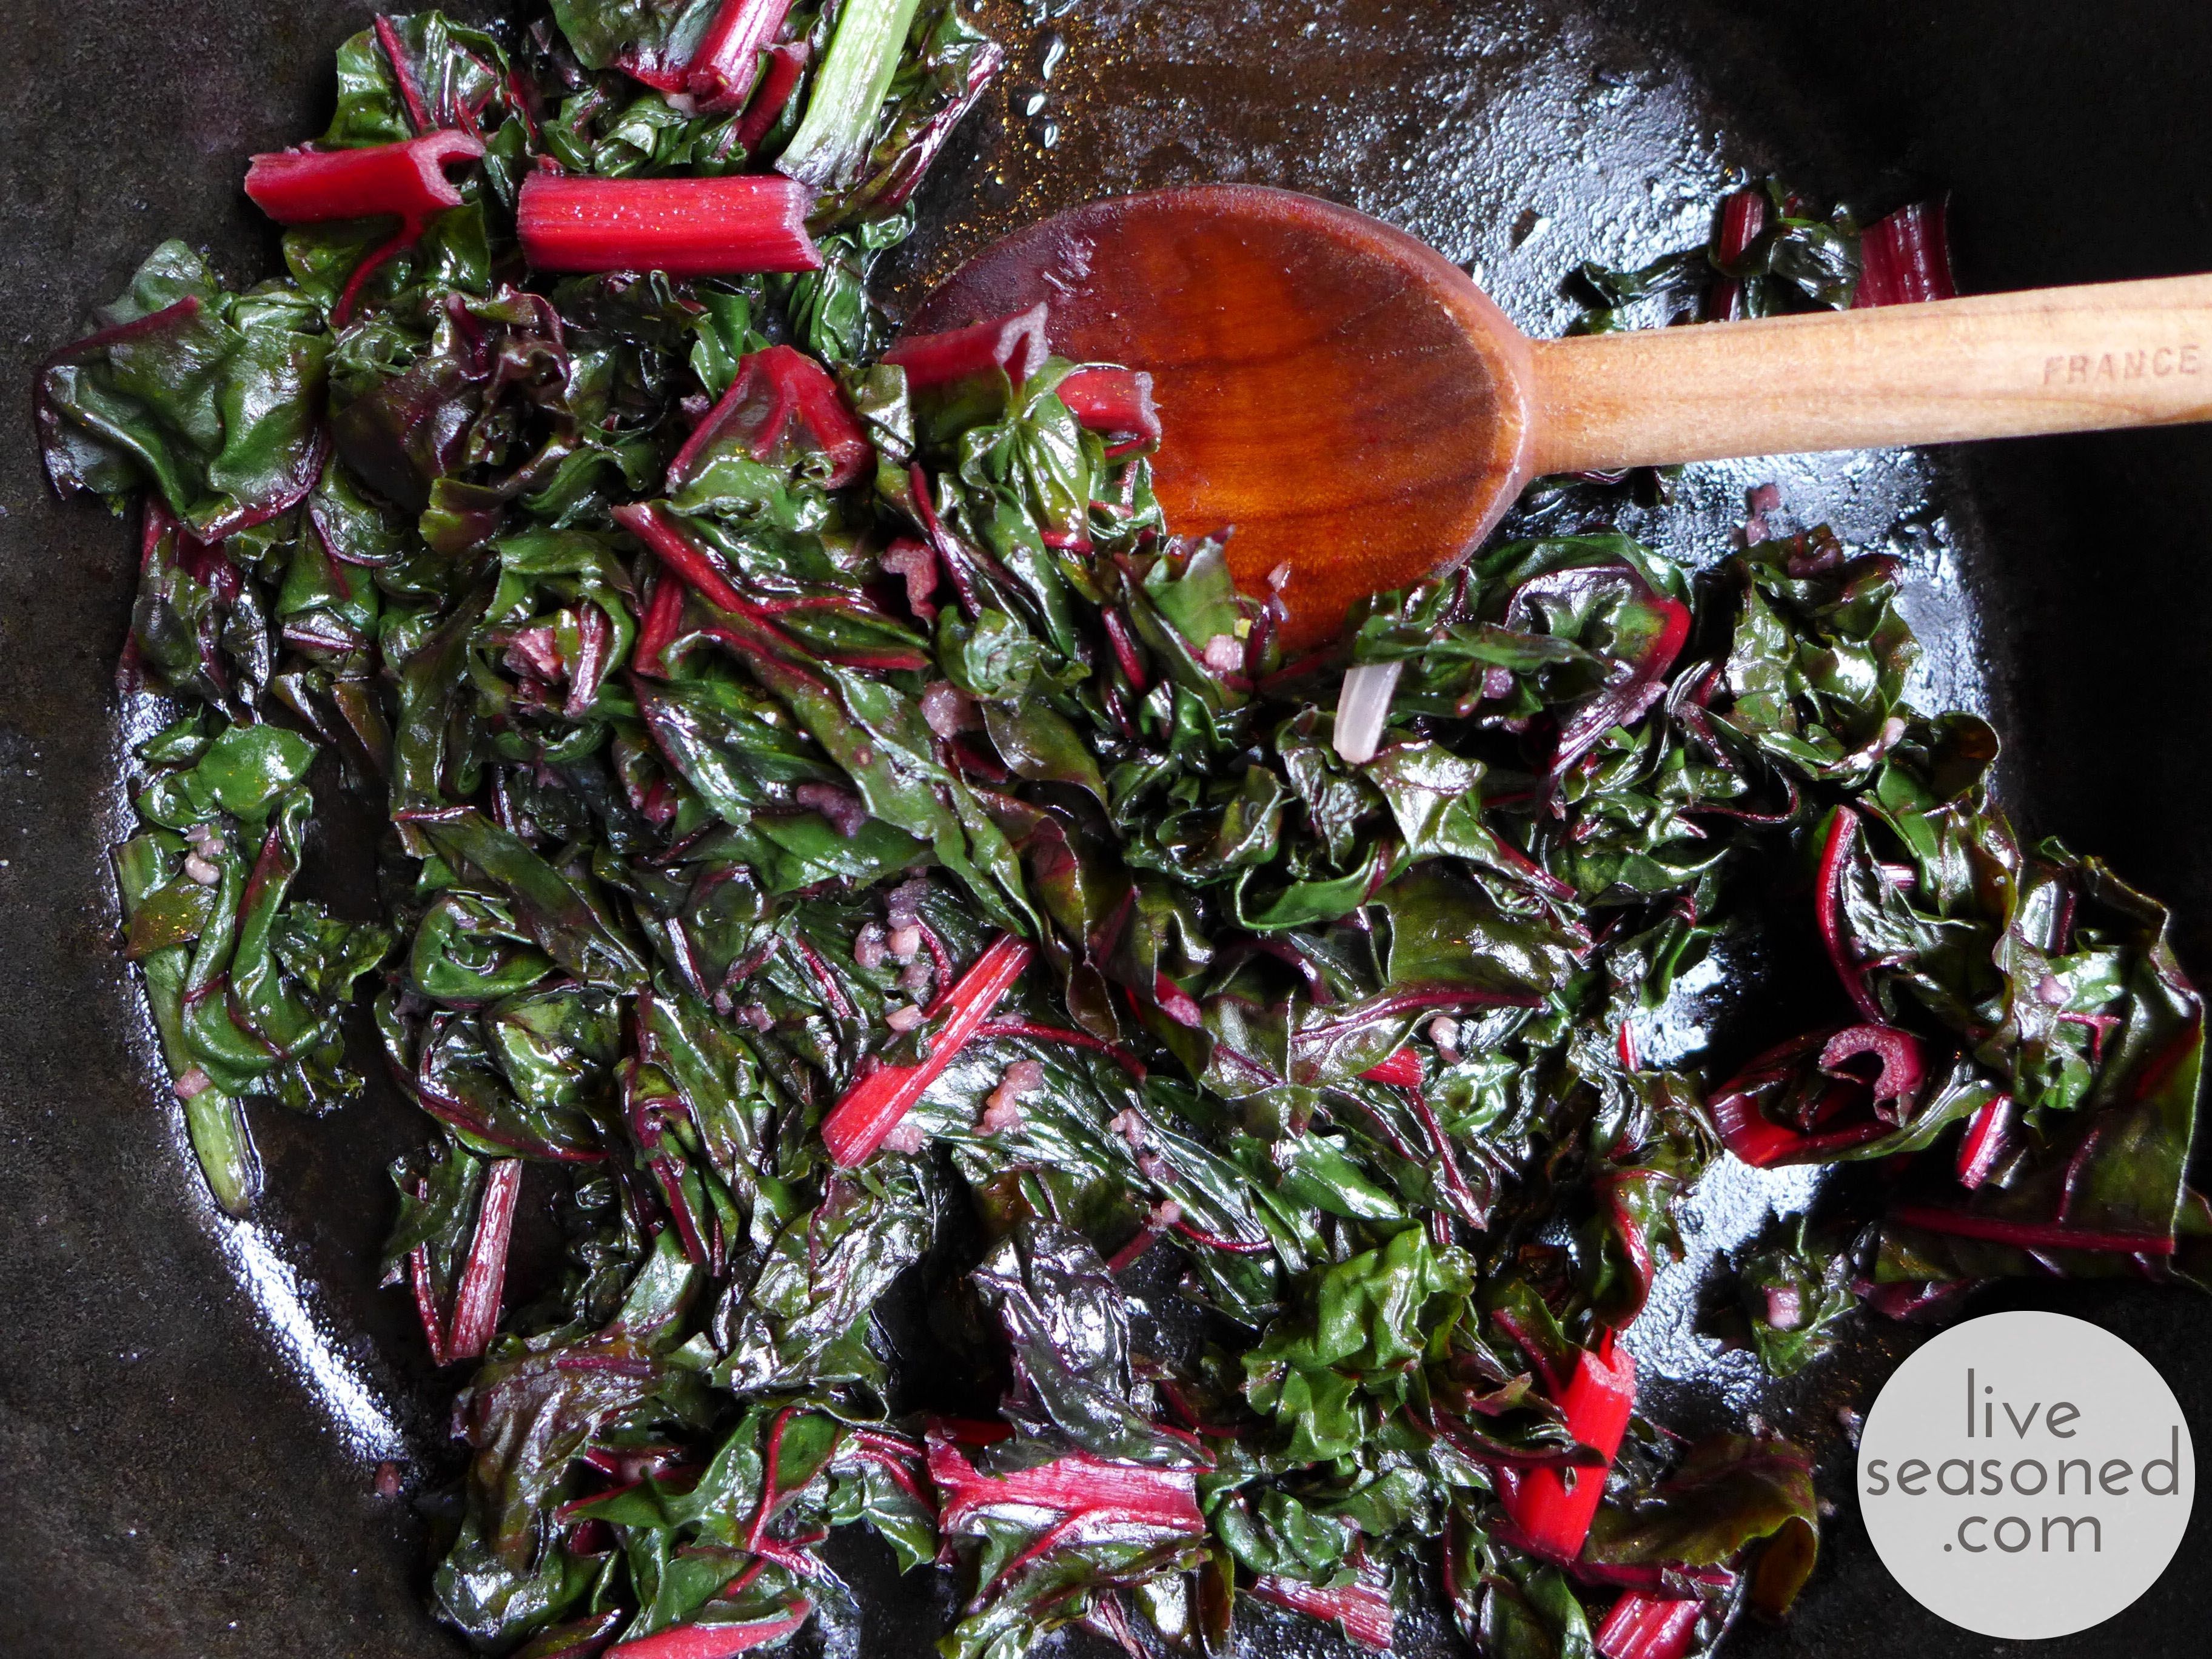
If using greens, saute them in some olive oil to prepare them. You can do this with a touch of salt and some diced onion and/or crush garlic or garlic powder.

liveseasoned_fall2014_roastedvegsoup8_wm

Alex loves this soup, I’m sure it has something to do with the sweet/savory combination from the roasted vegetables and the easy-to-eat pureed texture. I love knowing that he’s eating such a wide variety of vegetables with every bite. Oh, and I already have two quarts of this frozen for when I’m too tired to cook!

There you have it! A relatively simple soup that is so easy to prepare, packed with flavor, and with so many different veggies! Try making this for friends and family over the holiday season and I’m sure it’ll be a hit… if not, just send it to my house, I have a freezer that I’m looking to fill ;-).  
liveseasoned_fall2014_roastedvegsoup12 copy

Apple Cranberry Crisp

Apples are our ingredient of the season. We love to eat them, but we also love to preserve them, drink them, and craft with them!

liveseasoned_fall2014_applecrisp1_wm-1024x768 copy

It’s about time we shared the staple of all apple desserts ~ a crisp! What’s not to love? They are packed with fruit, covered in a hearty and nutty oat crumb. With the right combination of sugar and salt you can get that irresistible sweet yet salty flavor. Still warm, they make vanilla ice cream melt to produce a delicious sweet cream running through every bite. You can totally eat them for breakfast with plain yogurt and know you’re getting your day off to a great start. Or is that just me?

liveseasoned_fall2014_applecrisp5_wm

I made this crisp yesterday. It was our first unbelievably cold day of the season that also blanketed us with snow. A perfect day for finding any reason to stick close to the stove. So I did a whole bunch of cooking and baking. One of the recipes I cooked earlier in the day resulted in boiled cranberries that were then filtered out of that recipe (that’s vague, but you’ll get the full details next week!). The berries looked so perfect that I thought it wouldn’t hurt to experiment and see if I could re-use them in a crisp. I used my standard crisp recipe, it’s a simplified version of something I found in the King Arthur Baker’s Companion (my go-to for all sorts of standard baked goods).  While I don’t do it every time, I’ll often add fresh cranberries to the crisp, luckily, yesterday’s “used” cranberries still had a lot of flavor and worked just as well as fresh ones. 
liveseasoned_fall2014_applecrisp2_wm

Filling Ingredients

  • 5-6 apples, or enough to fill a pie dish, peeled and sliced
  • 1 cup fresh cranberries, coarsely chopped (I even leave some whole)
  • 1/3 cup water
  • 1/2 cup brown sugar, separated
  • 1 tsp cinnamon, separated
  • 1/4 tsp nutmeg
  • 1/4 tsp ginger
  • 3 Tbsp flour
  • 1/4 tsp salt

Crumble Ingredients

  • 1/2 cup flour
  • 1/2 cup quick oats
  • 1/2 cup chopped walnuts
  • 1/8 tsp salt
  • 1/3 cup brown sugar (or 1/2 cup not packed down)
  • 1/2 tsp cinnamon
  • 3/4 tsp baking powder
  • 8 Tbsp butter

liveseasoned_fall2014_applecrisp3_wm

How-To

  • Preheat the oven to 350F and heavily butter your pie dish (I will use about 2 Tbsp of butter and leave any excess within the pan).
  • Place all filling ingredients in a bowl and mix vigorously then transfer to the buttered pie dish.
  • Place all topping ingredients in a food processor and mix until crumbly. If you don’t have a processor, you can mix everything except the butter and walnuts, then cut in the butter and once crumbly lightly mix in the walnut pieces.
  • Sprinkle the topping over the apple mixture. Bake for about 1.5 hours, or until it’s bubbly and a nice golden brown color.

As you can see, the juices from this crisp ran over the side of my dish (producing those beautiful yellow and pink streaks on the outside of the dish – isn’t it cool that the apple and cranberry juices didn’t completely blend?). Depending upon how much I’ve over-stuffed my dish, I will often use a cookie sheet to catch the droppings – it’s much better than have the sugary syrup burn on the bottom of your oven!

liveseasoned_fall2014_applecrisp4_wm

This recipe is easily customizable. You can begin by keeping or skipping the cranberries and/or walnuts. You can replace the water in the filling with apple cider or orange juice. You can play with the spice combinations and amounts. But whatever you do, don’t forget the vanilla ice cream (and yogurt for breakfast!).

Crockpot Apple Butter

Apples are our ingredient of the season, so far we’ve covered a variety of baking and drinking recipes. Today it’s all about the condiment!

Have you tried apple butter yet? Apple butter is a more concentrated form of apple sauce, taking all of fall’s best flavors and turning them into the perfect little condiment. It was originally developed as a form of preserved apples that would last longer than apple sauce because of its higher sugar content. If you’ve never had it, it may be because it’s more of a regional food. Apple butter was developed in Germany and the Netherlands, making it a more popular condiment in regions of the US that were settled by people from those countries, particularly the Amish. If you haven’t had it, I encourage you to seek out a jar (or jump in with both feet and make our version below) ~ it’s soooooo good! Stumped on how to eat it? The spread is often eaten with bread, but I’ll share a few more fun ideas below.

I have to admit, two weeks ago when I was making this batch of apple butter, I was exhausted and little A was squawking because he wanted to go outside, making me question why I wasn’t just running to the store to pick up a commercial jar. But I quickly had a change of heart. Other than the hour of peeling and chopping, this butter required so little work, that I’m solidly convinced it’s worth the effort, especially since I can tailor the recipe to my wants, being sure to buy organic apples, lowering the sugar, and upping the spices. Plus, the concentrated apple and spice flavor is such a perfect condiment for the season, and that’s what we’re all about!

I have made apple butter many times, and never the exact same way, but every time it turns out delicious. I’ve made batches that started with 40 lbs of apples all the way down to this measly batch that started with 4.5 lbs. I’ve also made it in an electric roaster, an electric frying pan, and a crockpot. I’ve found the crockpot to be the easiest, but use what you have! That’s all to say – this particular condiment is so forgiving. As long as you start with a big pile of apples and allow them to cook down slowly with a touch of spices, liquid, and sugar, you’ll end up with something delicious. I promise.

liveseasoned_fall2014_applebutter2_wm

 Ingredients

Recipe makes approximately 5 cups of apple butter.
  • 4.5 pounds of McIntosh Apples, peeled, cored, and chopped
  • 1 cup brown sugar
  • 1 tbsp ground cinnamon
  • 1/2 tsp ground nutmeg
  • 1/4 tsp ground cloves
  • 1/4 tsp salt
  • 1.5 cups water (or you could substitute apple cider for half or all of the water)
liveseasoned_fall2014_applebutter3_wm

How-to

  • Mix all ingredients together in your slow cooker and put the lid on, but leave it slightly ajar to allow steam to escape.
  • Turn it on high for 3 hours, at the end of three hours give it a good stir and assess the pot. If there’s a lot of liquid, you could keep it on high for another couple of hours before turning it to low. If the apple butter is more concentrated, you can turn it to low immediately and let it cook for an additional 4-5 hours (or longer) until you reach your desired apple butter consistency. You can even remove the lid in the last few hours of cooking if you want to let more steam out, but as your butter nears the end, be careful to stir it and watch for any signs of burning (this is less of an issue if the lid is partially on, slowing the evaporation).
  • When your butter is done cooking, let it cool. I do this with the lid off to allow for that final dose of evaporation and concentration. Transfer it to a container and refrigerate.

Tips and Tricks

  • Use a wire whisk for all of your stirring. It’s a great way to break up the apples and get a smoother consistency than if you use a spoon.
  • If you have to leave the pot for while at work, just start with the crockpot on low for that time. Similarly, some people will start their butter at night and let it cook on low while they sleep. After 8 or so hours, give it a good stir and then you can always turn it up to high for a few hours if there’s still a bit of liquid in the pot (I’ve made apple butter while at work and it’s always turned out fine).
  • If you’re unsure about when it’s finished, you can scoop out a bit on a spoon and pour it onto a plate – if it holds its shape and doesn’t become a pool of liquid, then it may be done.
  • If you feel like the liquid is evaporating too fast and your apples aren’t cooking down and creating that caramelized brown color, then you can always add more liquid! This was the case for me when I was making big batches in the electric roaster, with such a large opening, it would let out a lot of steam (unless I had the lid positioned just right). Just add a cup at a time, stir it in well, and let the mixture continue to cook.
  • As I said, I’m prone to using less sugar and more spices than other recipes may call for. Feel free to adjust those levels as you see fit. There really is so much wiggle room ~ I’ve really never had a bad batch!
liveseasoned_fall2014_applebutter10_wm

Serving Suggestions

This batch made 5 cups of apple butter. We’re currently down to about 2.5 cups, so yes, we have plenty of serving suggestions!

  • As I mentioned, it’s common to spread apple butter on bread. As with my jam, I like to spread on a layer of butter first and then the apple butter. It’s particularly good on bagels.
  • A very common way to serve apple butter in Amish communities is with cottage cheese. This is one of my favorite ways to eat it (and Alex’s too!). If you’ve ever eaten at a salad bar in the area around Lancaster, PA, it’s very common to see cottage cheese and apple butter next to each other in the salad bar (and now you know why!).
  • Similar to cottage cheese, I like to stir some into plain yogurt.
  • Last weekend we added a spread of apple butter to our Saturday morning crepes with ham and cheddar cheese (Calder’s figured out a super easy way to use Bisquick for crepe-making, we’ll have to share the recipe soon!).
  • When we had some dinner guests last week, I added a ramekin of apple butter to the cheese plate. It was delicious spread on baguette with either brie or cheddar!
liveseasoned_fall2014_applebutter7_wm

Quick Pickles

If you’ve been following along, you may have heard and seen that our farm share started. I’m still in disbelief that we were able to get a share that is this awesome so late in the season! And now I’m remembering what it’s like to have (the wonderful) pressure of a fridge full of veggies pushing me to get creative with dinner.

liveseasoned_fall2014_quickpickels2_wm

In this first box we received your typical fall fare: a few bunches of kale and chard, potatoes, squash, etc. What I didn’t expect were the couple of cucumbers and the big beautiful bunch of dill blossoms. I thought cucumber season had passed, and I’ve never received the dill blossoms, so this was a new and unexpected surprise. I have to admit that I have a tendency to buy cucumbers and forget about them, but I didn’t want to let that happen this time. So I turned to one of my favorite easy ways to use up those cukes in a jiffy: overnight pickles! We don’t buy pickles often (and when we do they tend to sit in the fridge for months), but these are different. They are so fresh and delicious,  barely lasting a week in our house.

liveseasoned_fall2014_quickpickels4_wm

This recipe comes from my mom, but I adjusted it to make use of what I had on hand: eliminating the green pepper and adding the dill blossoms and a bit of fresh dill. Do you hear that? The blossoms were totally a bonus, this recipe is just as delicious without the fresh herb, but as you’ll see, they sure add a touch of something beautiful to the jar.

Ingredients

  • 3 average-sized cucumbers (here I used 2 large)
  • 1 green pepper
  • 1 onion
  • 1 Tbsp salt
  • 2 tsp celery seed
  • 3/4 cup sugar
  • 1/2 fresh lemon juice
  • 1 sliced lemon
  • optional – dill blossoms

liveseasoned_fall2014_quickpickels3_wm

How-to

  • Slice the cucumbers, green pepper, and onion, and mix them in a bowl with the salt and celery seed. Let this mixture stand for one hour.
  • Mix together the sugar and lemon juice and add it to the cucumber mixture. Add the sliced lemon and stir.
  • Cover the container and refrigerate for 24 hours before eating. I like to go in there and give it a stir once in a while, or if using a jar I just give it a gentle shake, slowly turning it upside down. The juices may not cover your mixture right away, but they will as the 24 hours progresses.

liveseasoned_fall2014_quickpickels5_wm

The blossoms are a really flavorful part of the dill plant. I added a few to a warm veggie mixture as it cooked, and they imparted a fantastic but not overpowering dill flavor. I found that they did a same thing here ~ creating a batch of pickles that had a sweet dill flavor. I added blossoms that weren’t fully open to my jar before filling it with the cucumber mixture (I’m not sure if there’s any difference in the flavor imparted by open versus closed blossoms?).

While the pickles taste delicious, I think I get just as much fun out of opening my fridge and seeing this beautiful jar sitting on the shelf (for the whole 2-3 days that it’s there!).

Ack, ok, maybe it’s even more fun seeing little A gobble them up and then sign for more with celery seeds sticking to his face!

Apple Cream Cheese Quick Bread

Apple is our ingredient of the season. Expect quite a bit of baking, a sampling of hard cider, and a house full of aroma (if you’re lucky!) from this series.

The same mystery apple tree that provided the inspiration for our German Apple Cake keeps on giving, so we keep on taking! Alex makes it a daily stop, and I’ve run over a few times when we needed an apple for this or that; today’s bread being the perfect example. We went on a one-night camping trip last weekend, and whenever we’re camping and I know there’s going to be a chill in the air I like to pack along a baked good – just something to snack on when we need an energy boost or want a little treat with our camp breakfast. Since this recipe comes together relatively quickly, it’s an easy last minute treat whether you’re staying home or packing the car (and forgetting the hotdogs!) as you head out for the weekend.

liveseasoned_fall2014_applebread3_wm

In addition to the apple, this bread gets its flavor from a touch of cinnamon, fresh nutmeg, and vanilla. And I loved the hearty addition of cream cheese, reminding me of another fall favorite ~ the pumpkin roll!

Ingredients

  • 2 apples, peeled and grated
  • 1/2 cup vegetable oil
  • 1 cup sugar, separated
  • 3 eggs (2 for the bread, 1 for the cream cheese filling)
  • 1 tsp vanilla
  • 1/2 cup whole wheat flour
  • 1/2 cup + 1/3 cup white flour
  • 1 tsp baking soda
  • 1/2 tsp salt
  • 1 tsp cinnamon
  • 1/2 tsp nutmeg
  • 1/2 cup chopped walnuts
  • 6 oz. cream cheese
liveseasoned_fall2014_applebread1_wm

The How-to

  • Preheat the oven to 350F and lightly oil a loaf pan.
  • Place the apples, oil, 3/4 cup sugar, 2 eggs and vanilla in a large bowl. Mix well. Gently fold in the flour, baking soda, salt, spices, and walnuts until wet. Pour the batter into your prepared pan.
  • With an electric mixer beat together the cream cheese, 1/4 cup sugar and 1 egg. Pour over the top of the bread batter and swirl with a fork or knife.
  • Bake for 30 minutes with a loosely covered foil tent. Remove the foil and continue to bake for an addition 15-20 minutes, until a toothpick inserted into the bread comes out clean.
  • Allow the bread to cool before slicing.
liveseasoned_fall2014_applebread4_wm

As I mentioned, this is a nice hearty bread. It was the perfect treat on our camping trip, especially with a cup of hot tea at the breakfast table. My cream cheese didn’t marble into the bread so much as it sunk into the middle and the bread seemed to bake up around it, but we didn’t mind – it made it more like a filling.

I adapted today’s recipe from Today’s Creative Blog, adding the walnuts, reducing the sugar, and taking her suggestion for a combination of whole wheat and white flour. I found the core recipe to be easily adaptable, so feel free to experiment and make it your own!

Nut Crusted Brie

Apples are our ingredient of the season.  This recipe is perfect served and garnished with a thinly sliced apple. This is also the first of a few cheese plates that we’ll be serving up this fall.  If you are vegan, we apologize in advance.

LIVESEASONED_fall14_brie2

Calling all cheese lovers! This recipe goes out to you…

Autumn is the perfect time to turn on the oven, wouldn’t you agree?  I love heating up my house a bit and making something warm to snack on.  This nut crusted brie is ridiculously simple and it’s classy as all get out.  Need a quick hors d’oeuvre? Having a few friends come over? Wanna feel better about eating an entire wedge of cheese?  Need snacks for Sunday night football?  All those and more are perfectly good reasons to roll your brie in crushed nuts and pop it in the oven. This takes ten minutes max (and only about a minute of active work) and you’re likely to have at least half the ingredients on hand.

Ingredients:

  • Brie (I used Auguste Le Petit. You can use whatever you’re comfortable with)
  • Buttermilk (or heavy cream)
  • Egg
  • Nuts of choice (I used almonds+walnuts. Macadamia would work well.)
  • Apple
  • Baguette

Instructions:

  • Preheat your oven to 300° and line a baking sheet with tinfoil.
  • Pulse the nuts in a blender or food processor until finely chopped, but not powdery.  I used about a half cup of nuts for a medium sized wedge. Set the bowl of nuts aside.
  • Whisk together one egg with a half cup of buttermilk.
  • Coat the brie wedge or wheel in the buttermilk and then press it firmly into the nuts. Repeat on each side of the brie making sure to completely coat it.
  • Delicately transfer the brie to the baking sheet and put it in the oven for 5-8 minutes.  You want the brie to be very warm, but not a melted puddle.  A full wheel will take about 10 minutes.
  • While the brie is baking, thinly slice the baguette and arrange on a baking sheet.  Put the bread in the oven while the brie is baking.  If you like your bread slightly browned, once the brie is done baking, turn the oven onto broil and toast the baguette.  Watch the bread closely so it doesn’t burn!
  • Thinly slice an apple or two and serve it along with the brie and baguette.

LIVESEASONED_fall14_brie4

I love this recipe for fall. Apples, nuts and warm cheeses, I don’t think there is a better combination. Unless you’re talking drinks, then I’m all about the fresh apple juice, cinnamon and vodka…


Sarah’s Appletini

Apples are our ingredient of the season. Check out Kate’s german apple cake right here.

I’m a fairly new martini drinker, but I can see these appletinis showing up on a regular basis around here.  They are full of fresh juice (& alcohol!) and they taste like Autumn!! Really, these apple martinis are fall flavored.  This recipe makes enough for two martinis so grab a pal or drink both. If your plan is the latter then have a great afternoon at home 😉

liveseasoned_fall14_appletini-1-4liveseasoned_fall14_appletini-1-6


Continue reading

Spring Rolls {Vegetarian & Vegan}

Mint is our ingredient of the season. Our archive of mint posts is rich with ideas for drinks, salads, main dishes, and cosmetic uses!

Before last week I had eaten my fair share of spring rolls, yet never made them, but with mint as our ingredient of the season, this was one of those recipes that I was excited to stretch my muscles and try making at home. I was totally intimidated before my first wrapper hit the water, but I’m happy to report that these were surprisingly easy to prepare!

liveseasoned_summer2014_springrolls20_wm

Making spring rolls at home is so much fun because you can personalize them to your tastes, choosing your favorite protein (tofu, shrimp) and vegetables (sky’s the limit!). On this particular night, we opted for veg rolls with tofu as our protein and nappa cabbage, carrots, and cucumbers as our vegetables. I did the rolling while Calder and A.Max were out on a bike ride, but while doing it, I thought about how this would be even more fun to do with a group of friends ~ setting up a big spring roll bar and letting everyone roll their own. If you try that, let us know how it goes!

Continue reading

Fresh Mint Ice Cream

Mint is our ingredient of the season. In the kitchen we’ve made a few alcoholic and non-alcoholic drinks, salads, and meatballs. For the bathroom we made a refreshing foot scrub and some non-toxic deodorant.

You know the mint ice cream in your grocer’s freezer section? This is nothing like that. This ice cream gets all of its minty flavor from fresh mint, and with that comes a deep, green, earthy flavor from the plant. That description may sound crazy for ice cream, but when you eat fresh mint you taste so much more than the isolated mint flavor that’s added to commercial ice cream. By infusing the milk and cream with fresh mint, you’re adding those layers of complexity to this very simple dessert.

As I was sharing a cone with A. Max this afternoon, I was trying to think of another way to convey the flavor of this ice cream. At our house growing up, there was so much mint growing around the edge of the garden that it would get cut with the lawn mower. Have you ever experienced that? Mint getting cut with the green grass on a hot summer day? That’s this ice cream.

Continue reading

Mint in your Lamb Meatballs?

Mint is our ingredient of the season. Of course we made mojitos. We also made some saladsiced teaagua fresca, a body scrub, and… deodorant!

I’ve been sitting on this recipe ever since Sarah and I picked mint as the ingredient of the season. It’s not that mint is the star of the dish, it’s just that, when do you ever expect to see mint in a meatball recipe? You might think it’s expected in a lamb meatball recipe, but the cookbook actually refers to these as beef meatballs. And mint isn’t the only thing flavoring this dish; it calls for four different fresh herbs and over a half dozen spices! If that sounds complicated, it’s worth the effort.

liveseasoned_summer2014_mintmeatballs4


This recipe comes from the cookbook Jerusalem. If it sounds familiar, I shared a couple of recipes from the book in April. Or maybe you read a review of the book, or heard that a Jerusalem craze is taking over the nation (it’s the #1 cookbook on Amazon in the natural food cooking category). I have to admit that I didn’t realize it was that popular until writing this post, but I completely understand the compassion for this book. The range of recipes are exciting, they are made from ingredients that I want to eat, the book’s photographs are wonderful, the descriptions of places and history transport you… Through food, this book blends religions and cultures, if only it could bring peace to a troubled land.

Continue reading