Tonic Water (& Gin)

I love, love, love gin & tonics! When I was pregnant with Luc, our friends in Boulder (a big brewery town) would ask me if I couldn’t wait to have a beer, and I would always so no, because all I wanted was a G&T. In fact, when I hit week 39 of my pregnancy, I stopped in a liquor store to pick up some gin… I’m sure it looked absurd that a hugely pregnant lady was buying gin with her two year old in the shopping cart, but other women get the urge to nest, and I got the urge for gin.

liveseasoned_spring2015_tonicwater6

Meanwhile, waiting at home for me was an awesome homemade tonic water kit that Calder’s sister gave me last July for my birthday. That was days after I became pregnant with Luc, and it killed me to have to sit on it for all those months! While Sarah was in town last month, we finally made the tonic water and broke open some new-to-us gins.

Continue reading

Making a Space for Native Bees

Happy Earth Day (again)! We’re excited to check in this afternoon with a second post, especially one about making a space for native bees in your backyard!

You may not be aware, but the honey bees that we all know and love for the pollination services and delicious honey are not native to North America. The bees arrived in North America by Europeans in the 17th century, and they are such efficient pollinators that over time our agriculture became dependent upon the insects. This dependency is due in part to honey bees living in such large colonies that we are able to easily move from field to field in portable hives. I love the idea of fostering different habitats in our backyard for a variety of animals from birds to insects to mammals; especially since observing these animals in our backyard is such a simple way to introduce and connect Alex and Luc to nature. As such, one day I would love to have a colony of honeybees in my backyard, but I know that requires time that I don’t have right now to learn about their care and monitor the hives throughout the year, not to mention the work that would be required to collect the honey. Meanwhile, our native bees are really interesting insects that receive relatively little attention yet are the perfect guests for a low maintenance backyard! Knowing that, we thought Earth Day was the perfect time to encourage everyone to invite these gentle creatures into your yard!

Osmia_cornifrons.5.1.08.w

Today when discussing native bees, we’re referring specifically to Mason Bees, of which, there are over 100 species in North America. Unlike honey bees that live in large colonies, Mason bees are solitary insects and they do not produce honey. Another difference between the two types of bees is that Mason bees do not sting unless squeezed or stepped on. For that reason and for their interesting nesting habits (read more below!), they are a great bee to encourage to nest in your backyard; kids will enjoy watching them create their nests without the threat of being stung!

Continue reading

DIY Macrame Plant Hangers

liveseasoned_sp15_plant hangers-57

liveseasoned_sp15_plant hangers-1

Macrame has long been my favorite fiber art.  Although there are some crazy complex macrame pieces out there, when it comes down to it, you’re just tying knots!  Making macrame plant hangers are similar to making friendship bracelets except on a slightly larger scale and at the end of the summer you don’t have to cut them off.  This project is great for beginngers and advanced fiber artists alike (yes, you’ll be a fiber artist if you create one of these plant hangers 😉 ) because you can tie a couple familiar knots or mess around with complex combinations of knots – it’s totally up to you.  I’m basically giving you an outline of how to make a plant hanger, but I want you to flex your creative muscles and make it your own unique macrame piece.  I wouldn’t mind seeing a few of the finished pieces either, so feel free to tag us.

liveseasoned_squareknot

Continue reading

Eight Natural Egg Dyes

liveseasoned_spring2014_naturaldyedeggs9 copy

liveseasoned_spring2014_naturaldyedeggs3

liveseasoned_spring2014_eggs9_wm

Hey there! With Easter only days away, we wanted to remind you of a fun, easy, and most importantly, natural way to dye eggs. This time last year, Katie and I decided to experiment with common kitchen ingredients to make our dyes.  Here are Katie’s eggs using purple onion skins, tumeric and purple cabbage.  For eggs dyed with coffee, cherries, cumin, paprika, and brown onion skins follow my instructions. Other than your dye ingredient, you’ll just need some water and vinegar, but as you’ll see in Katie’s post, you can also use a few drops of vegetable oil to make your eggs shine.

This is a great project to do with kids, because you can turn them into scientists ~ they’ll see these foods in new ways and may even want to experiment with dyes from other foods and plants (you may want to start with just a couple of the foods on that list, and then do some guided exploring to have them test out the other foods).

Let us know how it goes!


How To Use It: Coconut Oil

liveseasoned_coconutoil

Hey all you nutty kids! Katie and I have a bunch of products that make their way into our daily lives in some form or another and one of those is coconut oil.  We thought it might be helpful to explain how we use coconut oil in case you’re at a bit of a loss.  Personally coconut oil is used so often in my house that I have a jar in my kitchen, bathroom and car!  I can’t get enough of the stuff and while I like other oils too like argon and olive, coconut is so cheap and versatile that I find myself using larger quantities of it than the others.

Continue reading

Garden Research

Doesn’t the first hint of warm weather make you excited to plant something? It could be something small like a pot of flowers on your stoop or in a windowsill box. Or, you may have bigger plans this year ~ are you dreaming of a full veggie garden with a bed of flowers for picking?

coneflower_july_2012

If all goes according to plan, this time next week we’ll have moved into a new house (eek!). It has a huge deck, and many tiered beds for planting. Some of the beds have perennials, but from what we understand, some are open for annual plantings. With temps in the 60s and 70s this past week, I’m so excited to make planting the beds and flower pots one of my first new-house projects. And while I know it’s not time to plant yet, these early spring days are a great time to start doing research.

Continue reading

Project Sweater : Update II

liveseasoned_summer2014_sweaterproject1_wmb

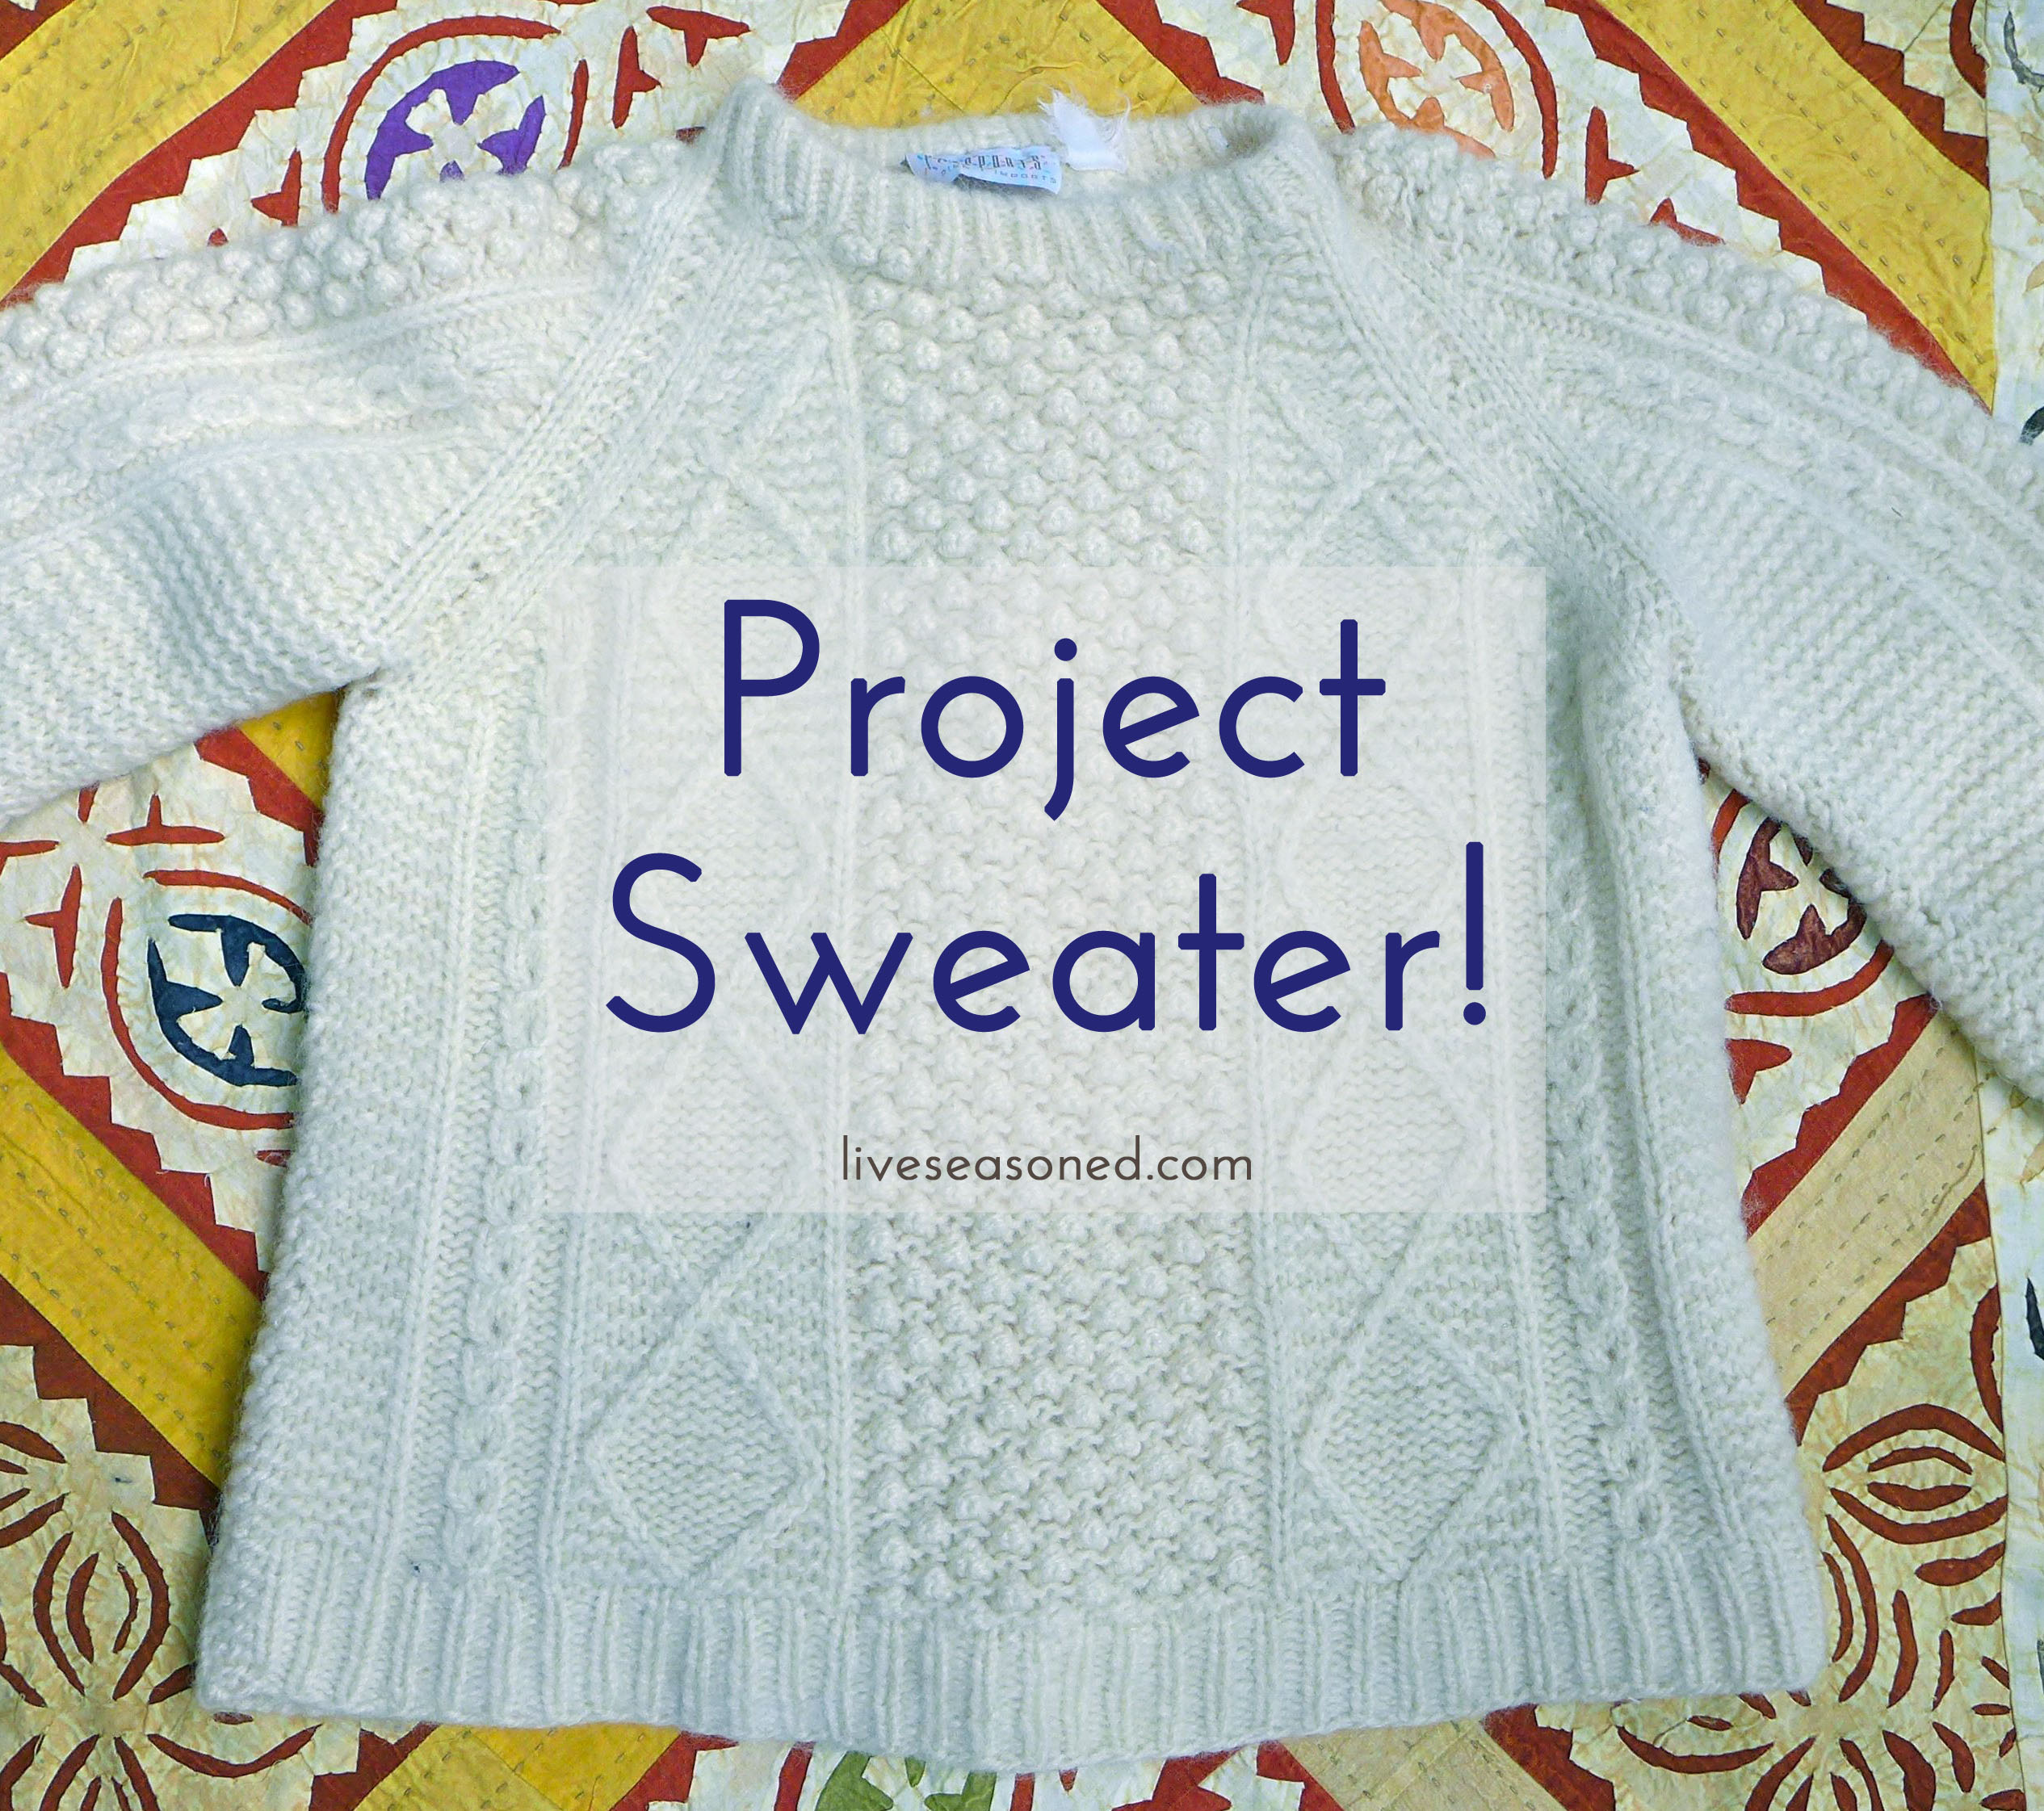
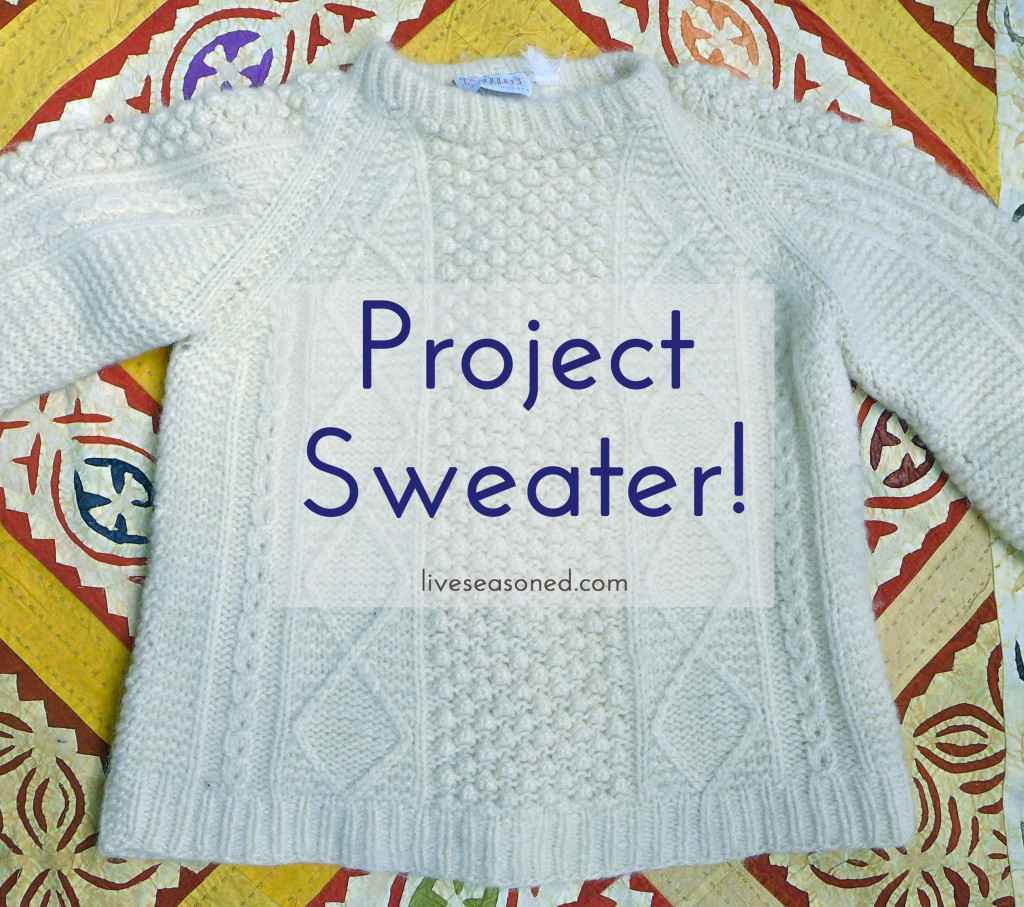
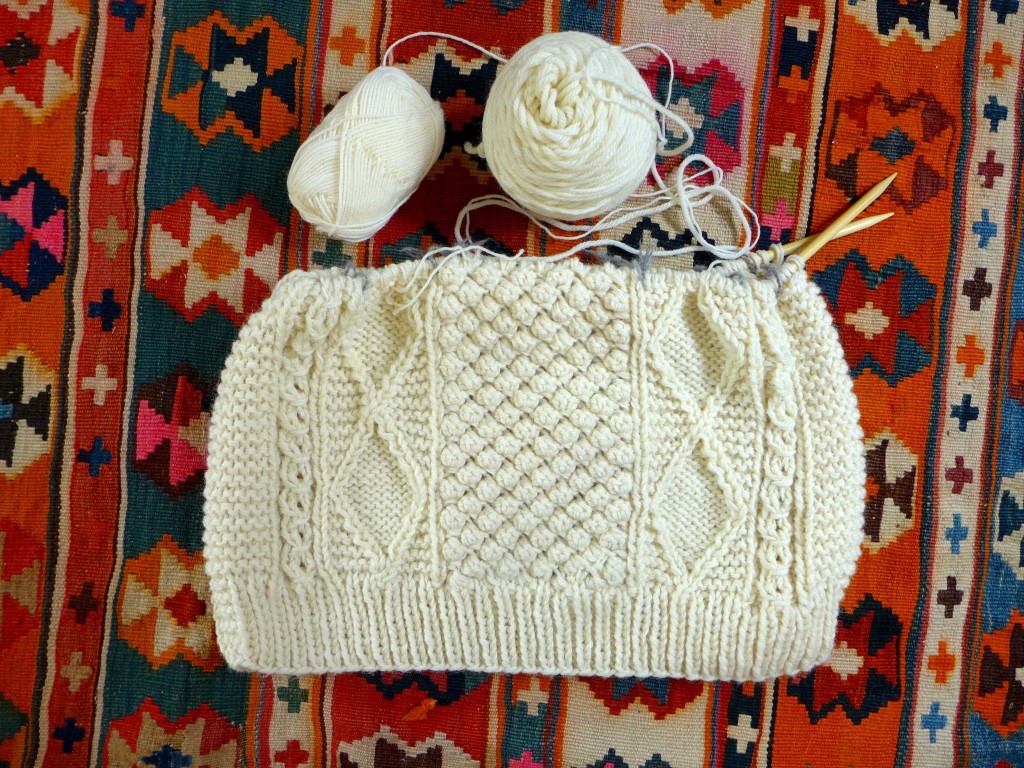
This is the third post in a series where I’m slowly taking you on the adventure* of figuring out how to recreate the sweater above. The original sweater belongs to a friend and has been well-loved and well-worn for at least a decade or so. Over that time, it also became slightly felted. I’m knitting a new sweater to be exactly like the old in every way except length – the new one will be a touch longer (one diamond cable’s length).

In the first post, I introduced you to the sweater, it’s three cable patterns, two yarn options, and two swatches using those yarns. Both of those swatches were too small to match the original sweater, but I was able to work out the stitch patterns. By the second post, I had found a yarn and needle combination that produced a swatch that was the perfect match to the sweater! I also discussed blocking in that post.

liveseasoned_summer2014_sweaterproject6_wm

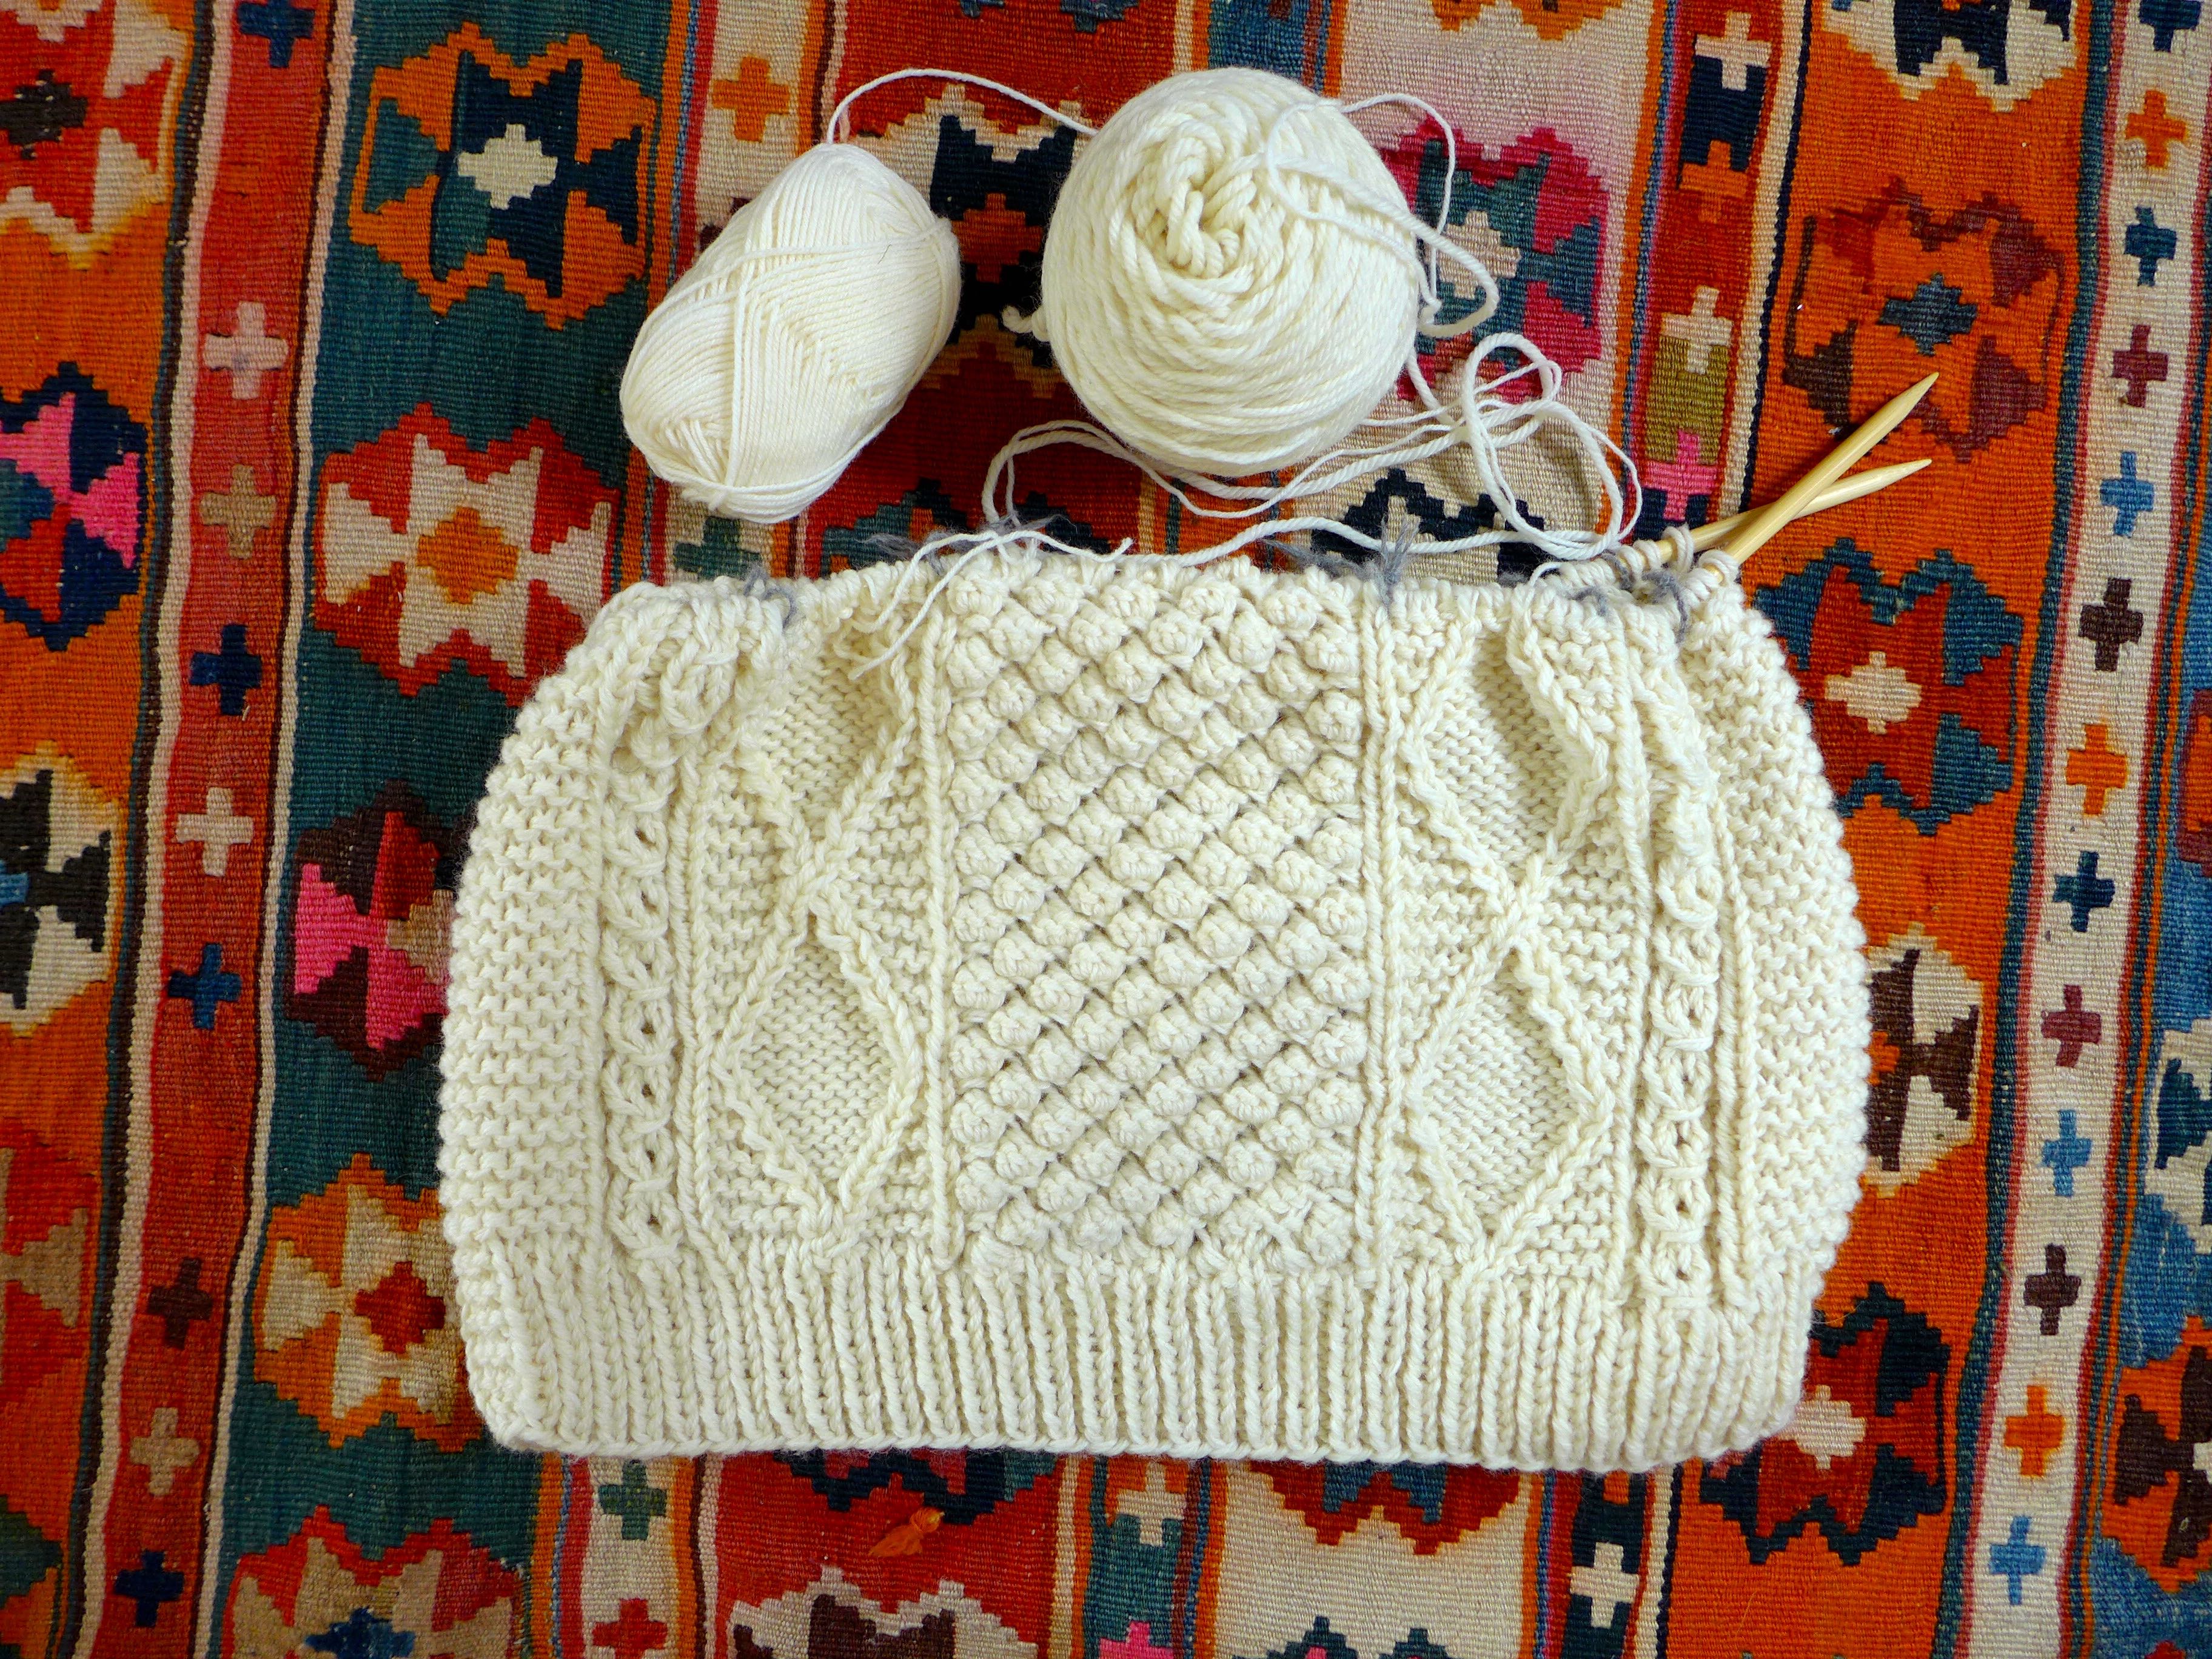
Today I’m back to share a minor update ~ mainly that actual sweater knitting has commenced, and I’m about halfway done with the body of the sweater!

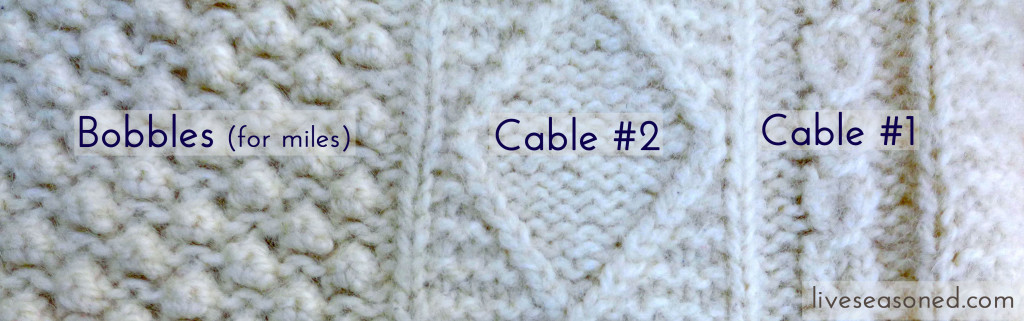
I also wanted to share my initial pattern notes for each of the cables. I often see a cable stitch that I’d like to incorporate into my own projects, but if it’s part of another pattern then I either have to buy the pattern of figure it out through trial and error. Of course, sometimes I get lucky and will find exactly what I’m looking for in a stitch guide, but even that takes a bit of hunting. Each of these distinct cable patterns can be incorporated into any variety of projects, from hats and sweaters, to throw pillows and afghans.

liveseasoned_w2015_sweaterproject4

The notes are written as if you’re knitting in the round and moving along each row from right to left, which is often the case for a sweater. If you need any help translating them to a flat piece of knitting, please let me know!

Cable 1

Worked over 7 stitches and 4 rows.

  • Row 1 : purl 2, knit 3, purl 2
  • Row 2 : purl 2, pass the third stitch on the left needle over the two stitches before it, knit 1, yarn over, knit 1, purl two
  • Rows 3 & 4 : purl 2, knit 3, purl 2

Cable 2

Worked over 14 stitches and 22 rows.

  • Row 1 : knit all stitches
  • Row 2 : knit 1, purl 5, c1b, purl 5, knit 1
  • Row 3 : knit all stitches
  • Row 4 : knit 1, purl 4, c1r, c1l, purl 4, knit 1
  • Row 5 : knit 6, purl 2, knit 6
  • Row 6 : knit 1, purl 3, c1r, purl 2, c1l, purl 3, knit 1
  • Row 7 : knit 5, purl 4, knit 5
  • Row 8 : knit 1, purl 2, c1r, purl 4, c1l, purl 2, knit 1
  • Row 9 : knit 4, purl 6, knit 4
  • Row 10 : knit 1, purl 1, c1r, purl 6, c1l, purl 1, knit 1
  • Row 11 : knit 3, purl 8, knit 3
  • Row 12 : knit 1, c1r, purl 8, c1l, knit 1
  • Row 13 : knit 2, purl 10, knit 2
  • Row 14 : knit 1, c1l, purl 8, c1r, knit 1
  • Row 15 : knit 3, purl 8, knit 3
  • Row 16 : knit 1, purl 1, c1l, purl 6, c1r, purl 1, knit 1
  • Row 17 : knit 4, purl 6, knit 4
  • Row 18 : knit 1, purl 2, c1l, purl 4, c1r, purl 2, knit 1
  • Row 19 : knit 5, purl 4, knit 5
  • Row 20 : knit 1, purl 3, c1l, purl 2, cir, purl 3, knit 1
  • Row 21 : knit 6, purl 2, knit 6
  • Row 22 : knit 1, purl 4, c1l, c1r, purl 4, knit 1

Cable Abbreviations:

  • c1b ~ place next stitch on cable needle and hold to the back, knit 1 next stitch from left needle, knit the stitch on the cable needle
  • c1r ~ place next stitch on the cable needle and hold to back, knit next stitch from left needle, purl the stitch on the cable needle
  • c1l ~ place next stitch on the cable needle and hold to front, purl next stitch on left needle, knit the stitch on the cable needle
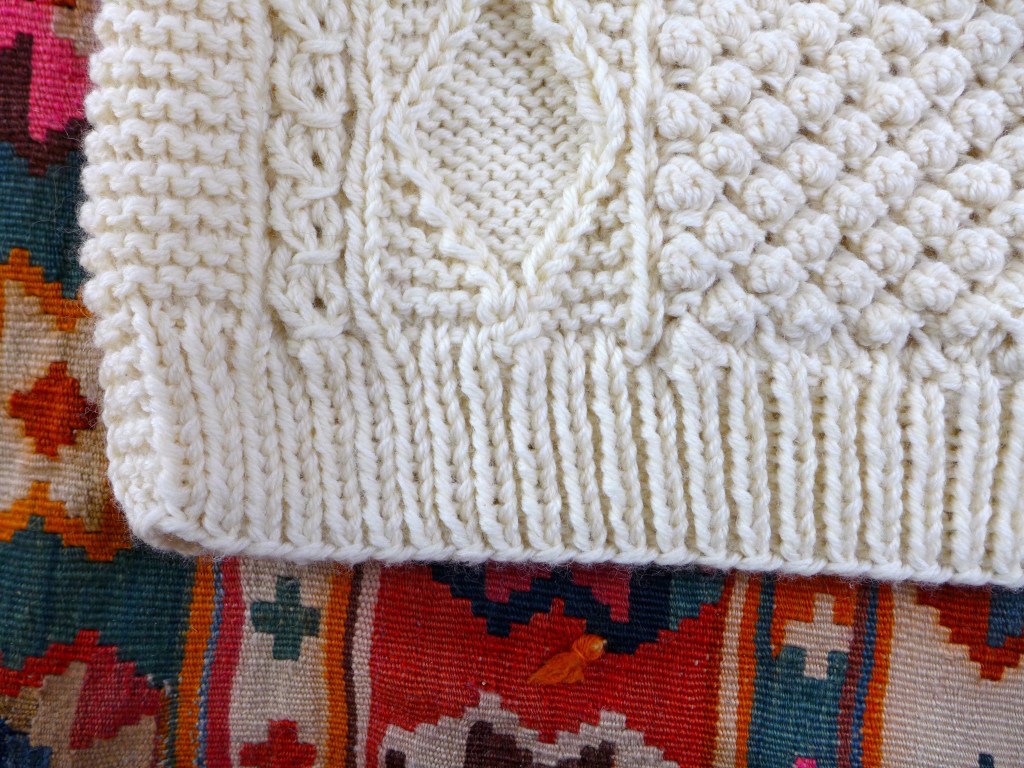

liveseasoned_w2015_sweaterproject3

 Bobbles!

The pattern below is for four bobbles, two worked in one row and two worked in a second row, with the bobbles alternating in a vertical pattern. The four bobbles are worked over a multiple of 10 stitches 4 rows. I like this bobble pattern because they lay flatter and don’t seem to eat up as much yarn as some of the more traditional bobbles.

  • Cast on 3 stitches.
  • Set-up row. Knit 1, k1fb into next two stitches, knit 1, k1fb into next two stitches, for a total of 10 stitches.
  • Row 1 : (k1,p1,k1,p1) into the first stitch, k4tog through the back of their loops, (k1,p1,k1,p1) into the next stitch, k4tog through the back of their loops
  • Row 2 : purl all stitches
  • Row 3 : k4tog through the back of their loops, (k1,p1,k1,p1) into the next stitch, k4tog through the back of their loops, (k1,p1,k1,p1) into the next stitch
  • Row 4 : purl all stitches
  • Repeat rows 1 – 4

*Go ahead, you can laugh at my use of the word adventure to describe this series, and if you do, know that I won’t be inviting you over for knit night ;-).


Homemade Lotion Bars

I feel like these homemade lotion bars should be rose scented to keep with this week’s unintentional theme.

liveseasoned_winter14_lotionbars-3 copy

Does your skin resemble dry, cracked, dusty earth? Mine does.  It’s the worst, especially in the winter.  Poor, poor me.  No, but really, my entire body has dandruff and I know you probably didn’t want to hear that, but I said it.  It is disgusting and it plagues me.  Dry skin is the monkey on my back.  You might think I’m being a little dramatic, but applying lotion six times a day (REALLY) is no joke!  This is my life. Welcome. Instead of spending a quarter (maybe I’m being a little dramatic here) of my annual income on lotion, I mixed up a double batch of this homemade version and called it a day well spent.  This easy lotion bar concoction only requires three ingredients! Yeah Kate, we know, your no-heat rosehip jam only has two. Congratulations.  No, congrats to YOU after you read through this lotion bar recipe and immediately order the supplies. I applaud you.  Happy moisturized skin to you my friend.

Continue reading

Valentine Archives

Hey there sweethearts! With Valentine’s Day right around the corner, we wanted to share/re-share some super simple projects for dressing up your space and celebrating the ones you love. And don’t forget to put on your favorite lovey-dovey playlist as you craft.

liveseasoned_w2015_valentinesgarland3

Instead of packing away the felt hearts I made as Christmas ornaments, I strung them on a piece of rustic twine to create a mini garland that greets guests right inside our door.

liveseasoned_w2015_valentinesgarland3

If you’re throwing a party, Sarah’s tassel and lace garland makes the perfect decoration and photo backdrop!

Continue reading

Christmas Candids: A few tips!

I just watched a video of people unwrapping puppies and I’ve never been more grateful for family photographers.  We all want to capture the cheer and joy during holidays and gatherings so here are a few tips for photographing this year’s festivities.  First off, it really doesn’t matter if you’re shooting with a phone, point and shoot or a DSLR, these tips will work for you. Second, have fun while photographing, try to capture candid moments and remember to put down your camera for a few hours and really enjoy the moment as it is unfolding.  Happy Holidays!

White Balance

  • Check it!  The camera’s default setting is Auto White Balance, but that may not be the best option for the scene at hand.  Change the white balance to Incandescent or Fluorescent to see which setting works best for your home and lights.  If that sounded like Chinese to you, check out this Photography 101 post.

liveseasoned_winter14_holidayphototips-1-2

Point of Focus

  • Pick one.  There is SO much going on at the holidays that you might see cookies, presents, lights and decorations all in one scene.  Decide what the point of focus is for your photo and zone in on that.  If it’s a little boy unwrapping a present, the photo is about his expression not the christmas tree behind him so frame the boy, not the entire living room.  Think about what you want to stand out about the photo and choose an angle that will highlight the subject not distract from it.

liveseasoned_winter14_holidayphototips-1-3

Shooting on Burst Mode

  • Anytime you’re shooting action like unwrapping presents, a New Year’s toast, someone blowing out candles, shoot on burst mode.  It might also be called continuous mode and depending on your camera and settings it will take anywhere from a couple to a dozen shots each second.  Shooting on burst mode is the perfect way to capture every expression especially in candid situations.

Out-of-focus Christmas Lights

  • Lots of folks are always asking me how to achieve a bokeh effect with Christmas lights – good news, it is super easy! Simply choose a low aperture a.k.a. fstop number and that will effectively blur whatever you are not focusing on, in this case it’s the lights.  An example?  If I’m photographing my nephew in front of our Christmas tree, I want the tree to be visible so I can set the scene, yet he is the main focus of the photograph so I would set my aperture to f2.8 and focus on his sweet little face.  The tree behind him would be out of focus and therefore the lights would attain the bokeh effect. In the photos above, all three photos are of the same scene, but the light circles grow bigger as they become more out of focus. I simply pointed my camera at a Christmas tree and turned my focusing ring just out of focus, a little out of focus and majorly out of focus.

Photographing Outdoor Lights and Decorations

  • There are a few things that are relatively difficult to photograph.  Outdoor Christmas lights are one of them.  You basically have a really bright object (the lights) against a really dark object (the house and sky), which makes a tricky situation to expose properly.    I feel like we have all been here before.  You see an amazingly gorgeous sunset and you think, ‘family photo opp!’ only to be completely disappointed by the results.  You either end up silhouetted against the sun or you use the flash and hate the unnatural outcome.  It’s the same type of deal, dark and light competing for a proper exposure.
  • Head outside during twilight when the sky is nice and blue – right after sunset, but before it gets dark.  You have a small window of time for these shots, only about twenty minutes.  Set up your camera and tripod.  Choose a low ISO number like 400.  Also choose a slow shutter speed somewhere around 1/25 of a second or slower.  Set your aperture according to your light meter and then experiment from there.  I usually set up the shot, ISO and shutter speed and then take a dozen shots adjusting my aperture by one stop (click) each time.  Then I’ll scroll through the shots, decide which I like the best and set the aperture accordingly.  This time I’ll play with the shutter speed a little bit by adjusting it a tiny bit faster or a tiny bit slower.  That way you get a good variety of exposures.

Good luck and let us know if you found any of these tips useful by posting your pics to IG and tagging us 🙂