Spring Beer Sampler


liveseasoned_spring2014_beer_glasses2_wmTop ‘o the mornin’ to ya! Happy St. Patricks Day.  Will you be sipping on a green beer today?  Katie and I agree that drinking beer with your friends is always in season.  Today we’re sharing our spring sampler picks and urging you to go grab yourself a sixer.

I’m more likely to order a beer than a mixed drink or a shot, but sometimes I’m at a loss for what to order.  I find myself sticking to the tried and true (Yuengling anyone?), which always taste great, but fail to surprise and excite my tastebuds like they did in the past.  If this sounds familiar, why not try sampling a six pack of new-to-you brews?  That’s what the Seasoned gang did this weekend and we were not disappointed.  We learned a lot about the various beers and our own tastes.  We also wrote down our views and opinions of each hoping to pinpoint our preferences for future bar and bottle shop visits.

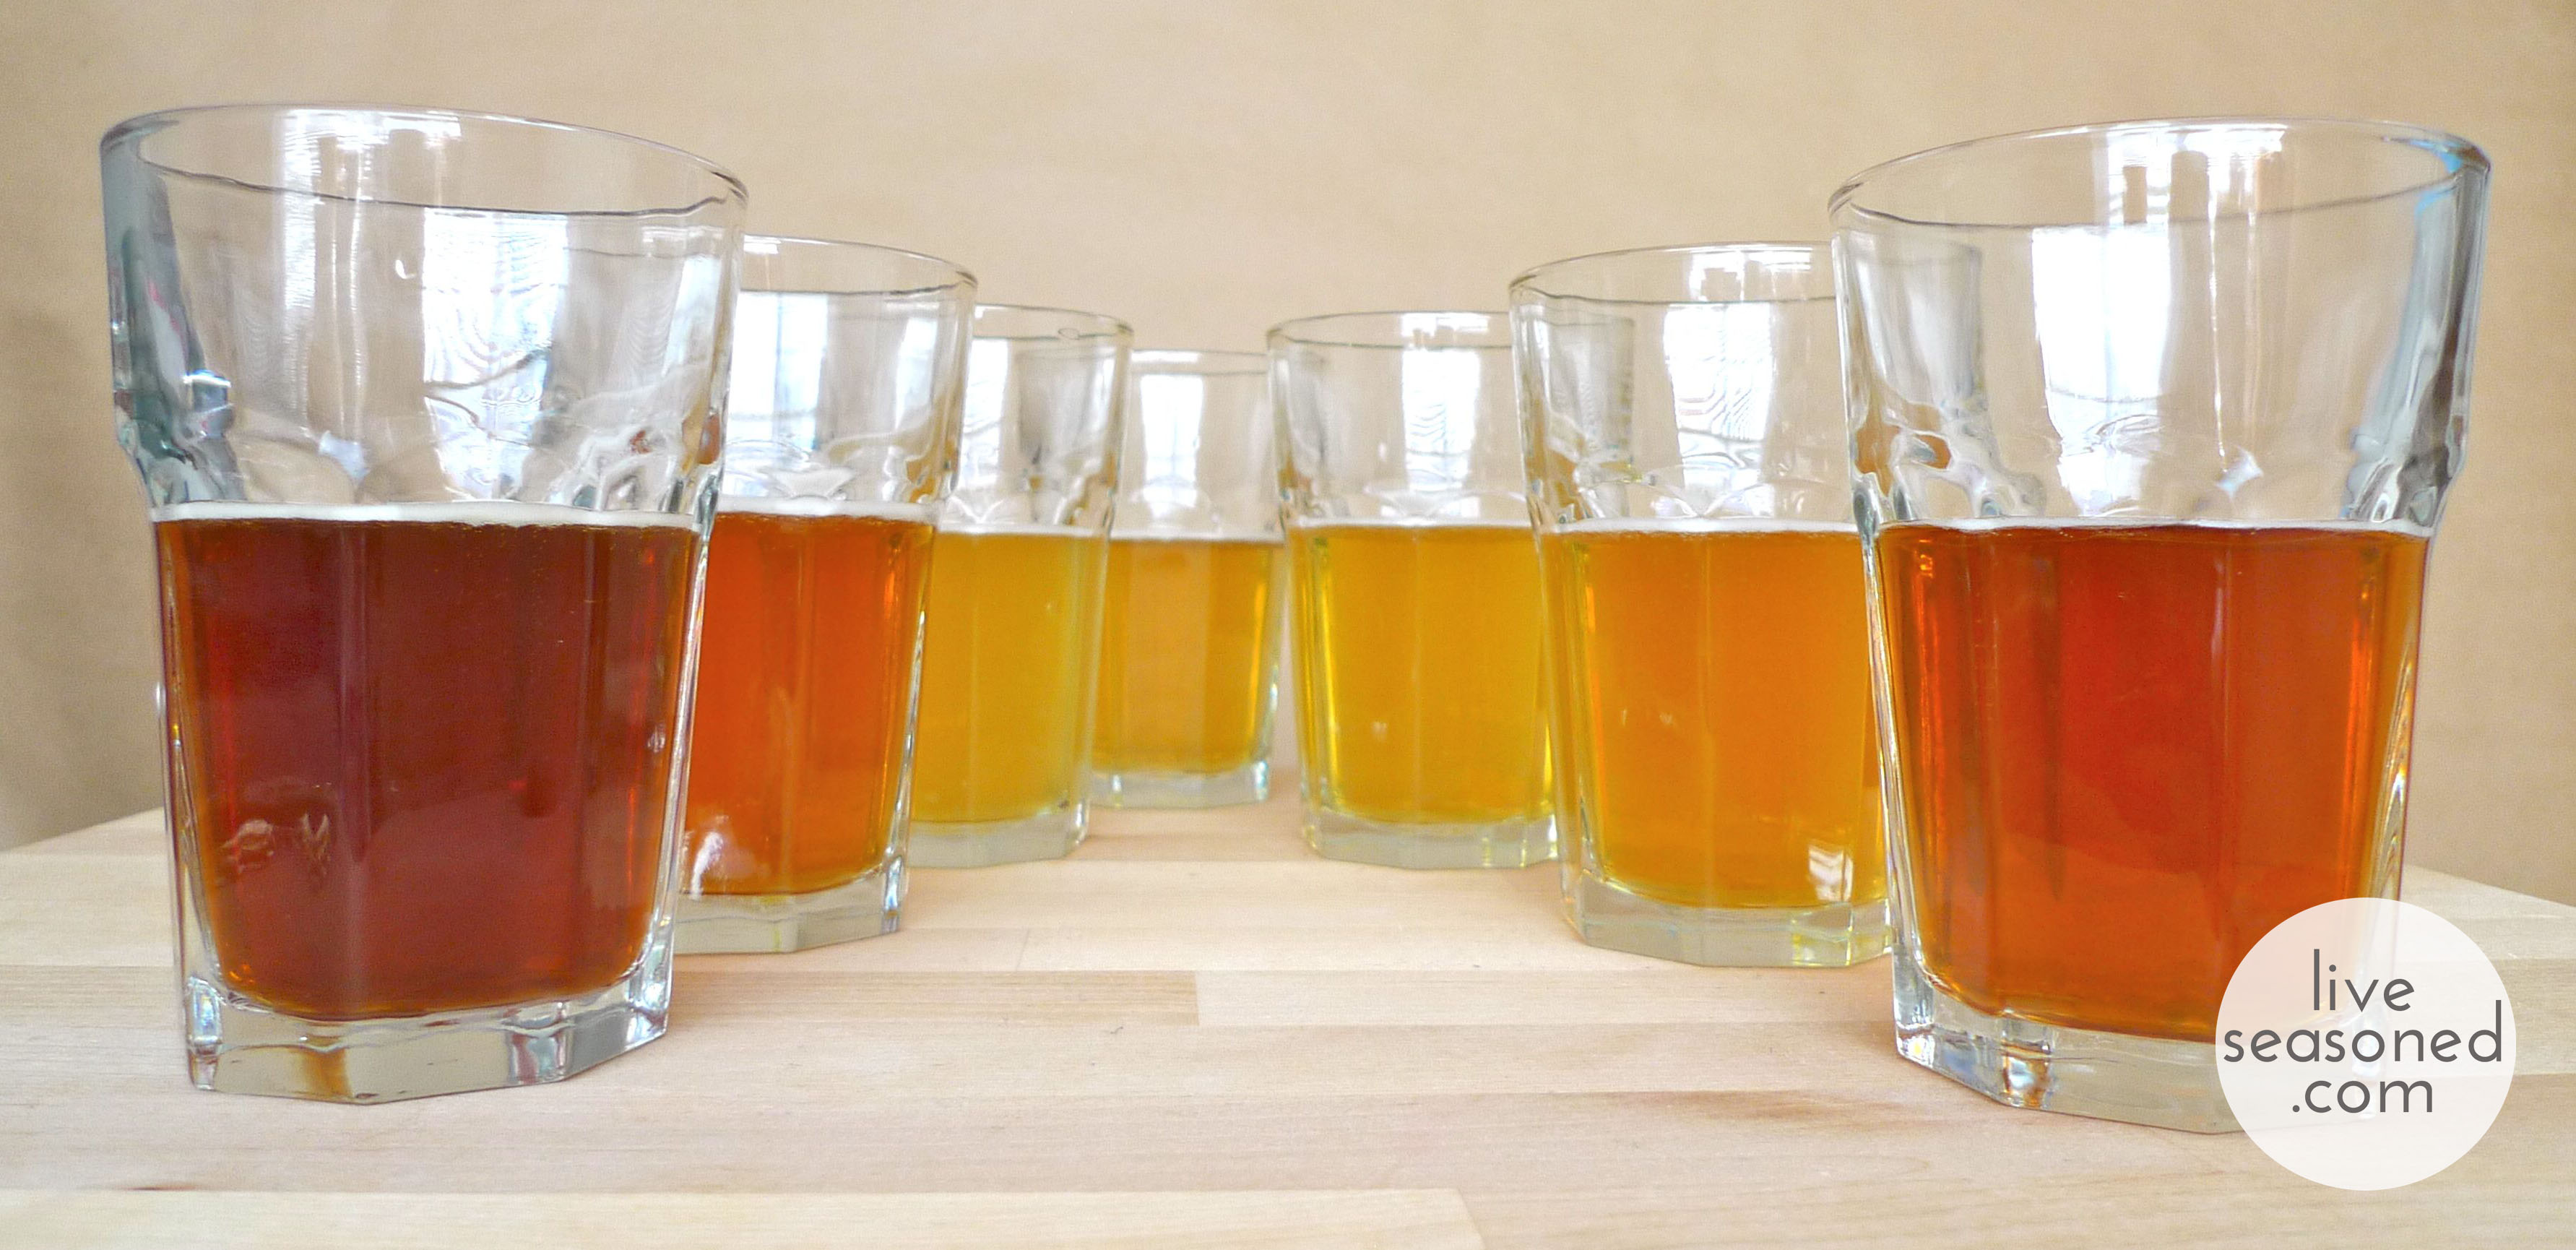
If you were following our Instagram feed, you probably noticed that there was a meeting of the Seasons last week when Katie and her gang were on their roadtrip. Minutes after they settled in, we paid a visit to the  Weaver Street Market, Carrboro’s co-op, to browse for beers.  Other than ordering a flight of beer in one of our favorite PA breweries, we have never sampled a variety of beers in one go at home. That said, we are amateurs when it comes to setting up a tasting, and we went with our guts when it came to making our selection. We scanned the shelves for both spring inspired and local beers and walked away with a great selection brewed in North Carolina, Delaware, Pennsylvania and Maine. Side note from Katie: In addition to the spring brews, I threw in the Sly Fox Christmas Ale as the rogue out-of-season beer because I’m in love with it and wanted to see what Sarah thought. 

liveseasoned_spring2014_beersampler-1

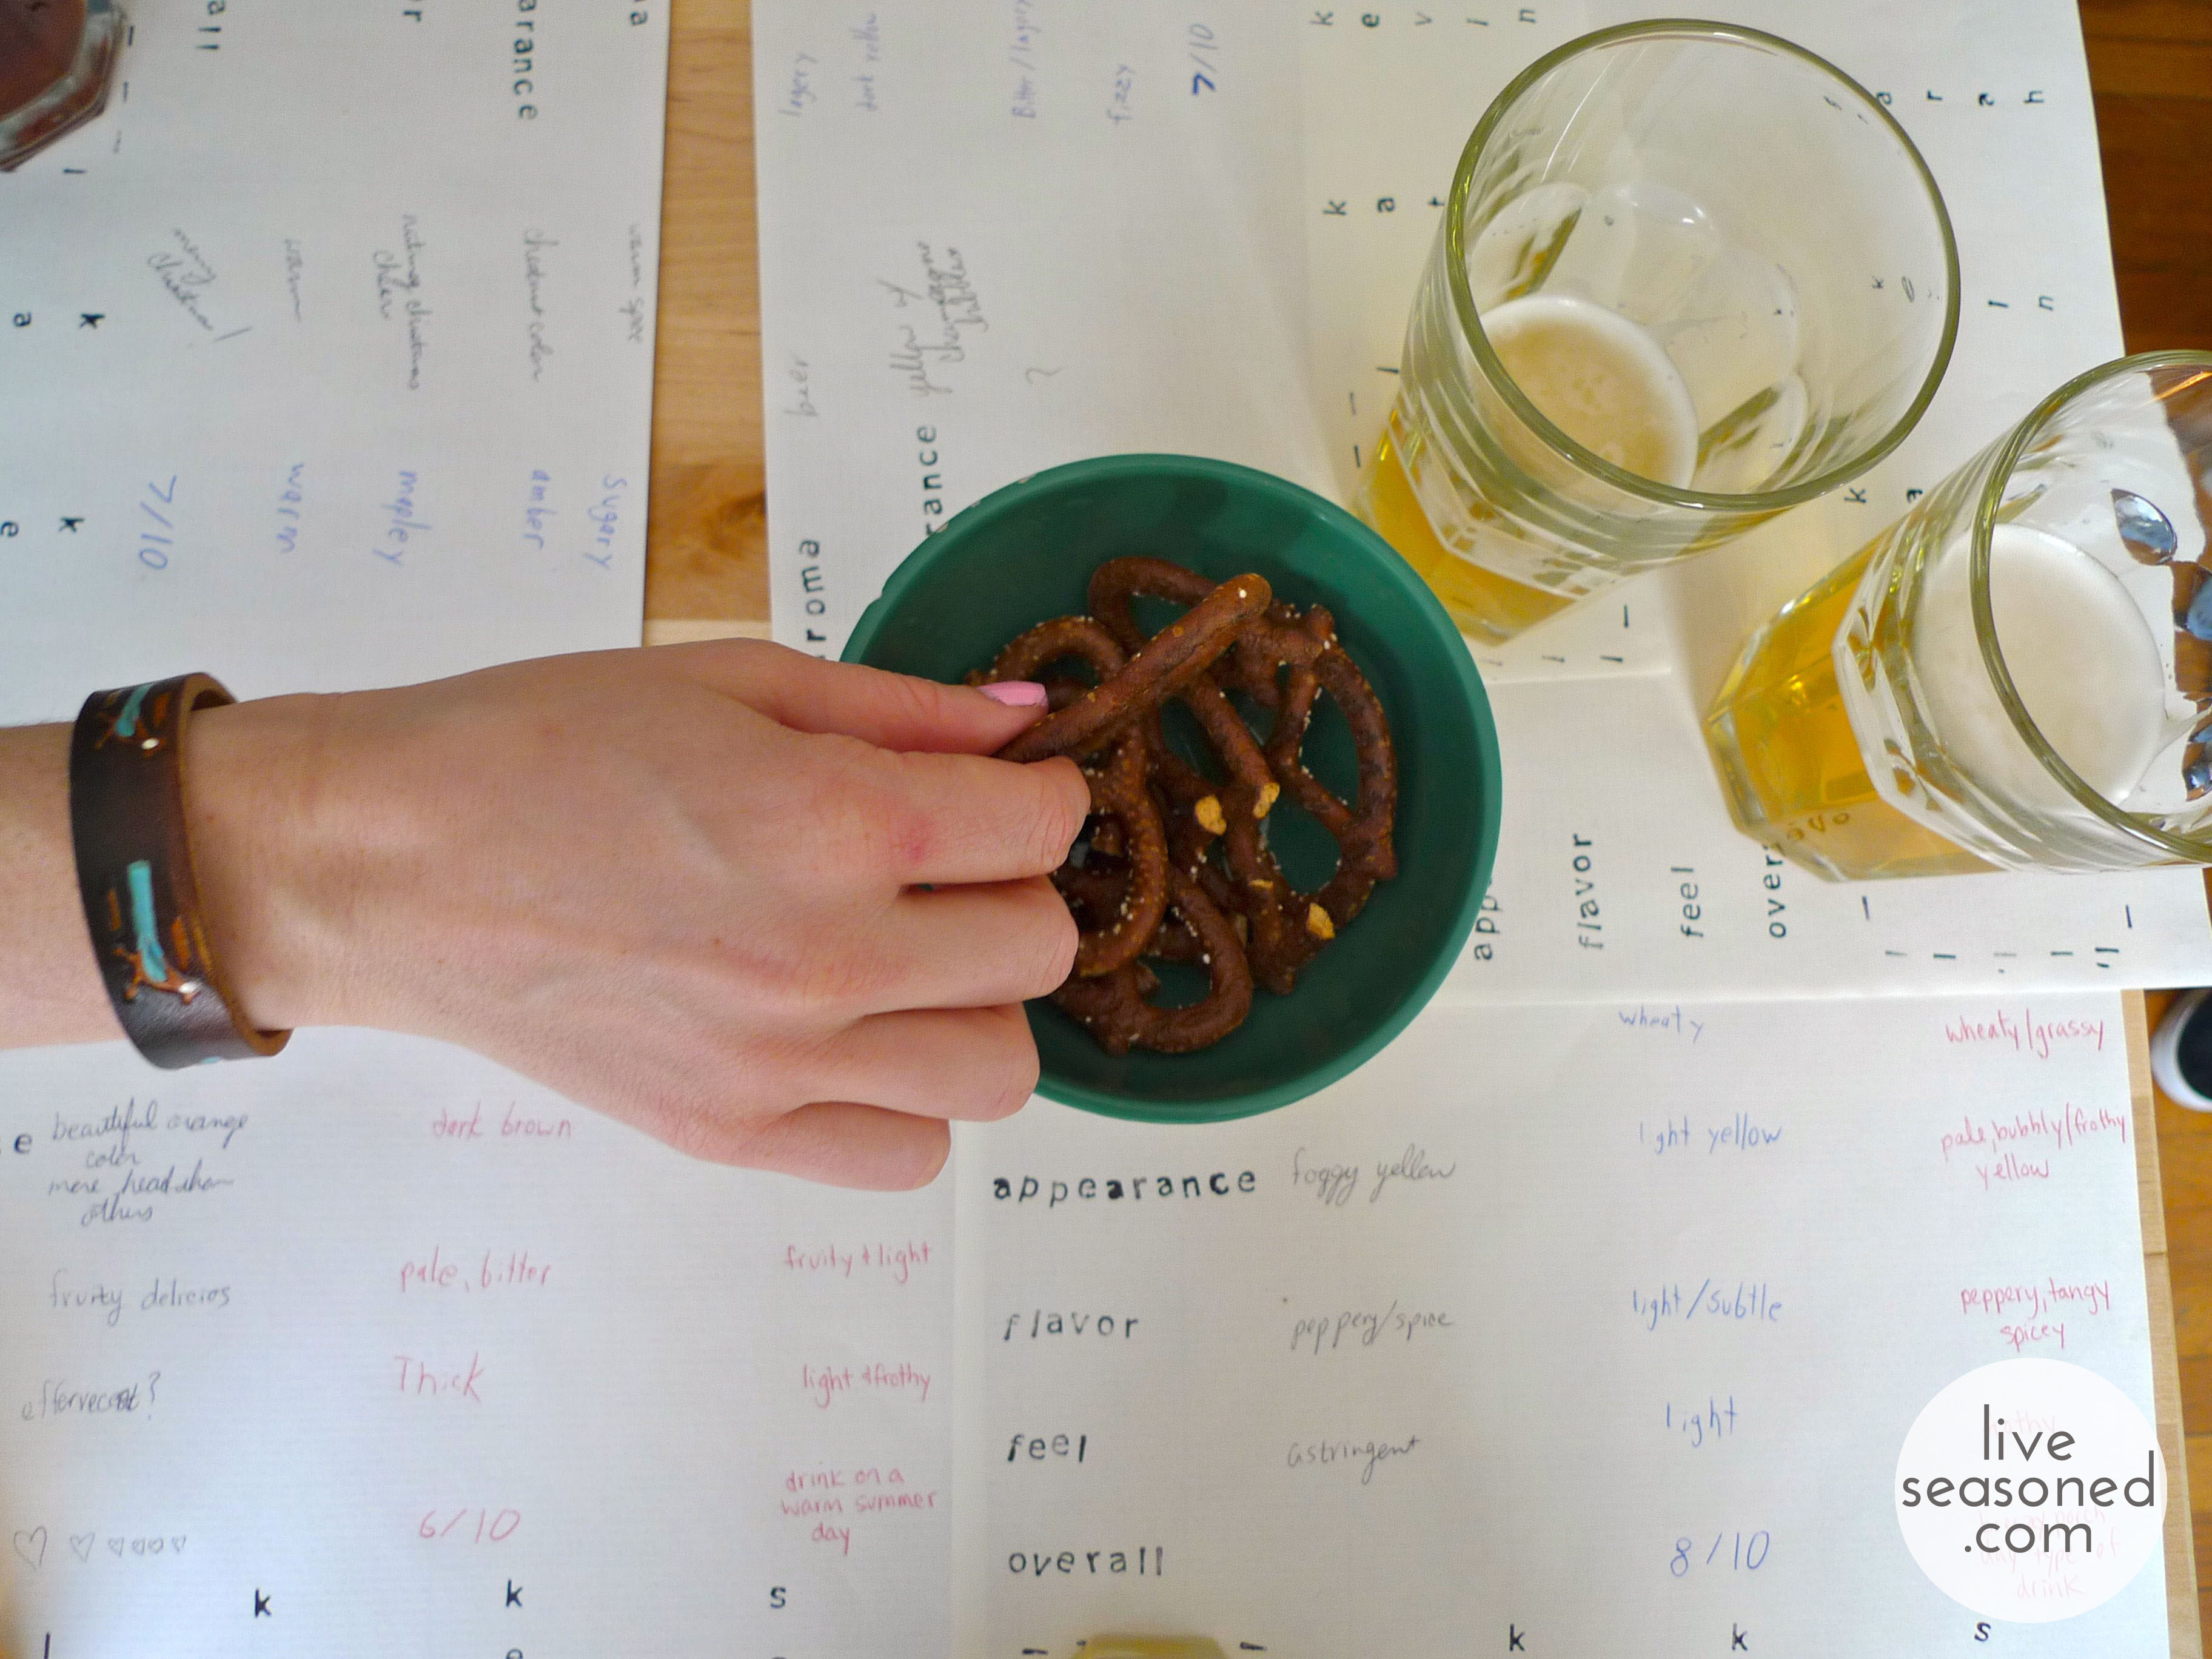
We set up a blind tasting to ensure we weren’t judging our brews by their labels.  If we were, Green Man and Sly Fox tied for the blue ribbon.  Being the Pennsylvania natives that we are, we made sure to include a bowl of pretzels to cleanse our pallet between beers. We also prepared score sheets so that we could keep track of our honest opinions of each beer.  We quickly realized we don’t posses the same vocabulary of experienced brew competition judges, but our simple notes were enough to categorize our tastes: Kate and Sarah on one end and Kevin on the other.

liveseasoned_spring2014_beersampler-1-2

Our Picks:

Carolina Blonde Cream Ale by Foothills Brewing -NC

Carolina Blonde was everything the bottle said it should be.  Clean, refreshing, rich, golden and unmistakably smooth.  We all agreed this smelled like beer.  That’s how articulate we are.  This beer was so smooth it was almost like drinking water.  It was good, but I wouldn’t say it was flavorful and on that same note it had really clean and refreshing qualities.  I commented, ‘replace your water with this,’ and I meant it.  It’s really easy to drink and it seems hydrating at the same time. Katie here: when I read Sarah’s water comment during the tasting, I laughed thinking she meant that it was equivalent to water (flavor-less, color-less, low in alcohol content, etc ), but after reading her explanation, I understood what she meant. This beer fell a bit flat for me, as Sarah said, it wasn’t as “flavorful” as the other more creative picks on the list, but it wasn’t necessarily brewed to have the fruity and hoppy notes that the others do, so perhaps this is an unfair comparison? 

Namaste by Dogfish Head Brewery -DE

Namaste is a white beer brewed with orange slices, lemongrass, coriander and peppercorns.  White beers and wheat beers are very similar, which is why Kevin loved this as much as the Weeping Willow Wit.  Namaste is a beautiful golden brew with a very fragrant aroma.  Kate thought it tasted like tea, Kevin like wheat and I like perfume.  I often taste what I smell so in this case the aroma was too overpowering for me, but for those of you that enjoy fruity, crisp, wheat beers, cheers to you!

Piercing Pils by Dogfish Head Brewery -DE

Piercing Pils is a Czech- style Pilsner brewed with pear juice, pear tea and Saaz hops.  Pilsners are hoppy, which translates to a spicy or floral aromatic flavor.  We all noticed a lemony-fresh scent along with hints of spring in this beautiful orangey golden beer.  Again Katie and I tasted the same peppery hops, while Kevin tasted the opposite: a lemony and light flavor, which was actually the pear ingredients coming through.  If you like a spicy and fragrant beer, this ones for you.

Rambler Spring Ale by Green Man Brewery -NC

Kate and I both fell in love with the beer immediately because of the label, cap, and brand, and it warmed our little tastebuds to know that it was actually one of our favorites in the blind taste test.  Kate and I both smelled orange blossom and Kevin and I also smelled lots of hops.  Rambler is a Pale Ale, which means there’s a balance of both malt and hops.  The Rambler features British malt and American hops with a floral undertone.  Kevin despises Pale Ales so it’s no wonder he didn’t dig this brew, but Kate and I on the other hand loved it.  Kate’s final assessment was ‘double love’ while mine was ‘drink this in the woods or around a campfire.’

Christmas Ale by Sly Fox -PA

We all agreed that this rich chestnut colored ale smelled exactly like Christmas.  Scents of clove, ginger, all spice, cinnamon and nutmeg translates into warm coziness for the nostrils.  Kate thought it tasted like nutmeg and Christmas cheer and while I had never tasted Christmas cheer, I thought it had a spicy, but mainly sweet, warm and maple syrup flavor.  We all agreed it made us feel warm and cozy inside, which is exactly what this ale intends.  If you missed Katie’s earlier note, we threw this one into the mix because she loved it to the moon and back and she had to pass it on and I’m oh so glad because it transported me right back to December. Katie here: I didn’t discover this Christmas Ale until after the season, but when I opened my first can of it, I was blown away by the spicy aroma, and I had one of those weird smell-induced memories that took me back to buying lebkucken in the Christmas markets in Germany. 

Weeping Willow Wit by Mother Earth Brewing Co. -NC

A Wit is a Belgium Wheat Ale that uses at least 25% of wheat malts.  The Weeping Willow Wit has a low hop bitterness paired with orange peels and coriander, which explains why Katie and I both thought it tasted peppery and spicy.  Kevin liked the light and subtle taste, which can be explained by his love of spice and distaste for bitterness (which this beer is not) making this one of his favorites.

Simco Spring Ale by Peak Organic Brewing -ME

This was another favorite of both Katie and I, while Kevin, the pale ale hater, thought it tasted bitter.  We all loved the look of this pretty orange brew and the flowery and sweet scent lulled us into a spring daydream.  Katie and I both described the flavor as fruity and light.  Katie even went so far as to describe the feel as effervescent, which is why we gave her the master judger award. Katie: a couple of days after the test, I’m still thinking about this beer! At the time I tasted it, I picked up on a distinct light and fruity taste, and scouting around online, I noticed that it was described as having “piney” and fruity notes, which is exactly right! There was a taste that I couldn’t describe when sampling, but it is definitely that hint of pine. Just as Sly Fox was so perfectly Christmas, this one is spring in a bottle. On a sadder note, maybe I was delirious from all of the road-trip driving, but throughout our taste test, I was sure that this one was called “Sycamore” Spring Ale, and I loved it all the more for having such a perfect name so I was bummed when I realized my mistake… and now I’m hoping that someone out there will brew up a batch of Sycamore Spring Ale for me. 

liveseasoned_spring2014_beer_pretzels2_wmAfter sipping our sampler pack and reviewing our comment cards we all really got a feel for what types of beer we prefer.  Katie and I steer towards pale ales while Kevin likes wheats and whites.  Usually I feel sleepy when I drink at home, but the blind taste test added a whole other element to drinking beer after beer.  We chatted about each selection, singled Kevin out for his opposite tastes and had a much livelier time than if we were drinking the usual Yuengling.

Katie (ugh, again, I know): I second Sarah’s comment that this was a lot of fun! To do this test, we bought a variety 6-pack from the grocer. And I wanted to butt-in to Sarah’s post just one more time to justify that purchase and encourage all of you to go out and do the same. It’s slightly more expensive than buying a 6-pack of a single beer, but obviously much less expensive than if we were to buy packs of each of the beers tested here. The beginning of the season is the perfect time to do a little test like this. I sampled the now notorious Christmas Sly Fox when I picked up a winter sampler in January, and immediately I wished I had tried it sooner so that I could have enjoyed it all winter. After this tasting, I’m excited for warm evenings on the deck or in the garden with the Simcoe and Rambler spring ales!

What about you, have you tried any of the beers on our list? If so, what did you think? How do you pick new beers to sample? By their label? Or is your choice more informed?

In Season: Pi Inspired Links

PiPineapplePie

Happy Pi Day from Live Seasoned!  Today we have math and pies on the brain, well mostly pies.  Here’s a few pi (and pie) inspired links for your Friday, there’s still time to make it a Pieday!

New to this whole Pi Day business? Well it’s time to get your act together! Learn a bit about Pi here.

People compete to memorize Pi, which is a challenge since its decimal digits never end and never develop a repeating pattern. If you want to do the same and impress your friends, get this mug. Looking at it every morning is sure to help.

I must admit, it’s rare that I bake a pie, but I recently spent two months on a mountain with an amazing pie baker!  He whipped them up like it was nothing and he also told me about this sweet pie blog that his friend created.  Eating his pies was inspirational, but I still haven’t gotten around to baking one yet. Shh, don’t tell.

What is 3.14 backwards? PIE!

I’m more likely to make a pot pie or shepard’s pie.

One of my favorite Christmas presents this year was a really pretty white ruffled pie dish.  Everyone should own one.  Here’s a few other pretty pieces.

And how cute are these Easy As Pie dishtowels?

One of the best pies I’ve ever had was raw.  I remember my roommates and I all shared it until it was finished, which took about five minutes.

This split decision pie pan is a great idea, especially to accommodate for different diets;  now gluten-freebies and vegans can eat pie with the rest of the gang.

If you succeed at baking and eating a pie today, please order this t-shirt.

Need some more pie inspiration?  Check out our pinterest board for more recipes and cute pie supplies.


*Image via the Nerdista

Potato Stamp Tutorial

If you’ve never transformed a vegetable into a stamp now’s your chance.  It’s a quick and disposable option for those days when you want to create something without too much preparation and effort.  Potatoes are cheap and it’s likely that you have a couple living in your kitchen right now.  Sliced in half, potatoes are a perfectly blank canvas just waiting to be customized.  Cheap, easy and customizable means a perfect craft for groups so test out this tutorial at summer camp, in the classroom or on a rainy day.  We love stamping so much here at Live Seasoned that this is just the first post in a Stamping Series.  From time to time we’ll be back to teach you how to make stamps from just about anything from Styrofoam takeout containers to pencil erasers.  For now grab your spuds and let’s get starchy.

Supplies:

  • Canvas or Cardstock
  • Potato
  • Pen
  • Pairing Knife
  • Paint
  • Exacto Knife (optional)
  • Paper (optional)
  • Stencil (optional)

Instructions:

  • Pick a potato, any potato.  Slice your potato in half and boom, we’re already on our way to making two stamps.
  • First cut the desired letters or shapes out of card stock to create a stencil.  If you’re a confident cutter, by all means skip the stencil step.
  • Stick a stencil on each half of the potato.  The moisture will adhere the paper to the potato; it’s quite convenient.
  • Carve around each stencil, basically tracing its form onto the potato.  I actually did this step with a pen.  I poked it in a little bit and then dragged it along the outside of each stencil.  (I had planned on doing it with the exacto knife, but the pen worked so well and I figured it’s more likely that you have a pen handy.)  If you aren’t using a stencil then carve your chosen shape into the potato using a pen, exacto knife or pairing knife.
  • After your shape is carved into the top of the potato, take your pairing knife and slice into the potato about a quarter to a half-inch.  Drag it all the way around the circumference of the potato making sure not to cut all the way through, which would cut off the design you just created.  Then cut down into the potato on each edge of the design removing any excess potato.
  • You should be left with a raised design, in my case an X and an O.  Clean up the edges of your design with an exacto knife, pairing knife or even your fingernail.
  • Finally make a small mark on the skin of the potato to signify where the top and sides of your design is.  This will help if you want to line up your stamp or space it evenly on your project.
  • Next dip your stamp in paint or brush some directly onto the potato and stamp your heart out.  I found that it worked best to dip my spud in a thin layer of paint rather than a puddle.  Potatoes have a high water content, that mixed with paint can make them slip around on your paper or canvas.  I used an old tin can lid as my paint palette, which worked well as far as pushing around the paint and ensuring only a thin layer was being applied.

Each stamping will look a little different and that’s really the beauty of the potato stamp.  It’s not rigid and formal; it’s unique and playful.  I played around with both repetition and white space.  I could have decorated a dozen canvases, but I only had three.  As you can see, some of the stamps are more opaque than others.  I decided to use a paintbrush on some and others I left alone.  It’s all a matter of personal preference.

I had a great time playing around with these potato stamps and it made me excited to babysit or teach again so that I could pass on the fun.  I’m always looking for cheap and easy household crafts that I can create in a pinch to entertain bored kiddos.  Potato stamps are the perfect solution for creating decorations, invites, or gift wrapping for those random occasions or specific party themes.  I know I’d rather run to my kitchen rather than a craft store whenever I need a simple stamp.  I hope you’ll try this out next time you’re entertaining some art-lovin’ little ones or maybe you’ll throw your first ever ‘Buds and Spuds’ art party.  Be sure to instagram your results and tag @liveseasoned, we’ll love you forever.

*This post contains affiliate links

Smoothie Round Up

liveseasoned_spring2014_smoothies-feature

I’m a smoothie fanatic.  Growing up I’d make milkshakes almost every night of the week, but as I got older my tastes changed and I’ve moved on from ice cream and milk to fruit and juice.  Lucky for me there’s about a million more options in the smoothie department.  A big smoothie is a great substitute from breakfast or lunch.  I especially like to drink them at the start of a big road trip that way I’m not tempted to stop for fast food or right before work as I’m running out the door.

You don’t need to follow a strict recipe for smoothies so feel free to sub in or out any of the ingredients listed.  Today we’ll make three smoothies from seven ingredients (oats are optional).  As long as you have frozen fruit and juice, you’re good to go.  I also like to add greek yogurt and any little extras I have lying around like oatmeal, chia seeds, maca powder or hemp hearts.  Plug in your blender, grab a jar and a straw and let’s blend.

liveseasoned_spring2014_smoothies-1-2

Green Goddess

  • ¼ c yogurt
  • ½ c orange juice
  • 1 frozen banana
  • 2 big handfuls of spinach
  • 6 ice cubes

I drank a Green Goddess every day for a month last summer and I felt light and airy like a little fairy (hehe).  It’s cheap, easy and healthy.   If I’m away from home and there’s a blender where I’m staying I always pick up these four ingredients.  It’s a great way to save money on the road while staying healthy and energized. If you think this sounds like a weird combination, you’re in for a tasty surprise.  You can barely taste the spinach; it’s actually a tangy and sweet smoothie.

Be sure to clean your spinach well since it’s part of the dirty dozen (one of the most pesticide-laden fruits and vegetables) or buy pre-washed or organic spinach. I named it the Green Goddess because among the many benefits of spinach, it’s has a high vitamin A and C content.  Vitamin A is key for sebum production to keep hair moisturized; it’s also necessary for the growth of all bodily tissues, including skin and hair.  Vitamin C is imperative for the building and maintenance of collagen which provides structure to skin and hair, therefore this smoothie will keep you looking like a goddess.

liveseasoned_spring2014_smoothies-1

Berry Blend

  • ¼ c yogurt
  • ½ c cherry juice
  • ¼ c milk or water
  • ½ c frozen mangoes
  • 5 big strawberries

Strawberries and cherry juice blend together to make the perfect mix of sweet and tart in this smoothie.  I used 100% Cherry Juice from Trader Joe’s.  It’s deliciously strong, which is why I also added some milk, but feel free to sub in water (or coconut water), a non-dairy milk or another juice if you’re vegan.  If you go the water route, don’t worry the taste won’t suffer.  Cherry juice is a good source of antioxidants, it helps regulate blood sugar, and is a proven aid in exercise recovery.  It’s also a great source of melatonin, which regulates your body’s internal clock.  Strawberries also pack a punch.  They’re heart healthy, full of vitamins and good for your teeth.  Strawberries are a great source of polyphenols, a compound that inhibits the breakdown of starches in mouth, while also fighting the bacteria that contributes to gum disease and tooth decay. Pretty sweet, right?

liveseasoned_spring2014_smoothies-2-2

Sunrise Smoothie

  • ¼ c yogurt
  • 1 c orange juice
  • ½ c frozen mangoes
  • 1 frozen banana
  • big spoonful oatmeal (optional)

The Sunrise Smoothie is a mild fruity blend to start your day off on the right foot.  It will wake you up, help you get energized and give you a whole host of benefits without you even knowing it.  Orange juice is a great source of Vitamin C, which aids in collagen production and helps control free radicals that cause early aging.  OJ also lowers bad cholesterol, reduces inflammation and balances blood pressure.  Bananas are the most widely consumed fruit and for good reason.  There are too many benefits to mention here, but for starters, bananas help one overcome depression, reduce PMS symptoms and protect against muscle cramps.  Here’s an interesting study conducted by Oklahoma State University concerning new health benefits of mangoes, which include aiding in blood sugar regulation and reducing body fat.  Top it off with a scoop of oatmeal to add texture, fiber and protein and sip away.

I hope you enjoyed these simple smoothie recipes.  Smoothies are a cheap, easy and quick meal substitute if you’re constantly rushing around or just don’t have the energy to cook something up.  Stay healthy friends!

Energy flows where intention goes: Create Daily.

Whether you decide to focus your energy on your profession, home, health or anything in between, it’s important to create a little bit of something each day.  It’s nice to feel a sense of accomplishment at the end of the day instead of worry.  Don’t go to bed thinking I should have, why didn’t I or what if?  Lay your head down knowing that however your day played out, you created a little something for yourself.

I tend to be hard on myself when it comes to making and creating.  I have so many ideas floating around in my brain that I get down on myself when I don’t put them into motion.  Sometimes I intend to finish a huge project, but by the end of the day I’ve only ended up collecting the materials to begin, but that’s ok.  Creation takes time.  Being inspired to do something is a process, but it will feel better if you take a tiny step towards your goal, project or creation every day.

I’m sure you’ve heard the quote by Lao Tzu, “a journey of a thousand miles begins with a single step.”  Think back to your last big project at work, in the kitchen or at your crafting table.  Better yet, think about awful papers you had to write in school.  How much energy was wasted resisting?  Then you put pencil to paper and the first sentence emerged and you realized you can get through this paper and who knows you might even go on to live a happy and fulfilling life.  The crazy thing is, I find myself resisting projects that I know I’m going to enjoy creating.  It must be biology trying to protect me from the unknown-I can’t fathom another reason why time after time I tip toe into projects.  Once I begin, I take off at lightening speed and enjoy every second.  Whether it comes easy or there’s problem solving to be done-it’s a nice creative challenge.  So here’s me encouraging you to take off, just do it, create daily!

It could be something simple like a daily doodle of encouragement, a step or two of a larger project or a workout.  Maybe you want to cook dinner five nights a week or edit and organize your entire photo library.  Maybe you’ve been pining awesome DIYs or filling up your basket of clothes to be mended.  Whatever projects you’ve been putting off or shuffling around, here’s your cue. Go, make, create!  Do a little something every day and I promise you, you’ll feel a whole lot better by the time the end of the week rolls around.

Remember: creation doesn’t have to be material.  Maybe you created space to think by meditating for five minutes or muscles by pumping out ten pushups. Usually my creations are meals or even cups of tea and to do lists.  As long as you set aside a moment for yourself in which you can relax and feel inspired you’re beginning to create. Now go! Think! Make! Create!

In Season: Gettin’ Crafty With It

liveseasoned_spring2014_craftlinks_knittinggals

This week I worked two smaller gigs that paid in cash and after each one I stopped off at Michaels, A.C. Moore and Lowes on the way home.  I realized I have a tendency to immediately spend my cash on craft supplies even though I already have a whole room full of fabrics, papers, ribbons and yarns.  Are you the same way?  What are your favorite craft supply sources and items?  We’ve rounded up a few fun ones here, but we’re always looking for those mystical bead shops or that warehouse full of fabrics so let us in on your secret supply stores too.

In a few weeks we’ll be sharing some map-tastic crafts so now would be a good time to stock up on these.

These safety pins make awesome removable stitch markers for your knitting projects, and with 300 in a box, you have plenty to lose, share, or stash!

Our mom left Katie with an extra (EXTRA) large crochet hook. What to do with it? Maybe this cowl? Or a crocheted rug?

And then there’s this yarn. wow.

Need a place to store your supplies? Katie uses a library card catalog she picked up on Ebay.

We also love metal tackle boxes for storage. One for jewelry supplies, another for the tools and bobbins we use when at the sewing machine.

Shop Goodwill is a great site for so many reasons.  Sarah is currently perusing their listings for a good sewing machine.

We don’t own fringe scissors, at least not yet! But don’t they look equally scary and exciting at the same time?

When it comes to making wearable gifts for others, the hardest part is getting the sizes right. Size charts like this one for hats are my go-to reference.

Of course, crafting doesn’t have to require buying the supplies, sometimes you have everything you need at home. Take these wine cork stamps as an example. (We all have wine waiting for an excuse to be opened, right?)

Have a great weekend everyone and hopefully it involves a little pro-craft-tination.

Ps. you can find us here now!

*Image via Library of Congress

Become a Woods Warrior

Want more yoga and exercise? Become a woods warrior, try this lower body workout, then end the day with bedtime stretches that relieve lower back pain. Check out my 200hour yoga teacher training experience and read about the school I attended here.

liveseasoned woods warrior

Become a woods warrior.  Nope, not the kind that wields a sword, instead the kind that smiles peacefully and stretches deeply.  Warrior pose is also known as Virabhadrasana (vira=hero, bhadra=gentle, asana=pose).  You can be a warrior anywhere, but I believe the woods to be the calmest and most inspiring space for these stretches.  There’s nothing like holding warrior one while you gaze up at your fingertips and see the tops of tall trees swaying in the wind.  You have the overwhelming sense of feeling grounded yet flexible like those limbs.  Then comes warrior two where you can pause and gaze miles past your fingertips.  The forest gives you ample spaces for exalted (reverse) warrior so you can stretch and lengthen until you’re as limber as the trees that surround you.  I love looking down at my environment in warrior three.  It gives me time to take in the dry leaves and tiny bugs as I breathe, balance, lengthen and stretch with all I’ve got.

live seasoned woods warrior yoga poses-9

After recently completing a month-long yoga challenge, I was a little bored with the warrior poses.  I was eager to move on to harder, more intriguing postures, but I realized that isn’t the yogi way.  It’s important to be present with each pose, no matter how many times you’ve practiced.  The more you appreciate the present, the more space you create for improvement and appreciation.  Of course, the same is true with life.  The more we focus on the task at hand, the more we come to contribute, improve, appreciate and love what we’re doing.  So even if you’ve practiced warrior one, two, and three a thousand times, try them all again and appreciate their presence in your life and your ability to stretch and strengthen your body.

A few tips:

  • Wear stretchy pants or shorts so you can practice your fullest expression of each pose.
  • Pick a relatively flat and non-slip surface.
  • Move into each pose slowly and with intention.  Think about each part of your body in order to achieve the proper alignment.
  • Breathe deeply and evenly through your nose.  If the pose seems tough, focus on your breath.
  • Try each pose for a couple breaths and then go back and hold them longer if you’d like.
  • My form isn’t perfect so don’t just peep at the pics – read through each warrior before practicing.


live seasoned woods warrior yoga poses-7live seasoned woods warrior yoga poses-2live seasoned woods warrior yoga poses-1

Warrior One

  • Stand up straight with your feet together, arms down by your sides, and palms facing forward.  Inhale and as you exhale, step your right foot forward about 4 feet.  Reach your arms upwards (perpendicular to the floor) as you rotate your palms to face each other and actively reach through your fingertips towards the sky.  Breathe as you roll your shoulders down and back into their sockets.
  • As you inhale, make sure your heels are aligned and turn your back foot (left) out 45-65 degrees to the left (anywhere from 9 o’clock to 11 o’clock). Exhale and rotate your hips and torso to face forward while grounding into your back leg.  You’ll probably have to pull your left hip forward and your right hip back.  Try to square your pelvis as much as possible, this is difficult (especially if you have tight hips like myself) and won’t happen overnight. I like to bring my arms down for a moment, touch both my hips and direct them towards the front of my invisible mat.
  • Keep your back foot firmly planted and as you exhale, bend your right knee over the right angle so the shin is perpendicular to the floor and your thigh is as close to parallel as possible.  You may have to scoot your front foot forward a little bit if your knee is tracking over the front of your ankle (you never want that to happen). Your back leg should be straight and your heel should be touching the ground.
  • Anchor yourself firmly with both legs, even though your front leg is probably burning a little more, your weight should feel equally grounded.  Inhale as you reach towards the sky, look up at your fingertips and those beautiful trees and reach some more.  There can be a slight bend in your back.  You can also bring your palms together overhead and spread your fingers if you’d like.
  • Relax into warrior one with strength, breathing deeply for thirty seconds to a minute.  To release, straighten the front leg while bringing the back leg forward to meet at the front of your invisible mat.

live seasoned woods warrior yoga poses-6live seasoned woods warrior yoga poses-8live seasoned woods warrior yoga poses-3

Warrior Two

  • Starting from warrior one (with your right foot forward), rotate your left arm back and your front arm forward so they create a straight line (parallel to the ground).  Keep a tall spine and feel strength radiating from your core.  At the same time rotate your hips and your back toes outward.  Your shoulders should be stacked directly over your hips and your left toes should be pointed towards the left side of your invisible mat (perpendicular to your right toes) .  The heel of your front foot should line up with the arch of your back foot.
  • Sink lower into your lunge and exhale while relaxing your shoulders.  Just like in warrior one, the weight should be distributed evenly in your legs, which means the outer edge of your back leg is pressing firmly into the ground.
  • Even though you’re actively reaching forward and backwards with your arms, they should be slightly relaxed not rigid.  I like to imagine a string tied to each middle finger, knowing I could sway my abdomen forward and backward if someone came along and pulled either string.
  • When you’re properly aligned, look out over the edges of your front fingertips.  Keep your gaze soft and your face relaxed.  Hold the pose for thirty seconds to a minute all the while breathing deeply. To release, rotate the arms upwards and the back toe and hips forward to return to warrior one and then straighten the front leg while bringing the back leg forward to meet at the front of your invisible mat.

live seasoned woods warrior yoga poses-10live seasoned woods warrior yoga poses-5live seasoned woods warrior yoga poses-4

Exalted or Reverse Warrior

  • Starting in warrior two, simply rotate the front palm towards the sky and slide the back palm gentle down your back thigh.  Inhale the front arm towards the sky, reaching and lengthening the front side of your body while your back hand extends lower on your thigh and eventually calf.  You don’t want to put any weight on your back hand, instead use your abdominal muscles and right hand to lengthen and raise your heart towards the sky.  Gently gaze up at your fingertips while keeping your neck relaxed.
  • Deepen the lunge in your front leg and breathe deeply for up to thirty seconds.  To exit, return to warrior two, warrior one and then straighten the front leg while bringing the back leg forward to meet at the front of your invisible mat.
  • *If you’d like to go into a half bind in reverse warrior, bring your lower hand around your back and place your fingertips in your front hip crease.  Make sure you keep a deep lunge and your upper body uplifted.

live seasoned woods warrior yoga poses-11live seasoned woods warrior yoga poses-12

Warrior Three

  • Starting from warrior one, simply (ok nothing is simple about this pose) tilt your upper body forward about 45 degrees and simultaneously straighten your front leg while you gently push forward and lift your back leg.  The goal is to look like the letter T.  Your hips should be squared towards the ground.  Stretch your arms forward so they’re parallel to the ground while you flex your back foot and push backward.  I like to imagine a wall directly behind me that I’m pushing against with my heal.  You don’t want your shoulders to sink below your hips so engage your core muscles and lengthen your arms while you gaze at the ground.  Hold this for up to thirty seconds, which is a major challenge, and gently release back into warrior one. To release, straighten the front leg while bringing the back leg forward to meet at the front of your invisible mat.


Now you’re well versed with warrior and equipped to take your calming strength out into the woods.  I hope you enjoyed a magnified look at these important postures.  I’m sure you’ll find yourself in one, if not all four, of these poses during any vinyasa class.  And remember that everyone’s body looks and works differently even though we’re all made up of the same parts, which means everyone’s warriors will differ slightly.  Embrace yours, whatever it may look like today and leave it in the woods when you’re finished.  It may look different tomorrow, embrace that too!

Sweet (Heart) Potato Skillet

liveseasoned_sweetpotatoskillet8 copy

If you’re looking to shake up your breakfast menu, try this sweet potato skillet.  It’s a quick and hardy dish with the perfect amount of spice.  The eggs are a great source of protein and the sweet potatoes add lots of fiber and potassium to the dish.  What’s my favorite aspect of this recipe?  The lack of dirty dishes.  Since you cook and eat out of the  skillet, clean up is easy peasy.

liveseasoned_sweetpotatoskillet3

Ingredients:

  • Splash of olive oil (or coconut oil)
  • 1 medium sweet potato
  • 1 clove of garlic
  • ½ an onion
  • 1 small sweet pepper
  • few sprigs of cilantro
  • 2 eggs
  • ½ teaspoon cumin
  • ½ teaspoon cayenne pepper
  • shake of red pepper flakes
  • salt and pepper to taste

Equipment:

  • Finely chop half an onion, the pepper and a clove of garlic.  Over medium-low heat, add a splash of olive oil to a small skillet.  Add the chopped onion, pepper and garlic. Sprinkle a pinch of salt over the onion mixture.
  • Wash, peel and julienne (or grate)  the sweet potato while the onion mixture is sautéing.
  • Stir in the grated sweet potato and turn up the heat to medium.
  • Finely chop the cilantro and add it to the sweet potato mixture along with the cumin, cayenne and red pepper flakes.
  • Stir every so often until the sweet potato begins to soften.  About seven to ten minutes.
  • Place a rack at the top of the oven and turn on the broiler.
  • Make a heart shape in the middle of your skillet and crack two eggs into it.  Sprinkle a little salt and pepper over the raw eggs.
  • Place your skillet in the oven, under the broiler, to lightly cook the eggs.  Anywhere from 2-5 minutes depending on your preference.  I broiled my skillet for only two minutes because I like my eggs runny. (Katie here ~ what? you like your eggs runny? I’m not sure if we can be sisters anymore!)

liveseasoned_sweetpotatoskillet4

If you’re serving it with toast you can put the slices under the broiler too.  I ate my skillet with an expensive ($8!), but delicious gluten-free loaf from the Saturday Farmers’ Market.  I’m not allergic to gluten, but the loaves at Imagine That Gluten Free looked so delicious that I had to give them a try.  It was a cold and windy (read absolutely freezing) Saturday and I was wandering around near closing time so the vendor even gave me a baguette ($6) for free!  That combination of friendliness and deliciousness will keep me coming back for more.  I wish I had a photo of the baguette.  It seriously looked like a piece of art.  My guy and I scarfed it down that day.  Stay tuned via Instagram and I’ll snap a picture of the beautiful baguettes this Saturday.

I hope you enjoyed this simple yet filling recipe.  The heart makes me smile every time I serve this up.  Do you ever play with your food?  Morph your pancakes into any fun shapes lately? If so, snap a picture, share it on instagram #foodart and tag us!  I’m off to make dinosaur pancakes and heart-shaped donuts!


*I highly recommend buying a julienne peeler.  It basically transforms any veggie into a noodle.  It’s my new favorite toy.

Lower Body Woods Workout

Want more yoga and exercise? Become a woods warrior, try this lower body workout, then end the day with bedtime stretches that relieve lower back pain. Check out my 200hour yoga teacher training experience and read about the school I attended here.

live seasoned lower body woods workout-1 copy            
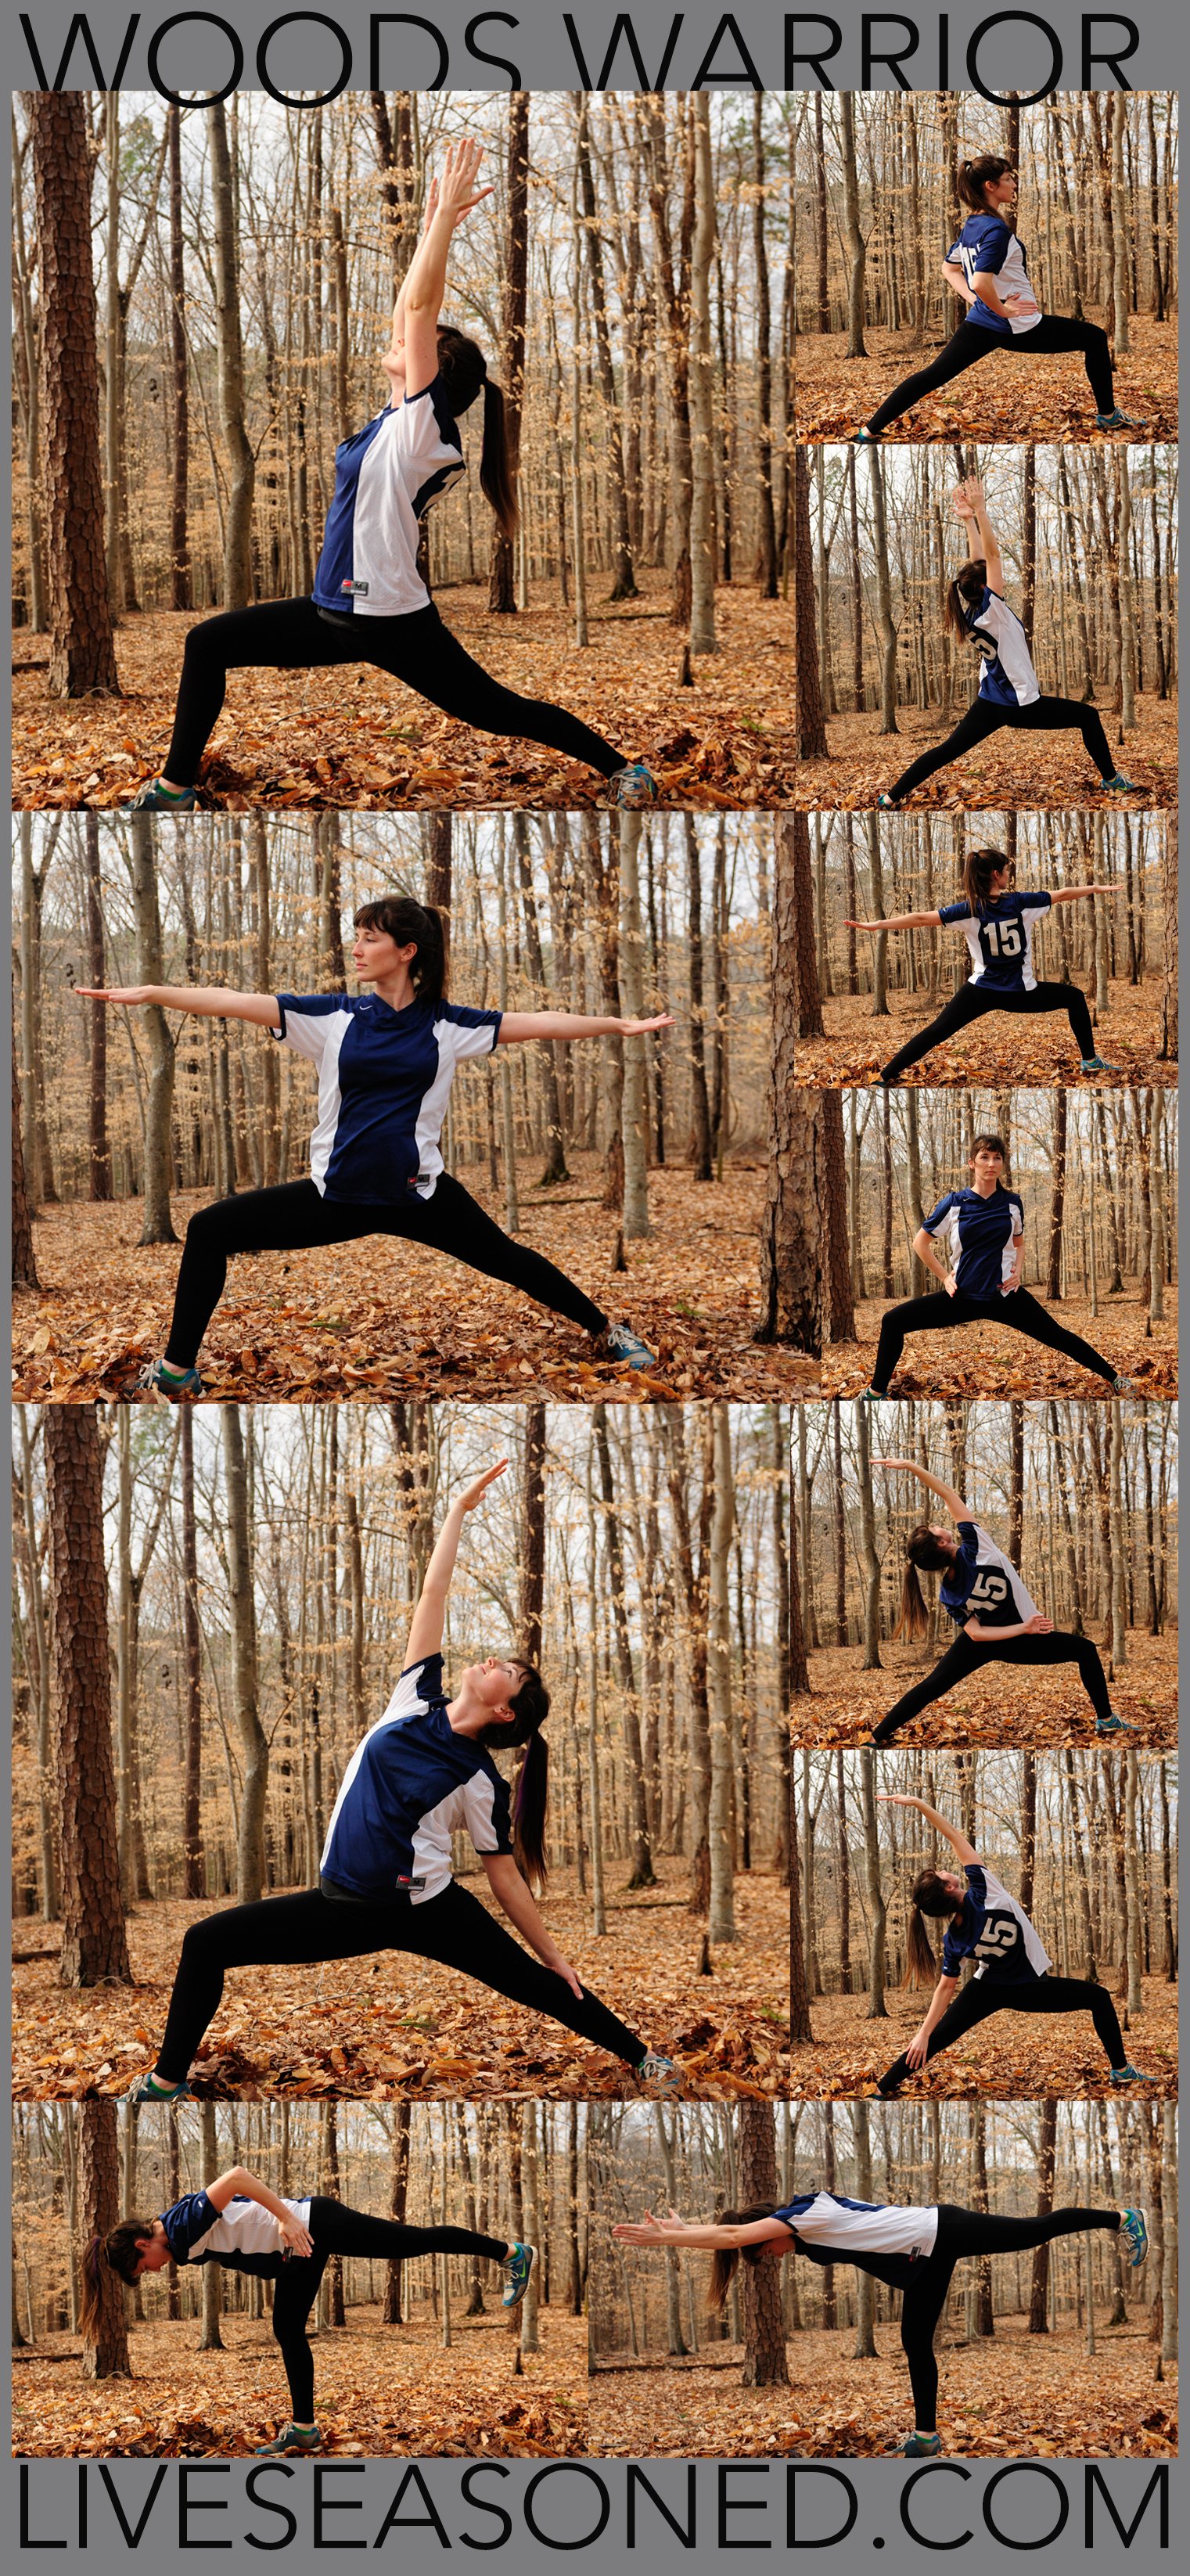
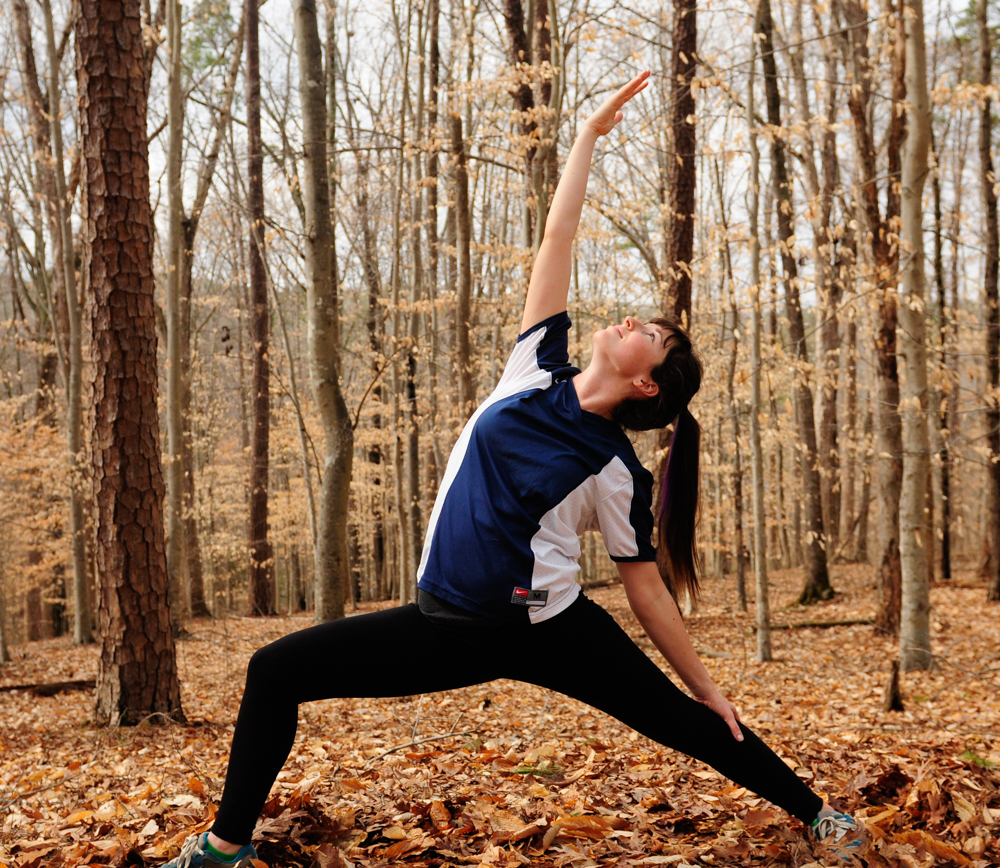
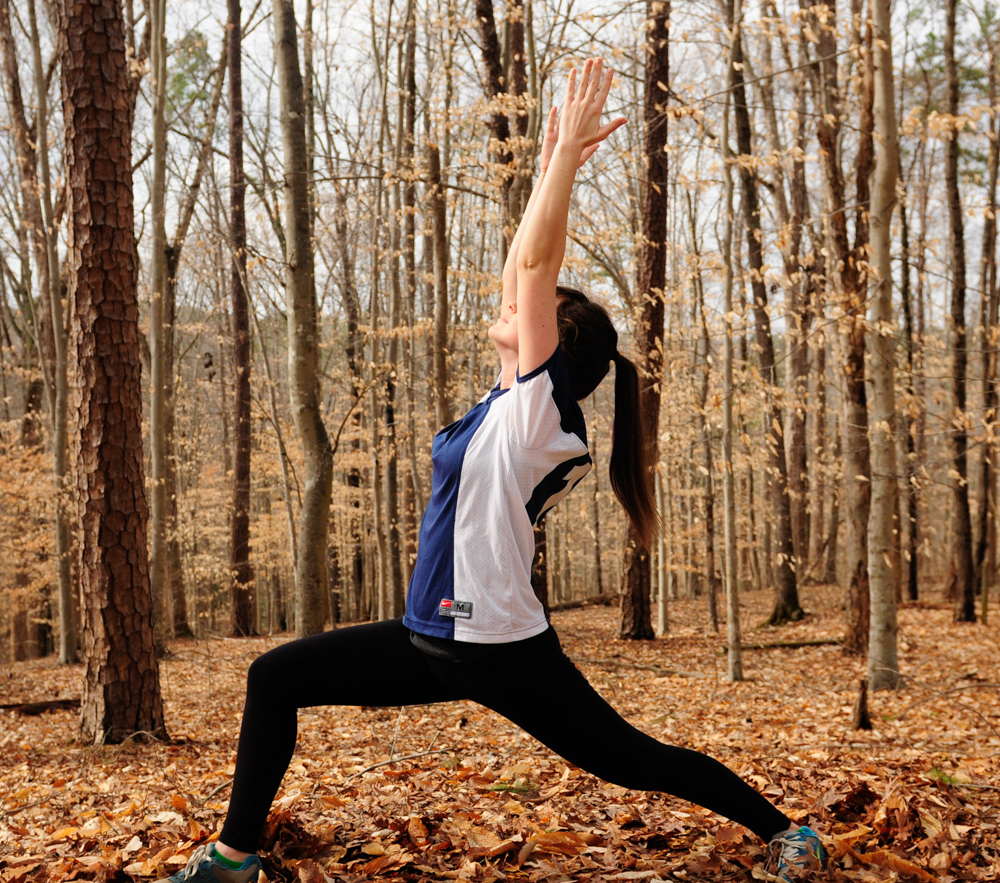
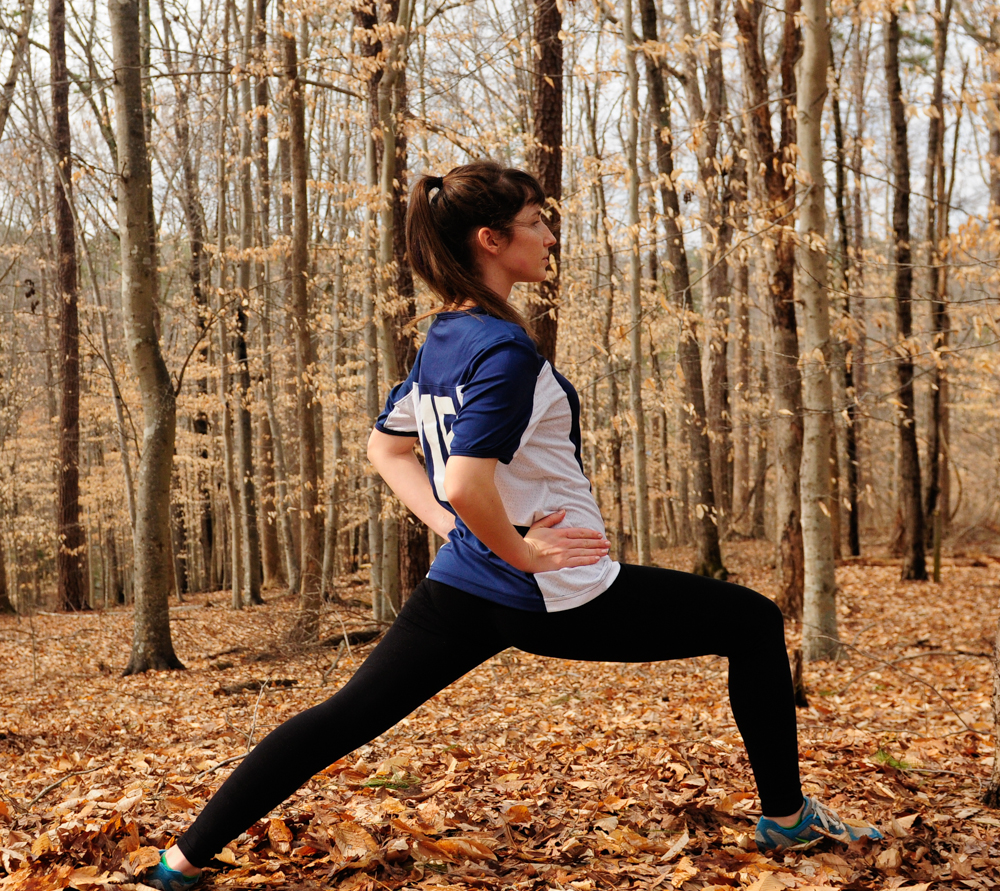
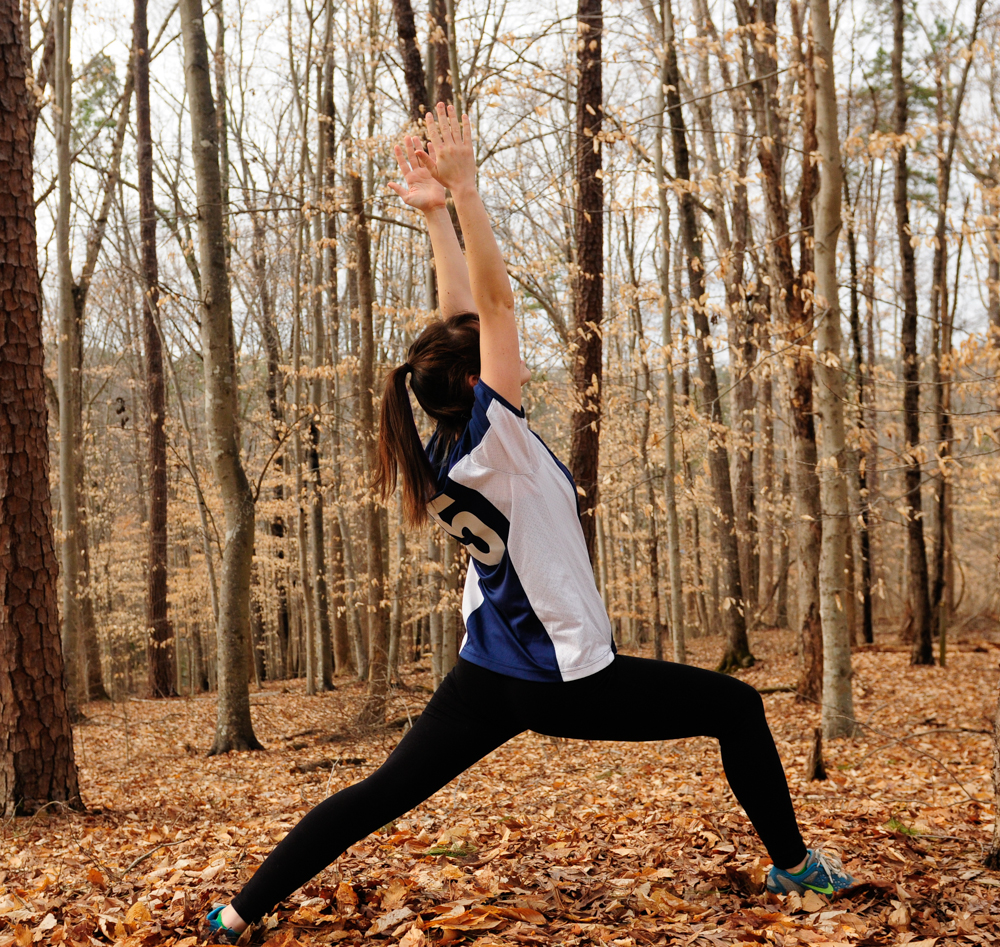
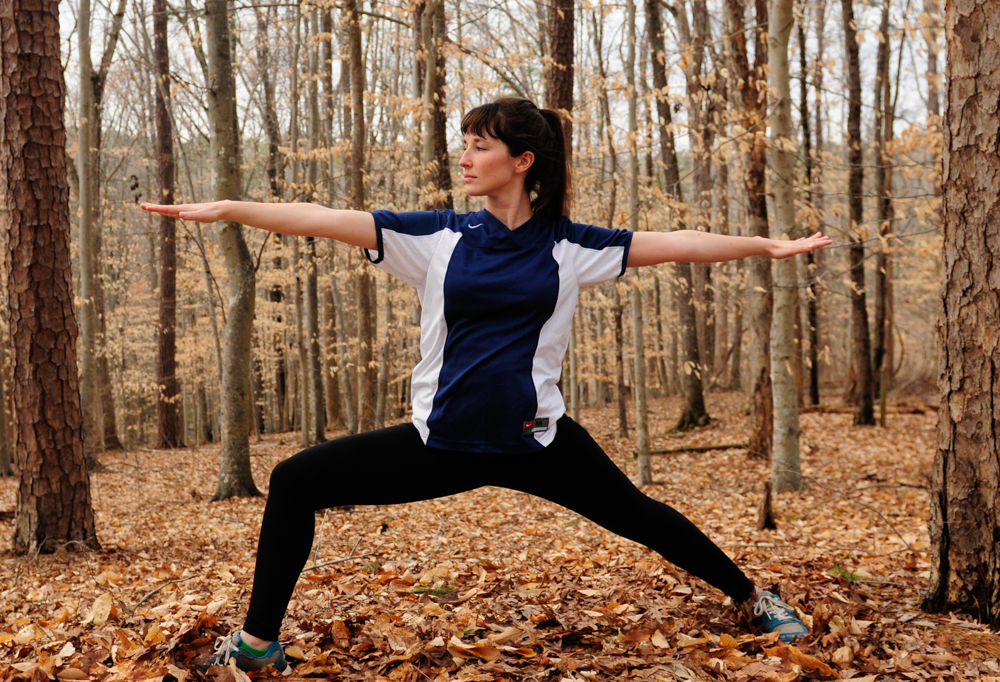
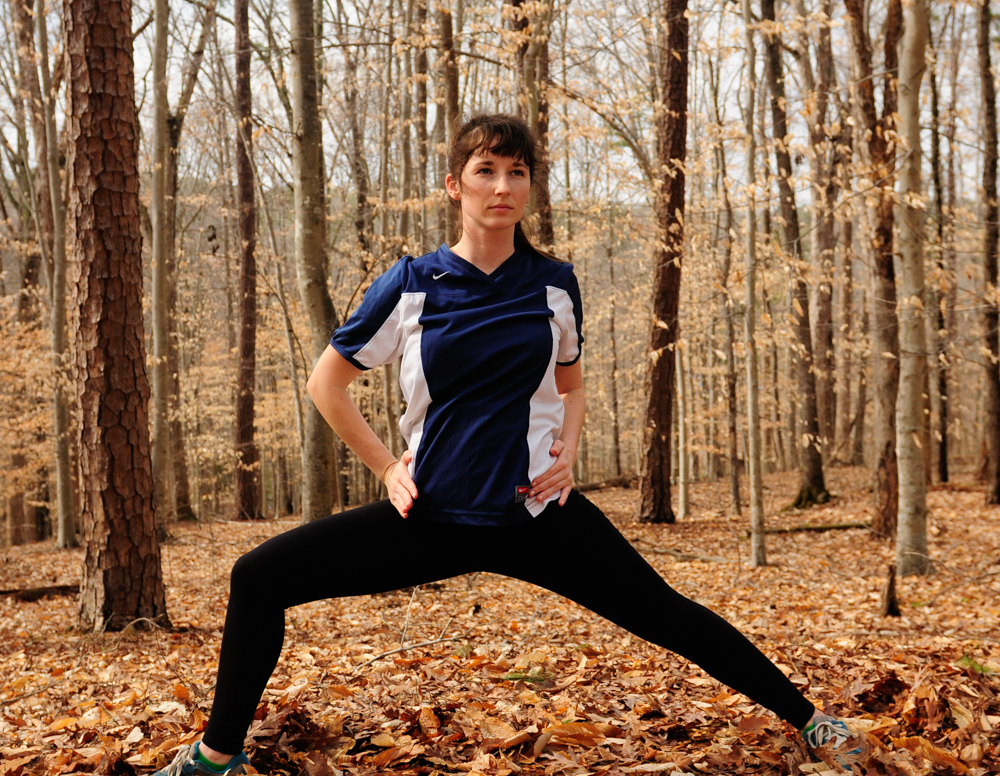
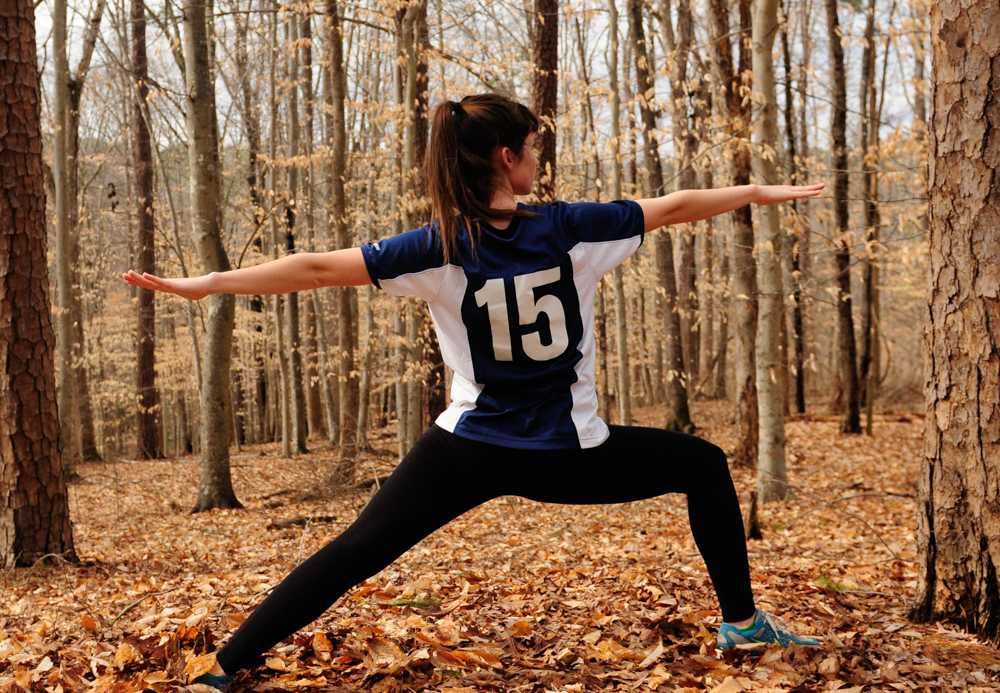
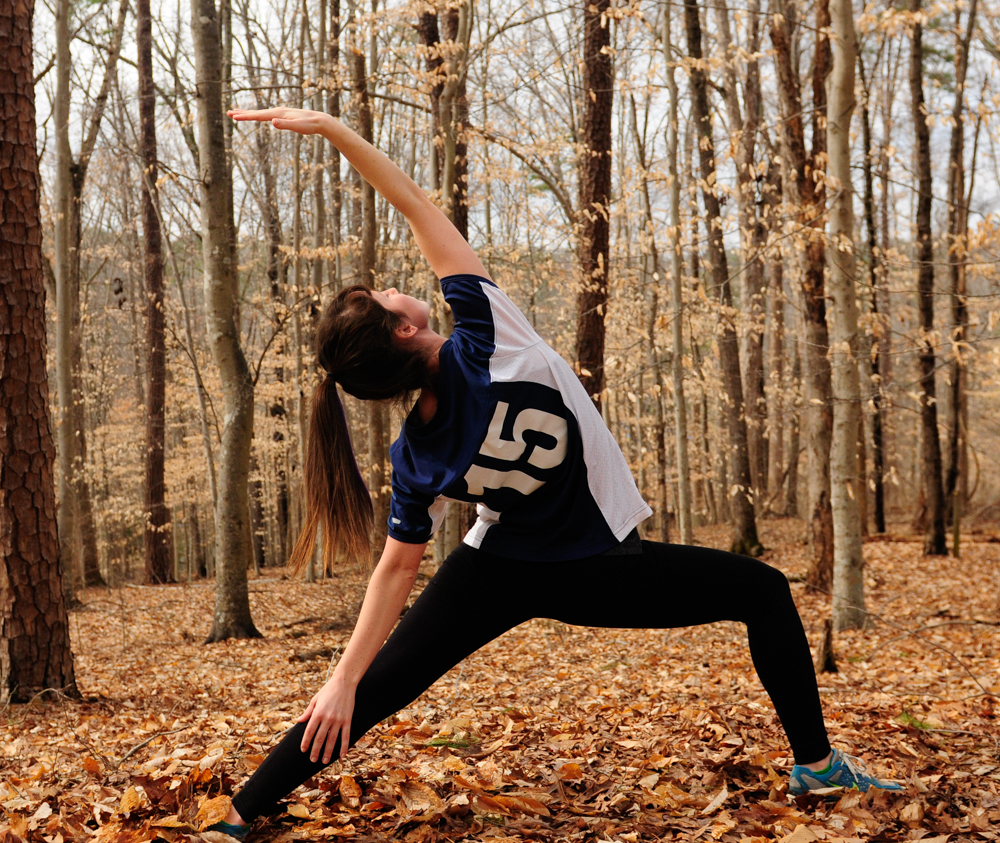
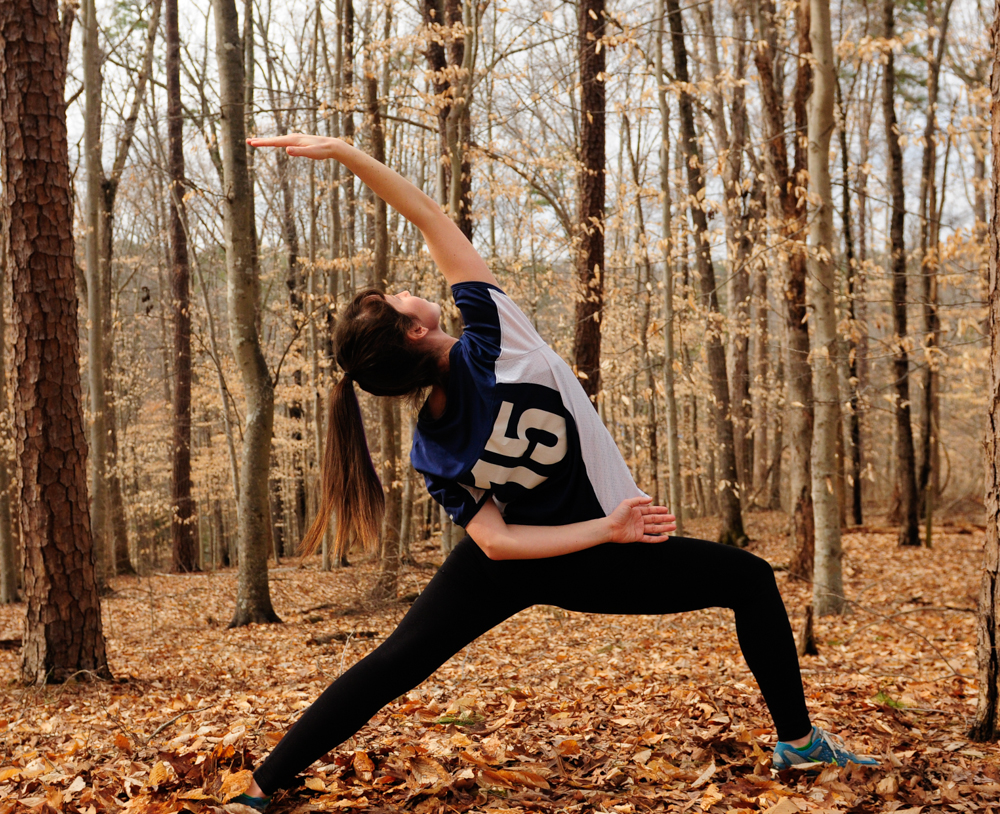
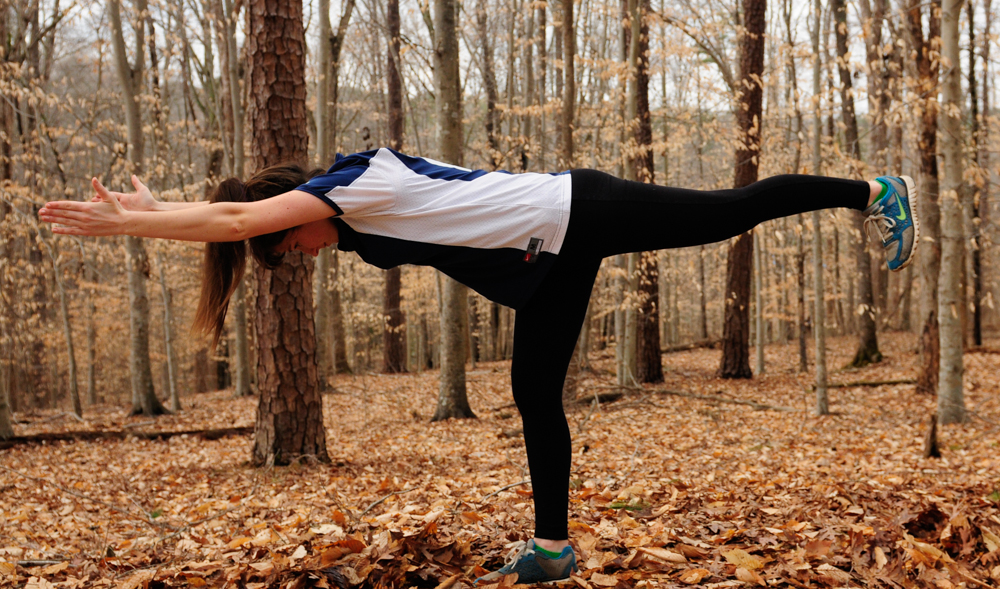
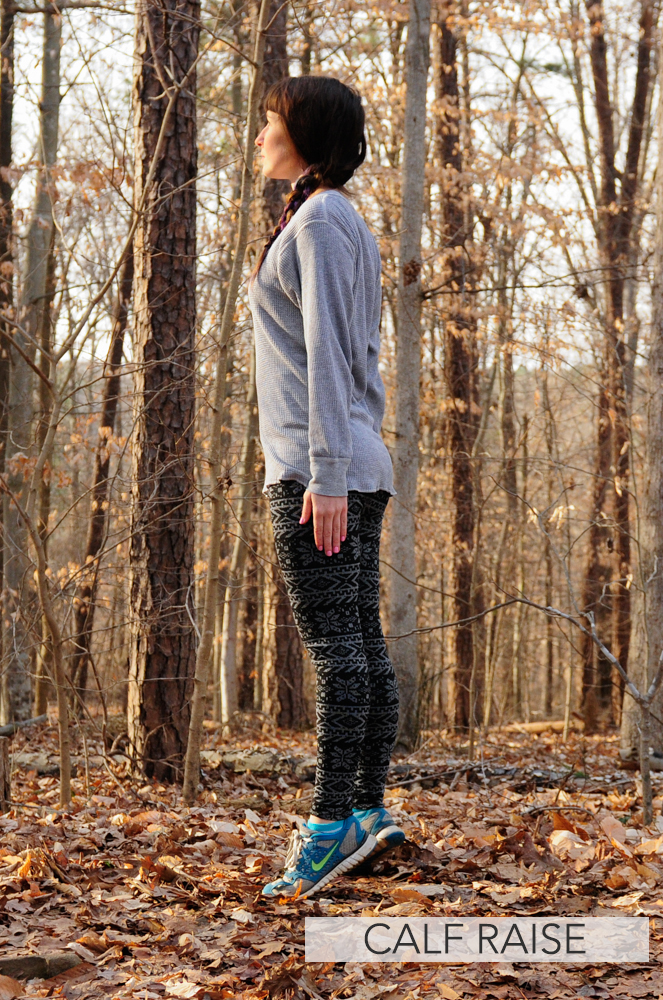
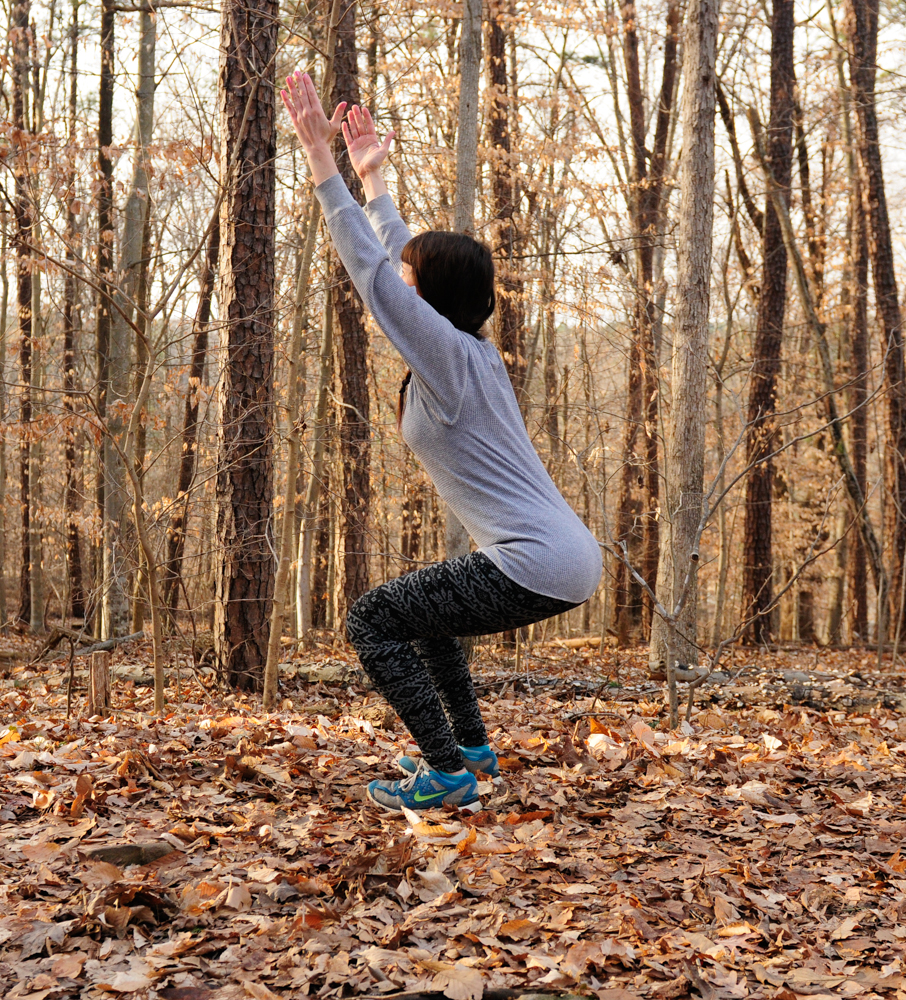
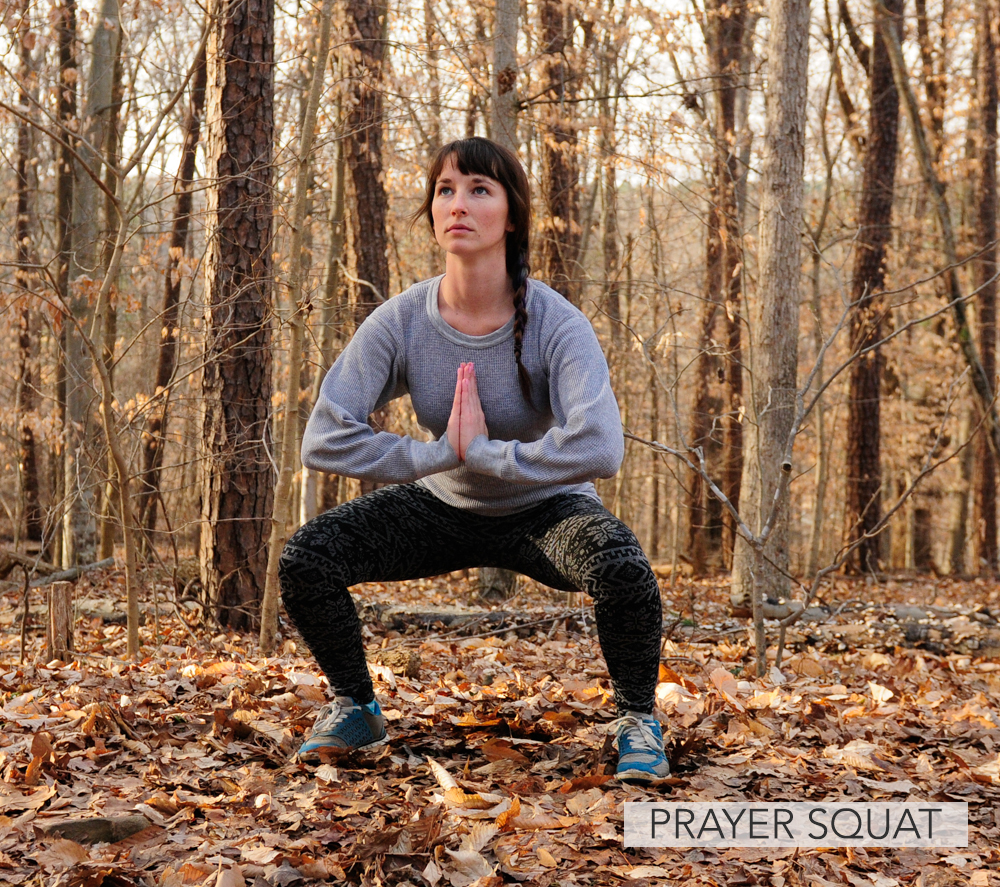
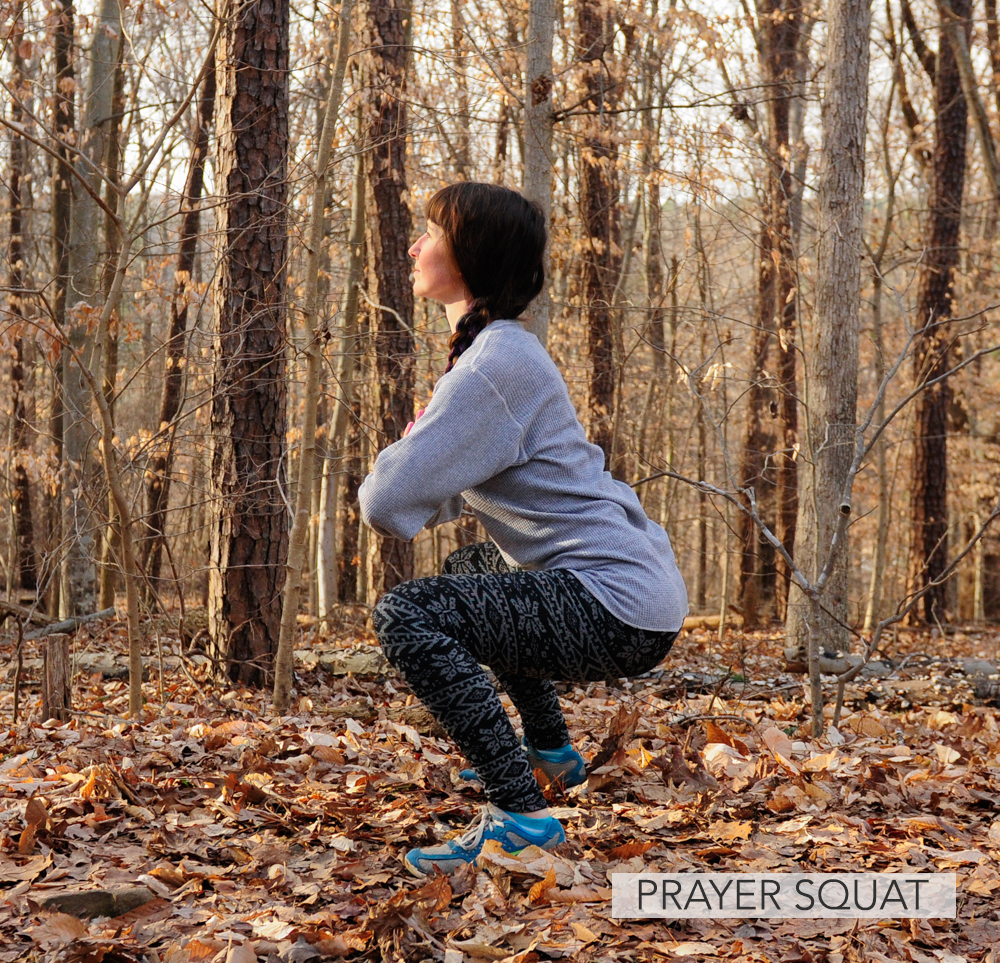
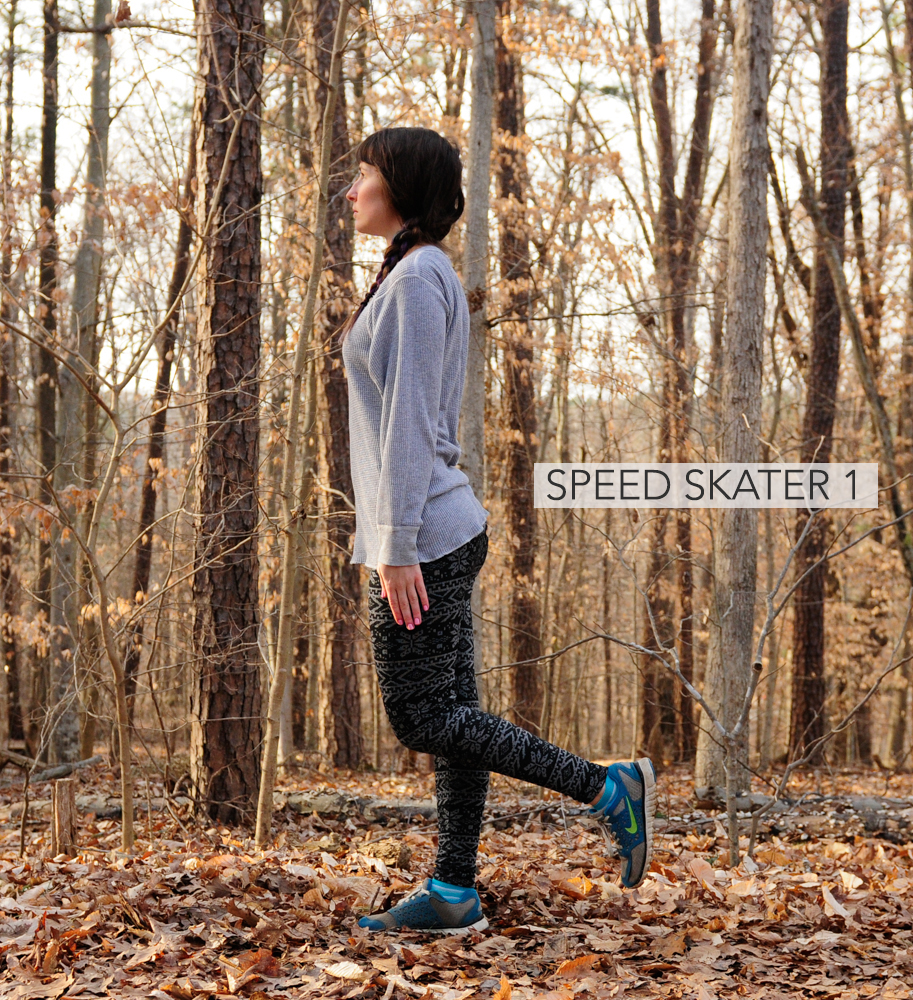
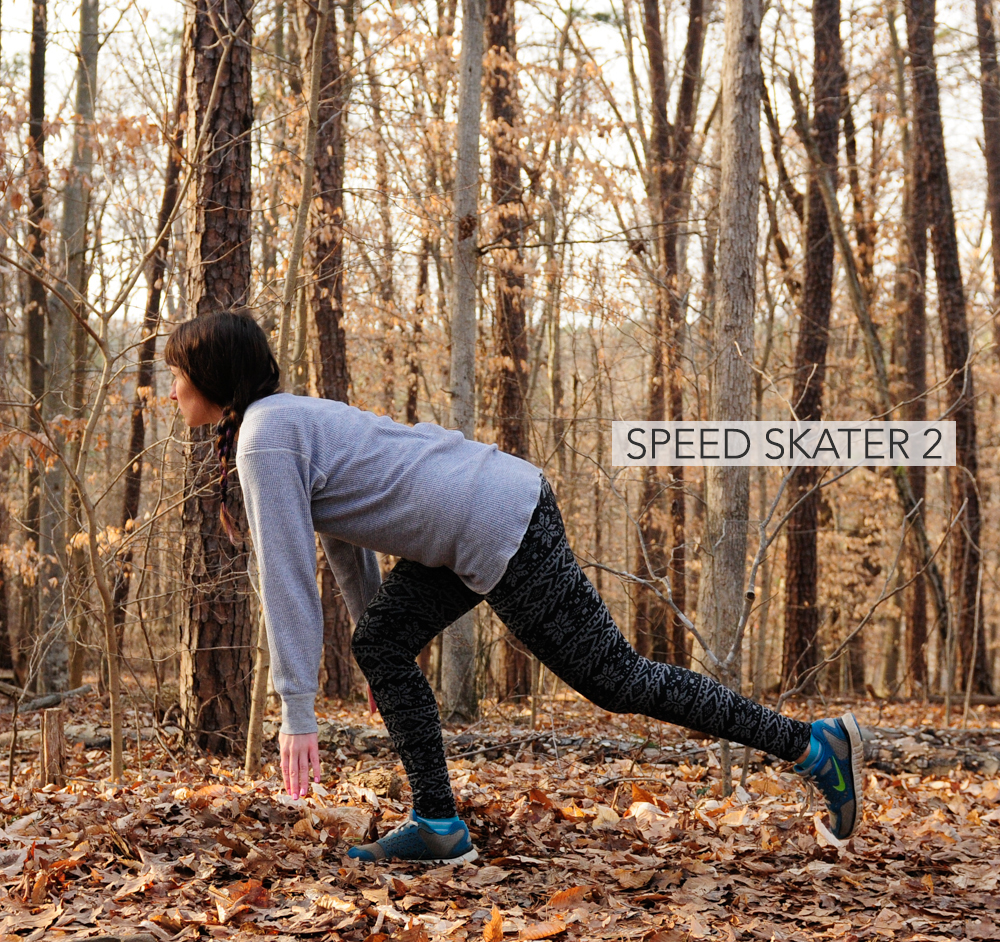
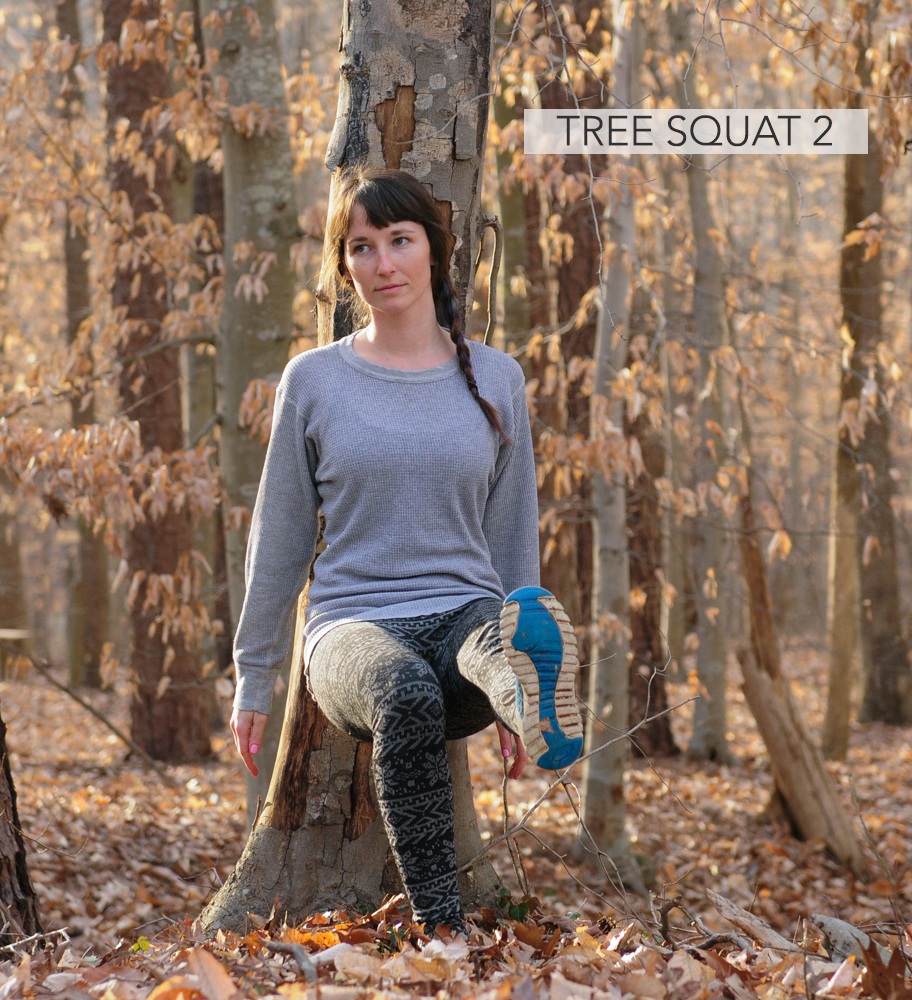
Growing up, I’ve always been involved in some type of activity, whether it was playing tag with my neighbors, going backpacking with my father or running around on the soccer field.  Because of this, my legs have always been the biggest part of my body and I admit, I used to feel a little insecure about it.  Struggling to squeeze into skirts and skinny jeans that my friends easily slipped on with their cute little bird legs and knobby knees.  Now that I’ve grown up a little bit and realized that Barbies and models are far from average, I love my muscular legs.  Are they proportionate to the rest of my body? Sometimes no, but it’s cool, thunder thighs are where it’s at.  They take me everywhere I need to go, even if it’s twenty miles from point A to B, I know they’ll carry me.  Climbing up a volcano? Yep, they were there. Walking three miles home from class carrying a twenty-pound camera lens? No biggie.  Taking dozens of photos while frozen in the same pose for an hour during this tutorial? No problem they say!  They even requested a yoga class afterwards. They’re that good.  So, after years of self-doubt and twirling in the mirror wishing they’d shrink up a bit, I decided it’s time to give my legs some love and some more exercise.  Time to cherish those limbs and treat them right.  This lower body workout is really basic, but can be easily modified if you’d like it to be a bit tougher.  I designed it to be easily remembered and equipment free that way you can add it to the end of a hike or a walk.  These moves target your thighs (especially the inner thighs), glutes, calves and even your abdominal muscles.  Read through all the exercises so you’re familiar with proper form.  You’ll find a concise workout routine at the bottom of the post.

live seasoned lower body woods workout-9 copylive seasoned lower body woods workout-10 copylive seasoned lower body woods workout-11 copy

A few quick tips:

  •             Wear sneakers or supportive shoes
  •             Stretch out for a couple minutes before you begin
  •             Breathe consistently throughout each exercise
  •             Engage your muscles, especially your abdominals
  •             You are your own trainer.  Do what feels best for you. Don’t push it unless that’s what your body wants.
  •             If you’re not accustomed to strenuous exercise, consult your physician before you begin.

lowerbodywoodsworkoutdesign

live seasoned lower body woods workout-1 copylive seasoned lower body woods workout-2 copy

Basic High Lunge

  • Stand up straight with your feet shoulder length apart.  Engage your abdominal muscles and step forward with your right foot until your knee is bent at a 90° angle.  Your thigh should be parallel to the ground or as close as you can get to parallel.  Your need should be directly over your ankle, never over your toe.  Your left heel will naturally rise off the ground.  There should be a slight bend in your left leg.   Stand up, bringing your back foot to meet the lead foot and switch legs.  Continue lunging forward for a total of 20 lunges.
  • Modification: Bring your hands in a prayer position and use your abdominal muscles to twist slowly to the left and then the right.  This strengthens your core and improves balance.

live seasoned lower body woods workout-7 copy

live seasoned lower body woods workout-16 copylive seasoned lower body woods workout-17 copylive seasoned lower body woods workout-18 copy

Calf Raise Three Ways

  • Super simple, but don’t let that fool you, these work and you’ll feel the effects instantly.  Stand up straight with your feet shoulder length apart.  Rise up onto your toes and count one Mississippi, two Mississippi and lower down.  Repeat twenty times and do a quick set of ten. Rise up, down, up, down as quickly as possible.  Make sure your rising up on your toes as high as is comfortable.  Now point your toes in towards each other and repeat, twenty slow, ten fast.  Finally, point your toes away from each other and repeat again, twenty slow, ten fast.  Your calves should be on fire at this point.  No need to wear heels to have defined calves anymore.

woods chair pose-100

Basic Chair Pose

  • If you’ve ever practiced yoga, you’ve probably done chair pose.  Stand up straight with your feet hip’s distance apart and your arms raised over your head.  Simply exhale and sit back as if you’re sitting down in an invisible chair.  The goal is to have your thighs parallel to the floor.  Your knees will protrude over your feet a little bit, but your weight should be in your heels.  I lifted my toes in the photo above to demonstrate that, but you should keep your feet flat on the ground. Keep your chest and arms lifted, look up and keep breathing.  Count to ten or twenty and stand up straight.  I like to sprinkle in chair pose between all of the other exercises.
  • Modification:  Instead of feet shoulder length apart stand with your feet together and challenge yourself to bring your thighs parallel to the floor all the while keeping your chest and arms lifted.

live seasoned lower body woods workout-5 copylive seasoned lower body woods workout-4

Lunge Rollover

  • This is very similar to a high lunge. Stand up straight with your feet shoulder length apart.  I like to hold my hands at my heart’s center in a prayer position, but you can also hold them overhead or down by your sides.  Engage your abdominal muscles and step forward with your right foot a little further than you would for a regular high lunge.  At this point, your knee should be behind your ankle.  You are balanced on the ball of your back foot.  Roll forward onto your toe, which propels your body forward so that your knee is now directly over your ankle.  Your knee should never be over your toe.  That is why you take a bigger step in the beginning. Rock back onto the ball of your foot, that’s one repetition.  Roll forward slowly onto your toe again and back, that’s two.  Complete 15 on each foot.

live seasoned lower body woods workout-3 copylive seasoned lower body woods workout-6 copy

Prayer Squat

  • Stand up straight with your feet a little wider than shoulder’s length.  Engage your abdominals and bring your hands in a prayer position at your heart’s center.  Lower down slowly until your thighs are parallel (or as close as you can get) with the ground and your elbows touch the insides of your knees.  Keep your weight in your heels and as you lower your knees will track outwards instead of forwards.  Your knees should never track out over your toes.  Slowly rise back up.  Repeat 15-20 times.

live seasoned lower body woods workout-8 copy

Squat Walk

  • First make sure there are no strangers around because this is one sure-fire way to creep them out.  Take a wide stance with your legs with your toes pointing outwards; I like to pretend I’m making the letter A.  Then squat down so your thighs are parallel with the earth.  Keep your head and chest lifted and take 6 small steps forward and 6 small steps backward.  You should feel it in your inner thighs.  Continue six-steppin’ for about a minute.

live seasoned lower body woods workout-14 copylive seasoned lower body woods workout-15 copy

Speed Skater

  • Stand up tall with your arms at your sides.  Bend your left knee with your toe pointed towards the ground.  Keeping your back straight, lean forward bend your right knee and kick your left leg out behind you.  Your fingertips should be pointing towards the earth and your right knee will track over your foot a little bit, but never past your toes.  Pretend you’re speed skating in place.  Do 15 reps without letting your left leg touch the ground and repeat on the other side.

live seasoned lower body woods workout-12 copylive seasoned lower body woods workout-13 copy

Tree Squat

  • Find a tree with a smooth surface.  Make sure there aren’t any poison vines growing on it and lean with you back against it, thighs parallel to the earth.  Sit up tall and count to thirty.
  • Modification: Try lifting one leg for 15 seconds and then the opposite for 15 more.

Lower Body Woods Walk Workout      1-3 sets

  • Basic High Lunge x20
  • Basic Chair Pose 10-20 seconds
  • Calf Raise Three Ways: Slow x20 Quick x10
  • Lunge Rollover x15 each leg
  • Prayer Squat x20
  • Squat Walk 40-60 seconds
  • Speed Skater x15 each leg
  • Tree Squat 30 seconds


There are dozens of modifications for each of these moves, but rather than overwhelm you I thought it’d be great to start simple and go from there. You’ll see these basic exercises being built upon in future posts.  Exercise doesn’t always mean putting on bright workout clothes, paying for a gym membership and fumbling around with machines.  Sometimes the most effective workouts are the simplest because we’re more likely to be consistent.  I hope you’ll try out some of these moves this week while you’re out walking around or hanging out at home.

Butter Lettuce Salad with Roasted Beets, Pumpkin Seeds and Citrus Parmesan Dressing

This salad’s citrus dressing combined with the flavor of roasted beets and the crunch of the pumpkin seeds creates a flavor that’s sure to please, making it a super healthy alternative for lunch or dinner.

Do you ever dine out and wonder why restaurant salads seem so much tastier than those prepared at home?  It’s because the chef had a certain vision and flavor combination in mind instead of chopping up every veggie in the fridge. I know I’m guilty of the latter eighty percent of the time, but not with this one!  The fewer the flavors, the more you actually recognize, taste and appreciate them.  I wanted a salad that had a warm feeling, hence the roasted beets, while simultaneously waking up my taste buds, which is where the citrus dressing comes in.  Butter lettuce is a great vehicle for the beet and pumpkin seed power couple.  Even though there are only four ingredients, this salad is packed with vitamins and minerals that have some pretty powerful effects and there’s even some protein in the mix.  If you prepare the beets ahead of time, you can throw this together in five minutes, making it perfect for lunch or a colorful appetizer before dinner.

Quick tip before you begin:

  • Roasting beets takes some time, so I usually do this step the night before.  I like to roast a bunch of beets at once so I have them in a pinch.  You can store roasted beets for up to a week in the fridge.

Ingredients:

  • Head of butter lettuce
  • 4 small beets
  • ¼ cup pumpkin seeds
  • 4 stems Cilantro
  • 2 oranges, juice and zest
  • 1 tsp white wine vinegar
  • 2 tsp olive oil
  • ½ tsp lemon juice
  • 1 Tbs parmesan cheese
  • 2 shakes of salt and pepper

Equipment:

  • Sheet pan
  • Aluminum Foil
  • Pairing Knife
  • Skillet


  • Preheat the oven to 400°F.  This is a flexible temperature; if you’re cooking something else you can throw them in at that temperature. Cut the leaves off of the beet near the bulb and then scrub them clean. Wrap each individual beet loosely in aluminum foil without drying them off first.  Place them on a baking sheet in case they drip.  Check on the beets after 25 minutes by sticking a fork through the center.  If it goes in easily then they’re finished.  The bigger they are the longer they’ll take, but most beets are cooked completely after an hour.  Once the beets are finished roasting, take them out of the oven and unwrap them to cool.  Once they’re cool enough to be handled, peel them by rubbing them gently with a paper towel or using a pairing knife.  The peel should separate quite easily; if it doesn’t then the beets probably need to be a roasted a little longer.
  • Next you want to roast the pumpkin seeds.  Put them in a small skillet over medium heat.  Shuffle them back and forth every two minutes or so until they’re lightly browned.  The seeds quickly turn from roasted to scorched so keep an eye on them, it should only take about five minutes.

liveseasoned_butterlettucebeetspumpkinseeds6

  • While you’re roasting the pumpkin seeds, wash the lettuce and chop up the beets.  Pull the leaves off of four or five stems of cilantro and add them to the mix.  Top with the warm seeds and your salad is complete.

liveseasoned_butterlettucebeetspumpkinseeds2

  • Now it’s time to mix up the dressing.  Juice two oranges and add a little zest to the juice.  Mix in the olive oil, vinegar, lemon juice, cheese (leave it out if you want to keep it vegan) and a few shakes of salt and pepper.  Whisk it with a fork and give it a taste.  Adding a bit more of anything your taste buds think it lacks.

liveseasoned_butterlettucebeetspumpkinseeds4

  • Pour some dressing over the salad and then cut it with a knife and fork.  I think this is the best way to mix all the flavors together, which is why I don’t rip up the lettuce leaves while prepping the salad.  Take a big bite and enjoy your fresh and healthy meal.

liveseasoned_butterlettucebeetspumpkinseeds7

A note about our star ingredients: If you’re not a beet lover, I’m begging you to give them another chance.  Beets are high in vitamins like A, B and C and minerals such as potassium, magnesium, fiber, phosphorus, and iron just to name a few.  I’m always looking for ways to get more iron since I eat a veggie heavy diet (otherwise meat is a great source of iron) and that’s where beets and pumpkin seeds come in handy-they’re loaded with iron.  Back to the beets, they contain betaine, which is used to help treat depression and tryptophan, which relaxes the mind similar to chocolate.  Beets are also an aphrodisiac because they contain high levels of boron, which is directly related to the production human sex hormones, so eat beets and get busy.  If all that isn’t enough, I don’t know what I’m going to do with you, but if you come over for dinner be prepared to eat it or beat it!

Now about those pumpkin seeds, you can substitute in another roasted seed or nut, but I chose pumpkin seeds because they’re a good source of vitamin B, E and K and they have loads of iron, magnesium, phosphorus and copper.  Like beets, they also contain tryptophan which helps produce serotonin.  Pumpkin seeds are also high in zinc, which means they’re a natural protector against osteoporosis.  They also add some protein to the salad.  The list of benefits goes on, but I don’t want to overwhelm you, just go ahead and pat yourself on the back for treating yourself to this salad.

While you’re chowing down, think of all the great benefits of beets and pumpkin seeds and know that you did something great for yourself today.  Even if making a salad is the only thing you did besides sitting in bed, typing posts and dreaming up new recipes.  If you’re one of those who thinks a salad won’t cut it for the entire meal, that’s cool and that’s me most days, just whip it up as an appetizer!