Holiday Room Spray

Ginger’s our ingredient of the season, and we love using essential oils for home and body.

We’re popping in with a quick DIY : a holiday room spray! It’s simple, yet it totally adds to the ambiance when hosting visitors (this and a big glass of wine).

room_spray

Honestly, I don’t regularly use room sprays, BUT whenever I have visitors stopping in, I like to know that the house is smelling nice. You can easily accomplish this with a simple essential oils room spray.

Continue reading

Gift Guide : Games for Preschoolers

Today we’re sharing some of our favorite games for preschoolers. I’m on a mission to start family or family+friends game nights in our house. It hasn’t happened yet, mainly because I’m (almost) all talk and no game (hah!). I haven’t invited anyone over, and I haven’t opened an adult game box in years. But behind the scenes, I’m cultivating a few young game-lovers and am slowly building my game-night momentum.

With a 4yo and 2yo in the house, we’re still slightly new to the kids’ game section. Fortunately, I think we’ve already found some great ones. Sometimes we play in the evenings as a family, and I love the together time. But the mom in me also loves that playing games can be used to reinforce other skills that they’re learning. Read on to see what I’m talking about.

games_for_preschoolers

This guide contains a few games that we’ve played and liked. If you’re looking for a last-minute gift for a 3-5 yo, I really don’t think you can go wrong with anything on our list. A few are card games, making them perfect stocking stuffers.

Continue reading

Ginger + Citrus Cocktail

First the good news : Ginger is still our ingredient of the season! We chose it as the featured ingredient this past fall, but felt that we didn’t spend nearly enough time experimenting with this gem. So, we’re holding onto it as the first two-season ingredient.

snap_ingredients

Now, the bad news : I’m making a recipe today with an ingredient that has been discontinued. The news broke in early 2017, but as you can see, it’s hit me hard, and I just can’t quit SNAP… or the other Art in the Age Cocktails. (ROOT? My love. Will I ever find a forgotten bottle of you on the liquor store shelves? I can only hope and dream.)

Continue reading

Welcome December

Near the beginning of each month we like to pause and take a look at what’s going on in the world around us. Over time, these posts have transformed into a little op-ed about what’s going on with us each month.

We’re only five days into December, and I feel like it’s been here for ever. It must be the Christmas invasion.

December can create such a mix of emotions in us. There’s the obvious joy and celebration of the holidays, but there’s also the hustle and bustle leading up to Christmas and New Years. There’s the cozy feeling of evenings in front of the fire, but also the pent up energy and angst from short days and not enough time spent outside.

P1220398

Just reading that probably gave someone the shivers. Sorry.

Continue reading

Winter Face Oil

The cold and dry air of winter has a way of wreaking havoc on our skin and nails. Our remedies include drinking plenty of water and creating barriers to moisture loss.

For our hands, we’re a huge fan of balms. Most of ours are made at home with a combination of beeswax, moisturizing carrier oils, and nourishing extracts and essential oils (think calendula, lavender, comfrey).

winter_face_oil

We won’t shy away from using a balm on our cheeks if we’re heading out for a day in the elements, but for everyday use, we want some thing a touch lighter than. And that’s when we grab a DIY face oil.

Continue reading

Weekend Project : Knit a Stocking (or three!)

We’re republishing this today as a reminder to take it slow, get cozy, and complete a craft, but I couldn’t bring myself to delete Katie’s original text because it talks about the *first* Christmas as a family of three – wow so much has changed! <3 Here are all the Christmas decoration DIYs BTW.

Ok, maybe three’s a stretch, but we’re all a bit crazy at this time of year. This is the first year we’re celebrating Christmas morning as our own little family of three, and we didn’t have stockings. Knowing that my original plan was to do something fun and easy. Maybe buy a couple pair of festive knee high socks or some cozy looking wool men’s socks and use those for this year. But a month or so ago I ran across some bulky yarn, decided it was perfect for stockings and worth just testing the waters.

liveseasoned_w2015_stockings7_wm

It’s easy to fall down the knitting hole, but with so many other balls in the air, I didn’t want this project to consume me. So I picked up two skeins of yarn (one red and one white) and wanted to see how long it would take to knit a single stocking and how far the two skeins would go. When I knit that first stocking in a weekend using only those two skeins, it was a no-brainer to knit the other two!

If you have ever knit a sock before, this is a project that you can easily finish in a weekend. If you’ve never knit a sock before, then this project may take you a little bit longer, but knitting big is such a great way to learn some new sock-knitting skills, and I include links to some of my favorite resources in this post. Plus, a common problem for a first time sock knitter is finishing that second sock and/or getting it to match the first; you won’t have that problem here!

liveseasoned_w2015_stockings16_wm

Whenever I hear “knit stocking” the one thing I worry about is how dense the stitches are. If you have a loosely knit stocking, then as soon as it’s filled with treats, the stocking will stretch and you’ll get that holey look between the stitches. I wanted to avoid that, and one of the easiest ways to do it is to knit with a bulky yarn on needles that are a few sizes smaller than what you would normally use. That’s exactly what I did here, and it produced a nice dense fabric that doesn’t stretch out of shape too much when filled.

liveseasoned_w2015_stockings19_wm

Resources

  • Cast on. Turkish Cast On
  • Increasing. M1L and M1R
  • Short Row Heel : basic instructions or a video with a method for eliminating the little holes that are common at the start and finish of the heel. This heel is really easy to make, and the holes are so (soooo) minor, so I don’t want that to deter you. I have my own way of dealing with them by picking up extra stitches and then decreasing them later, but since you’re knitting a simple stocking that won’t be worn, you could easily just use some extra yarn to stitch the hole closed – if you even get them!
  • I cord bind off. You will have to use the cable cast on before starting the I cord bind off.

Materials

  • Yarn : Loops & Threads Cozy Wool in fleece (white) and claret (red)
  • Needles : US 10, you will need either one long circular for the magic loop method or a set of double pointed

liveseasoned_w2015_stockings15_wm

Instructions

You will be knitting these stockings from the toe up to the cuff. I’m going to give you a set of generic instructions that can be used to knit any stocking of this size, and then I’ll give you the details for the specific patterns you see in the photographs. I’ll assume that your stitches are split evenly between two needles (i.e. that you’re using the magic loop method).

  • Cast-on. use the Turkish method to cast-on 20 stitches (ten on each needle). Fortunately, these instructions show you how to do the Turkish cast-on with exactly that number of stitches, so you can follow it step by step.
  • Begin Knitting. When I start a sock, I like to knit one and a half rounds before starting my increase rows (I always think that knitting across the first needle creates a single row for the tip of the toe, and then knitting a complete round creates my first official round – I may be crazy).
  • Start the increase rows (this comprises the toe area of the sock). Round 1 (increase round) : k1, M1L, knit to the last stitch on the first half of the stocking, M1R, k1. Repeat over the stitches on the other half of the stocking. Four stitches added. Round 2 : knit all stitches.
  • Continue repeating rounds 1 and 2 until you have 44 stitches on your needle.
  • Knit the foot. Knit straight for 27 rows.
  • Knit the heel. Use the short row method to knit the heel. You will work the heel over the 22 stitches that are on one half of your sock. When making the stockings, I wrapped 7 stitches on each side of the heel, leaving 8 unwrapped in the middle.
  • Knit the leg. Once your heel is finished, knit the leg of the stocking for 53 rows.
  • Bind off using the i cord method. This is a great technique for binding off the stockings because it creates a strong final row that will not stretch out over time (unlike a ribbed cuff) and as you’ll see, it also seamlessly morphs into a loop for hanging your stocking. The only problem is that you may not be able to really stretch the cuff if you want to sneak an over-sized present in the stocking! The other problem that arises is that the loop for hanging your stocking will be placed where ever you start the i cord bind off. Thus far we have been knitting the stocking in the round starting from one side of the sock; you don’t want your loop on the side, but on the back of the stocking. Before beginning the i cord bind off, knit 11 stitches so that you are now positioned at the center back of the stocking. You will work the i cord bind off over three stitches, just like these instructions (lucky you!).  Once you come to the end of the cuff, don’t cast off the three i cord stitches, rather continue knitting an i cord for 21 more rows.
  • Finish your stocking. Sew the live stitches of your i cord to the start of the i cord row ~ creating a seamless-looking i cord band with a loop in the back. Weave in all loose ends. Hang your stocking and cross your fingers that it doesn’t get filled with coal!

Santa’s Sock Stocking Detail

  • Knit the toe. Use the basic instructions from above, casting on with the white yarn and using it to knit the toe area.
  • Knit the 27 rows of the foot in red.
  • Switch to the white yarn and knit the heel.
  • Knit 40 rows of the leg in red.
  • Switch to the white yarn and knit 11 rows in seed stitch.
  • Knit one complete round plus 11 stitches to position the start of the i cord at the back of the stocking. Finish with the i cord bind off.

Striped Stocking Detail

  • Knit the toe. Use the basic instructions from above, casting on with the red yarn and using it to knit the toe area.
  • Begin the stripes. Switch to the white yarn, but don’t cut the end of the red yarn (you can carry both colors up the length of the stocking, drastically reducing the number of loose ends that you’ll have to weave in). Knit five rows in white. Knit five rows in red. Repeat this pattern for 25 rows (ending with five white rows and just before starting a red row). Knit two rows in red.
  • The heel area. I like to work the heel in the middle of a stripe so that there aren’t any funny color switches immediately before or after the heel. Continuing to use the red yarn, knit the heel. Once the heel is complete, knit three more rows with the red yarn. When looking from the front/top of the stocking you should see the five red rows of the stripe pattern.
  • Knit the leg. You are now at the start of a white stripe. Continue working the five row stripe pattern for 50 more rows.
  • You are now at the top of the stocking. Knit 11 more stitches to position the start of the i cord at the back of the stocking and continue using the red yarn for the i cord bind off.

Snowflake Stocking Detail

  • Knit the toe. Use the basic instructions from above, casting on with the white yarn and using it to knit the toe area.
  • Knit the 27 rows of the foot in red.
  • Switch to the white yarn and knit the heel.
  • Knit the 52 rows of the leg in red (not the 53 listed above!).
  • Switch to the white yarn. Knit one round plus 11 stitches to position the start of the i cord at the back of the stocking. Work the i cord bind off.
  • Finish the stocking by embroidering a snowflake design into the side of your stocking. I make a very simple design using a backstitch. I decided to embroider the snowflake because I wanted it to have six points (like in nature), but it’s hard to find and/or to design a knit snowflake pattern with points rather than eight. As for other embroidered embellishments, the skies the limit! I added a line of running stitch around the toe and heel areas. You could add number of snowflakes, varying their size and shape.

liveseasoned_w2015_stockings1_wm

If you knit a stocking, we would love to see it! Leave us a comment below or tag us on instagram @liveseasoned. Happy knitting or happy rushing around buying those last minute presents ~ either way, we hope you have a great weekend!


Gift Guide : Play Kitchen

We’re sharing a variety of themed gift guides this year. Check out Dinos in the KitchenHeard You Like Cats, Ice & Drink Pairings, and DIY Edible Gifts.

**Quick note – all of the items below include an additional 15% off coupon on Amazon, but we’re not sure how long it will last.**

Last Christmas the boys received a play kitchen, and it’s become one of the most-used toys in the house.

Kitchens are such a great toy for creative and make-believe play. Sometimes our boys are making us coffee and toast for breakfast. Other times they are serving me ice cream cones for an afternoon treat or acting as waiters and chefs in their own restaurant.
gift_guide_kids_kitchen

I love big ticket toys like this kitchen because it’s a themed toy that you can slowly can add to over time. For us, this meant buying a few items to play with Christmas morning, and then letting our family give them additional kitchen elements on Christmas and again at their birthday.

The slow giving method is also a great plan if you’re not sure about how much your kiddos will love the big toy. For us, the kitchen’s a winner, and we’ve been happy to buy them quality items for it.

~

Below is a list of the exact items in our play kitchen with info about why we like them. *Notice that our list contains more items than are pictured above. It’s all so good!

  • kitchen (pictured above) : this retro blue kitchen is the exact one we have. We picked it because of looks and also because it seemed to have slightly more storage than others (key for all of the awesome accessories below!). The one downside to this kitchen is that it comes with a million pieces and takes a billion hours to put together. Keep that in mind when on Christmas Eve and pour yourself a big glass of eggnog before starting.
  • broom & mop set (pictured above) : the boys love this set and use it often. Almost never for cleaning, but always for sweeping out the marbles that roll under the couch. Patting myself on the back for encouraging them to be self-reliant.
  • cut-apart fruit (pictured above) : our boys love cutting apart this fruit. We also have this cut-apart food set.
  • espresso machine (pictured above) : if your kids love to help make your morning coffee, then they will love this! And you’ll always be caffeinated.
  • mixer (pictured above) : so cute and comes with a few cake-baking accessories. Our kids are always mixing up mini dinos. #boys
  • toaster (pictured above) : comes with bread and butter. A complete meal!
  • ice cream (not pictured) : BUY THESE! Even if you don’t buy the kitchen, this set is so much fun. They ice cream, spoons, and cones are magnetic, creating a bit of magical fun and driving the kids crazy as the ice cream tumbles when they try to make a four-scoop cone.
  • cookies (not pictured) : so cute and creative. The only bummer is that the tray is too long to fit in the oven (they’re different brands). Our boys don’t seem to mind, but some might.
  • canned food (not pictured) : a great food filler for the fridge, and all of the cardboard cans can be opened again and again, letting them do double duty as little storage containers.
  • tea set (not pictured) : comes with cups, wooden tea bags, kettle, etc.
  • pots & pans (not pictured ) : all metal and awesome

Gift Guide : Ice Cubes

We’re sharing a variety of themed gift guides this year. Check out Dinos in the Kitchen, Heard You Like Cats, and DIY Edible Gifts.


I know, who gives ice? We don’t.

BUT we do like a clever ice cube in our drinks, and so, we have a few ice cube tray + drink pairings that are perfect for that last minute gift or that dad mom that really doesn’t need anything other than a good drink.
ice_cubesice shot glass : perfect for your nephew going off to college. You are the cool uncle after all. Maybe don’t include the alcohol with this gift. Just get some gatorade for the morning after.

buddha : looks wise sitting in a good whisky

gin and titonic : Why don’t I own these yet? Pair it with a good gin, obvs.

polar bear and penguins : pair them with Kahlua because these would look awesome floating on a White Russian.

diamonds : champagne with the suggestion to make OJ ice cubes for a classy mimosa

The awesome thing about many of these molds is that they could easily do double-duty for someone that likes to experiment in the kitchen. Imagine juice-colored jewels for a summer day, chocolate shot glasses filled with a dessert, chocolate buddhas with gold leaf… talking myself into a few trays right now.

Gift Guide : Cats

This year we’re doing a few gift guides that blur the line between whimsical and practical. See our Dinos in the Kitchen guide for further evidence. But if prefer making over buying, check out our ideas for edible gifts.

Do you know someone who likes cats? We do. (like ’em and know ’em)

You know how when you know that someone likes a “thing” then sometimes whenever you see something with that “thing”, then you have the urge to get it for them? Hold back.

But just a little, because if that “thing” is cats, then we have a few gifts that are totally worth giving this year.

gift_guide_cats

cat umbrella : because sometimes it’s raining cats and dogs!

candle : this thing burns down to unveil a metal cat skeleton… not sure if you’re supposed to buy it for the cat lovers or haters?

cat ring : subtle bling

mug : perfect for so many reasons.

paperclips : a stocking stuffer that will make them smile when they return to that boring cubicle

I’m proud of this list because we tried to go for some of the more tasteful cat gifts out there. We spared you guys the cat sweaters (for your cat, not you, silly), but can’t make any promises about what’ll happen next year.

Sparkling Cider Mocktails

 *republishing this today ’cause cheers even if you don’t drink beers! Amiright?
Apples was our ingredient of the season during the autumn of 2014. Check out our complete archive of apple drinks, recipes, and crafts.

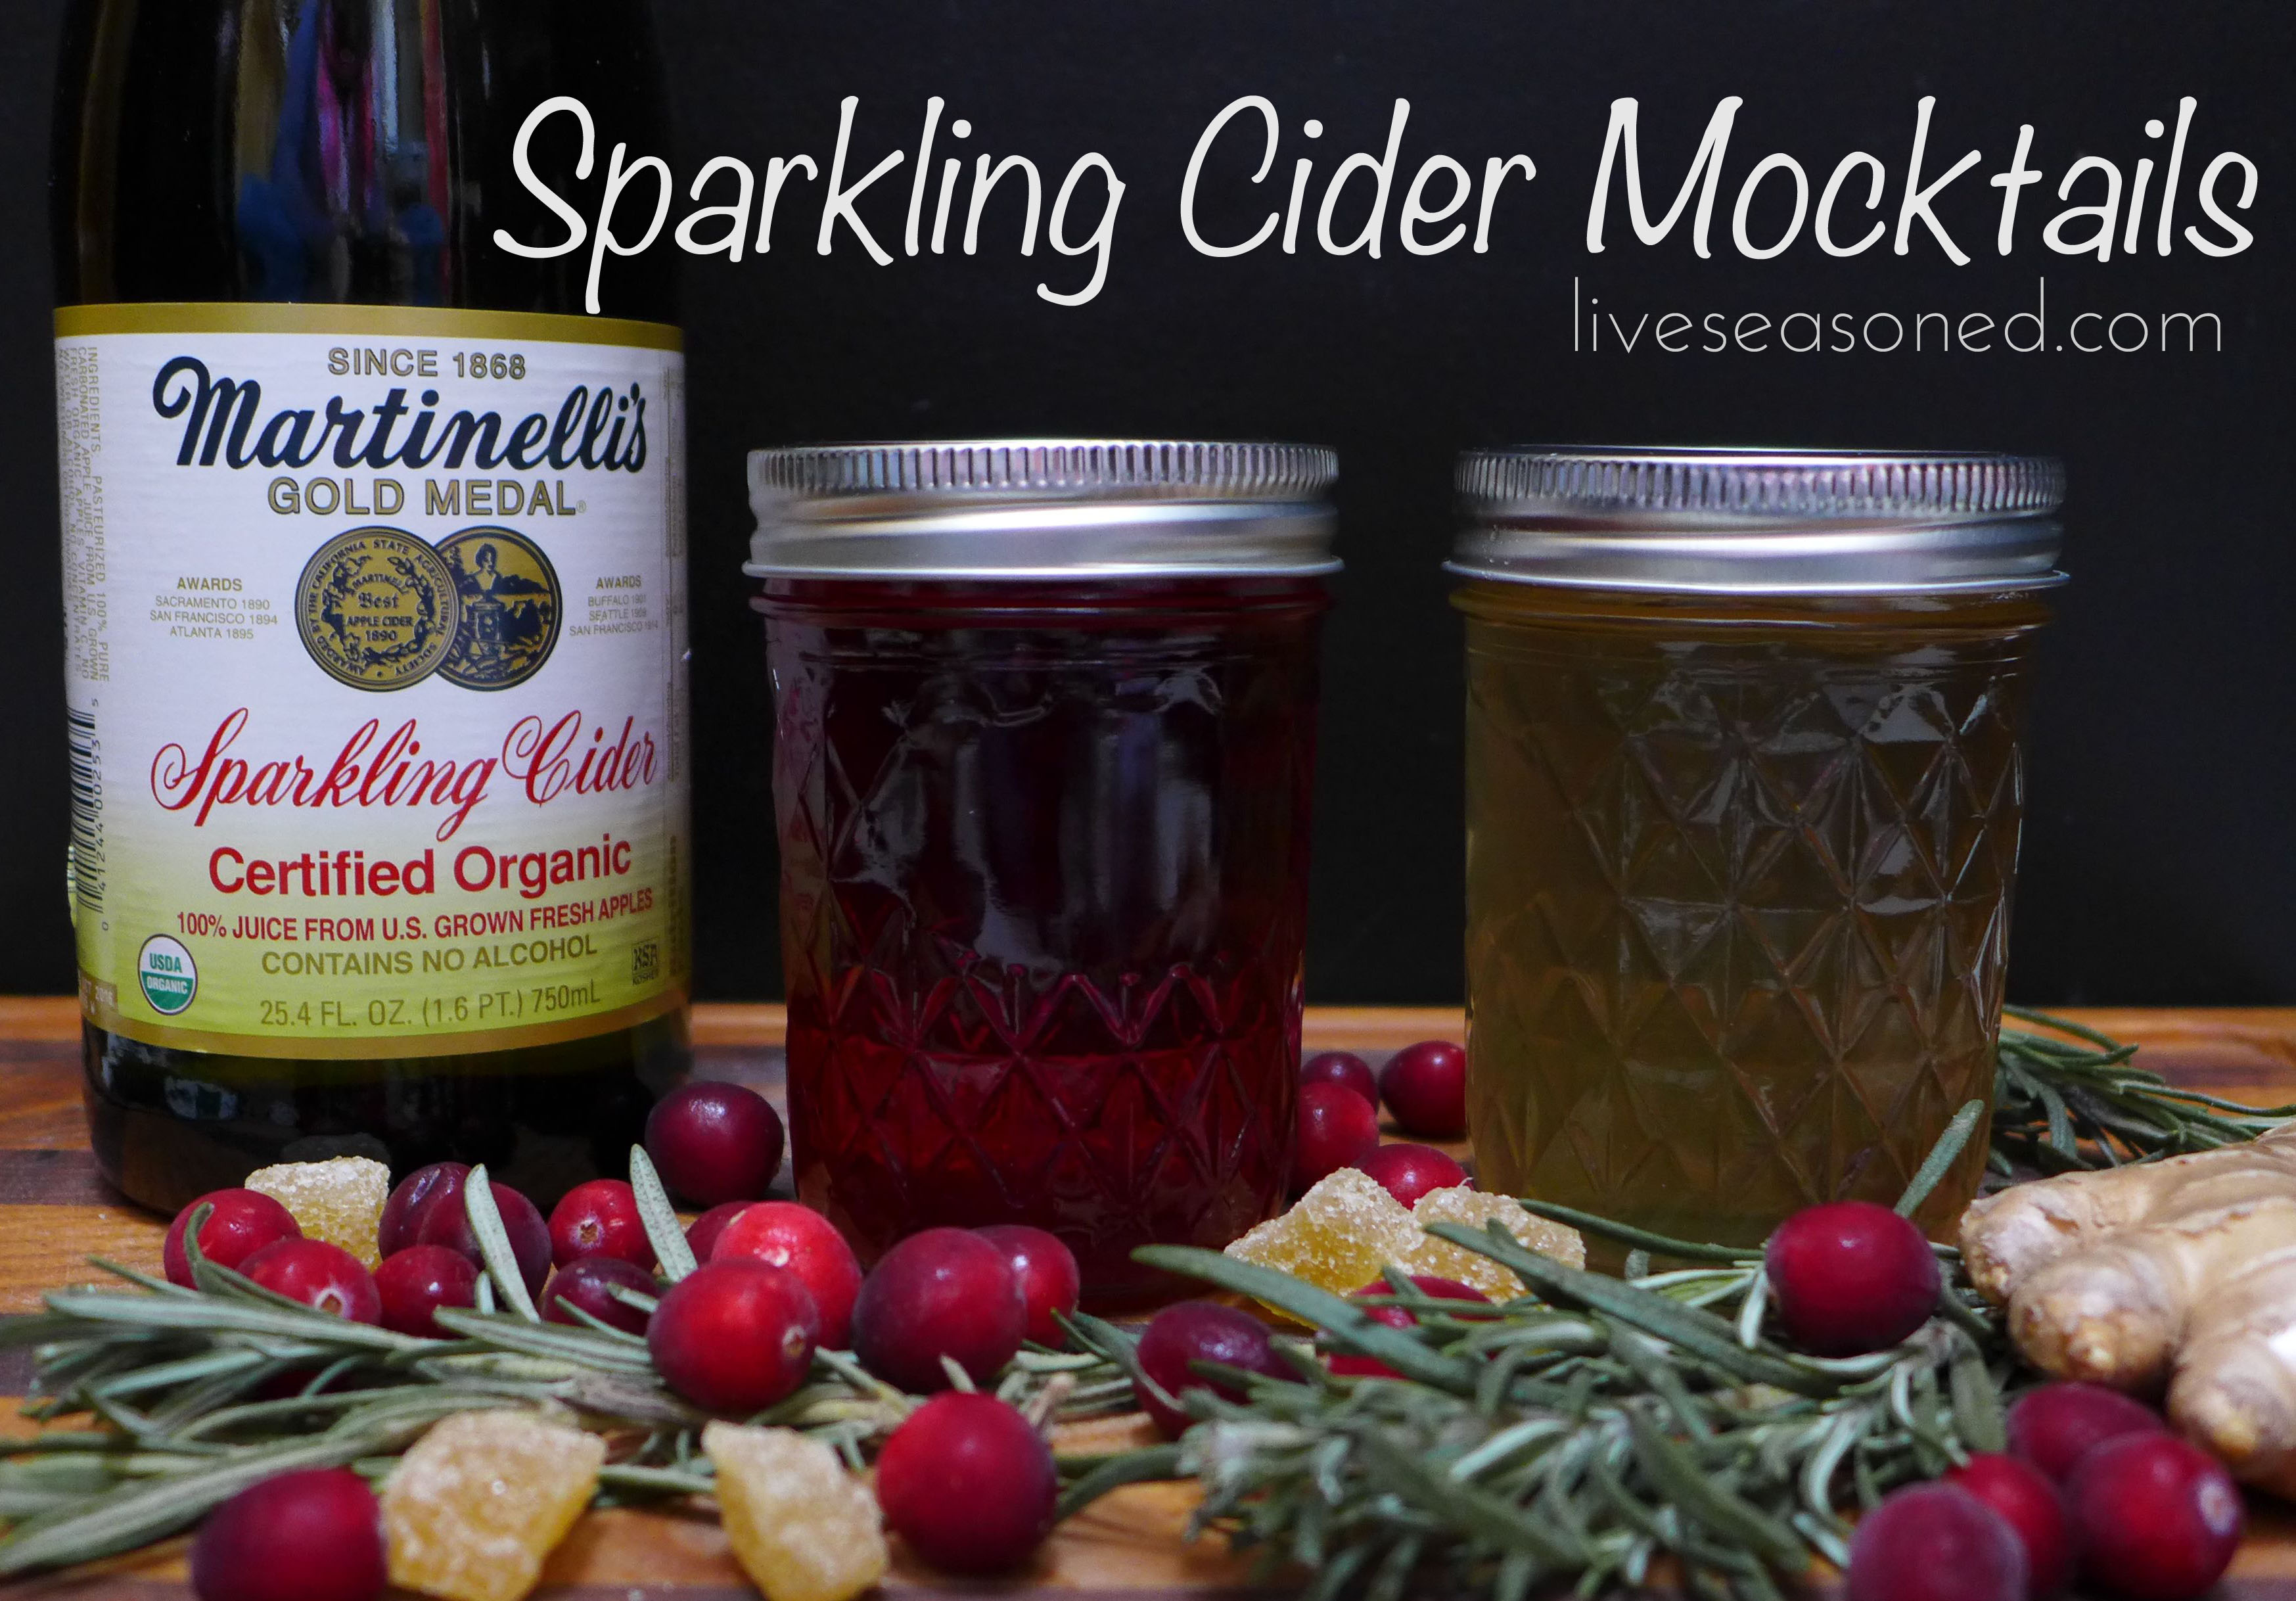
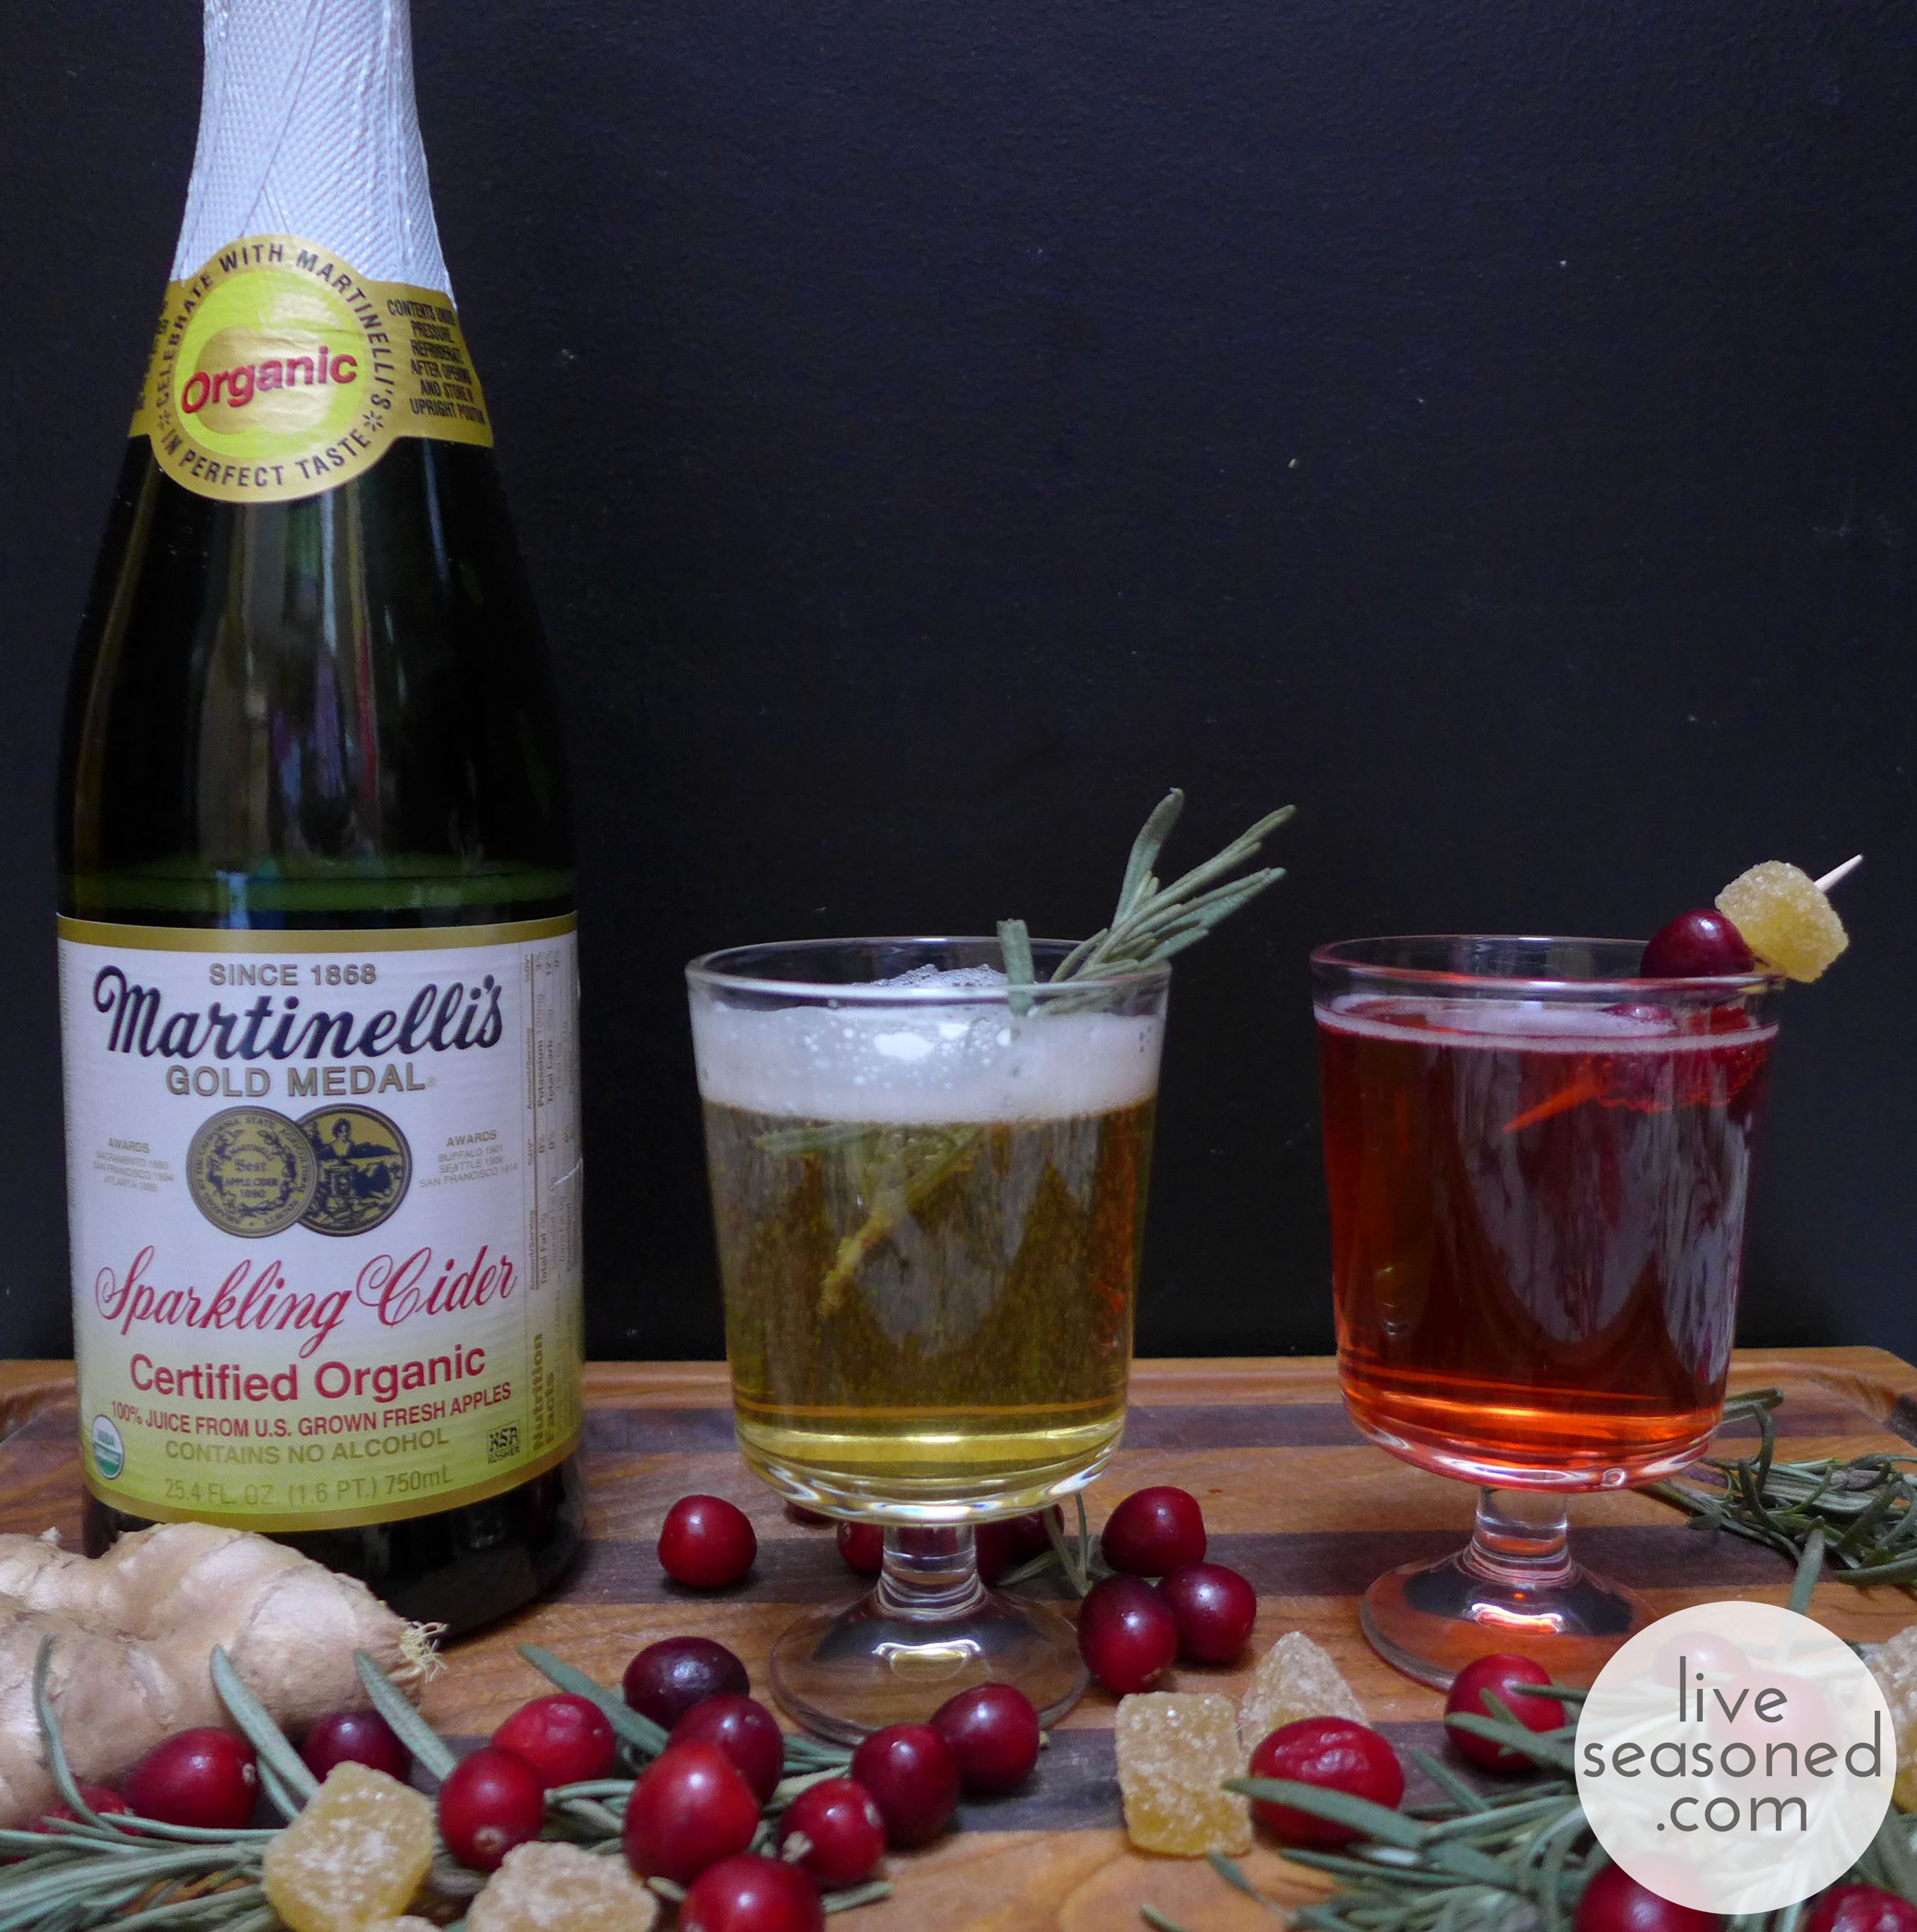
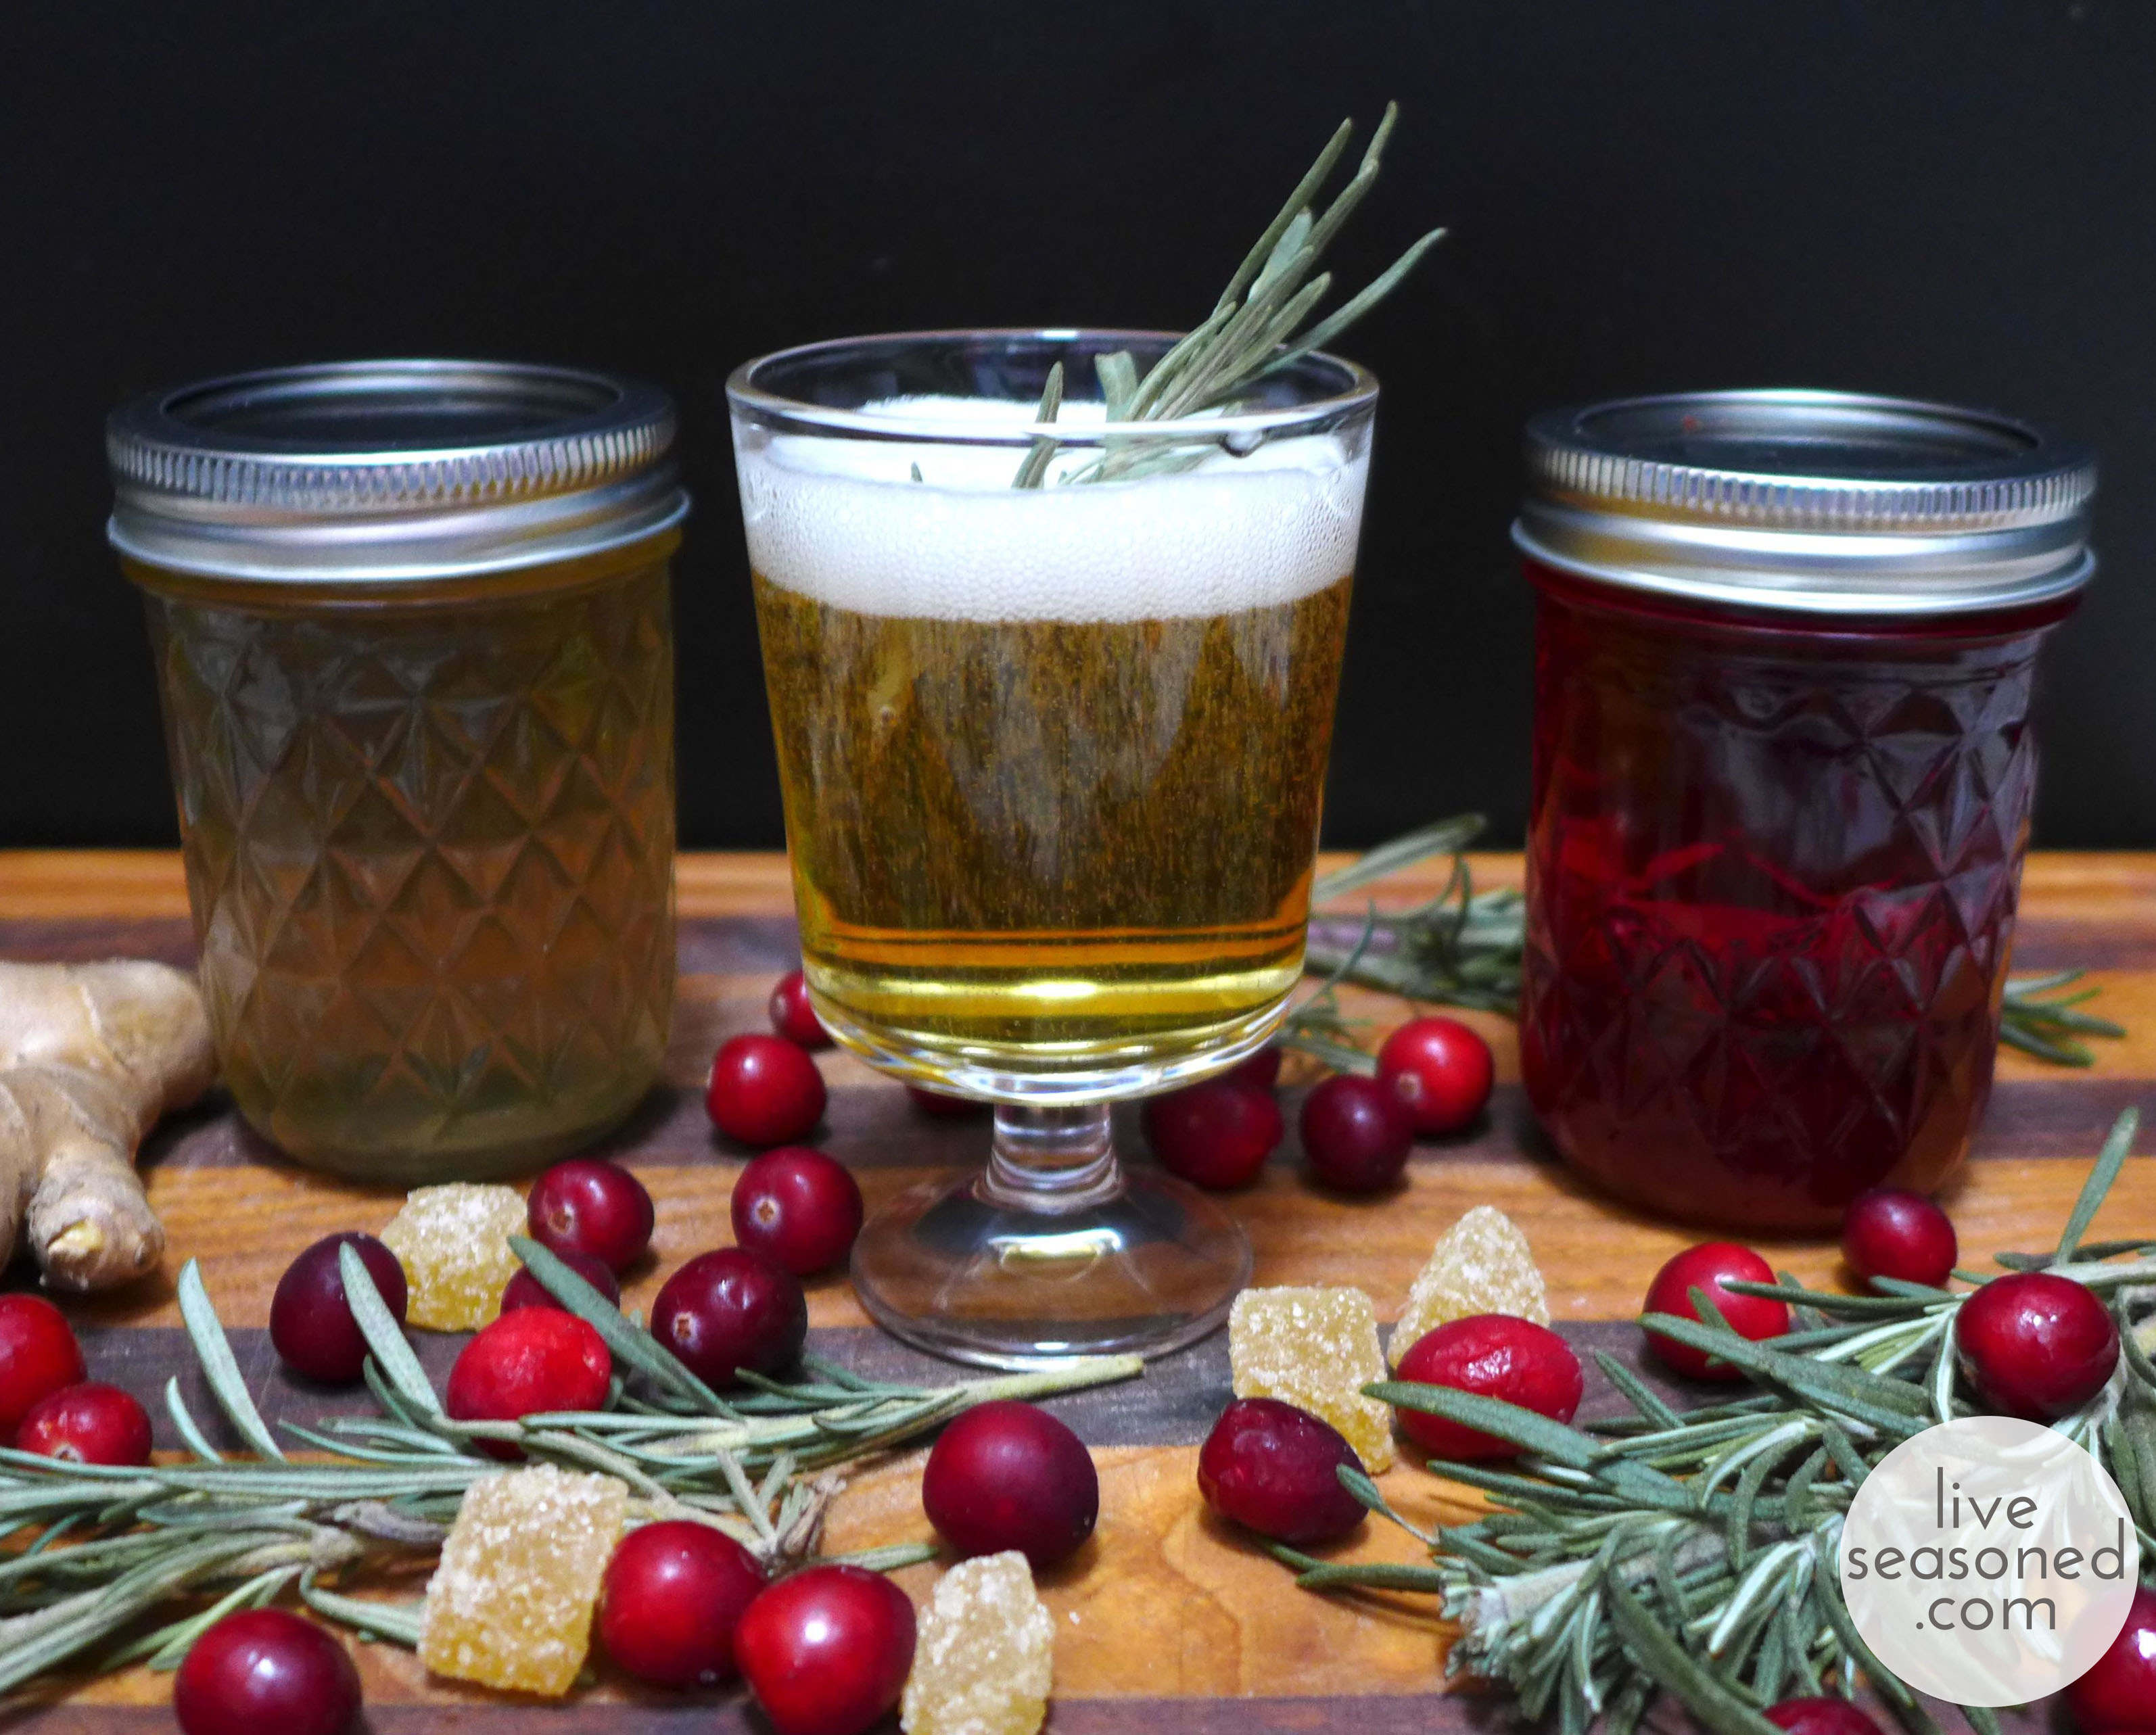
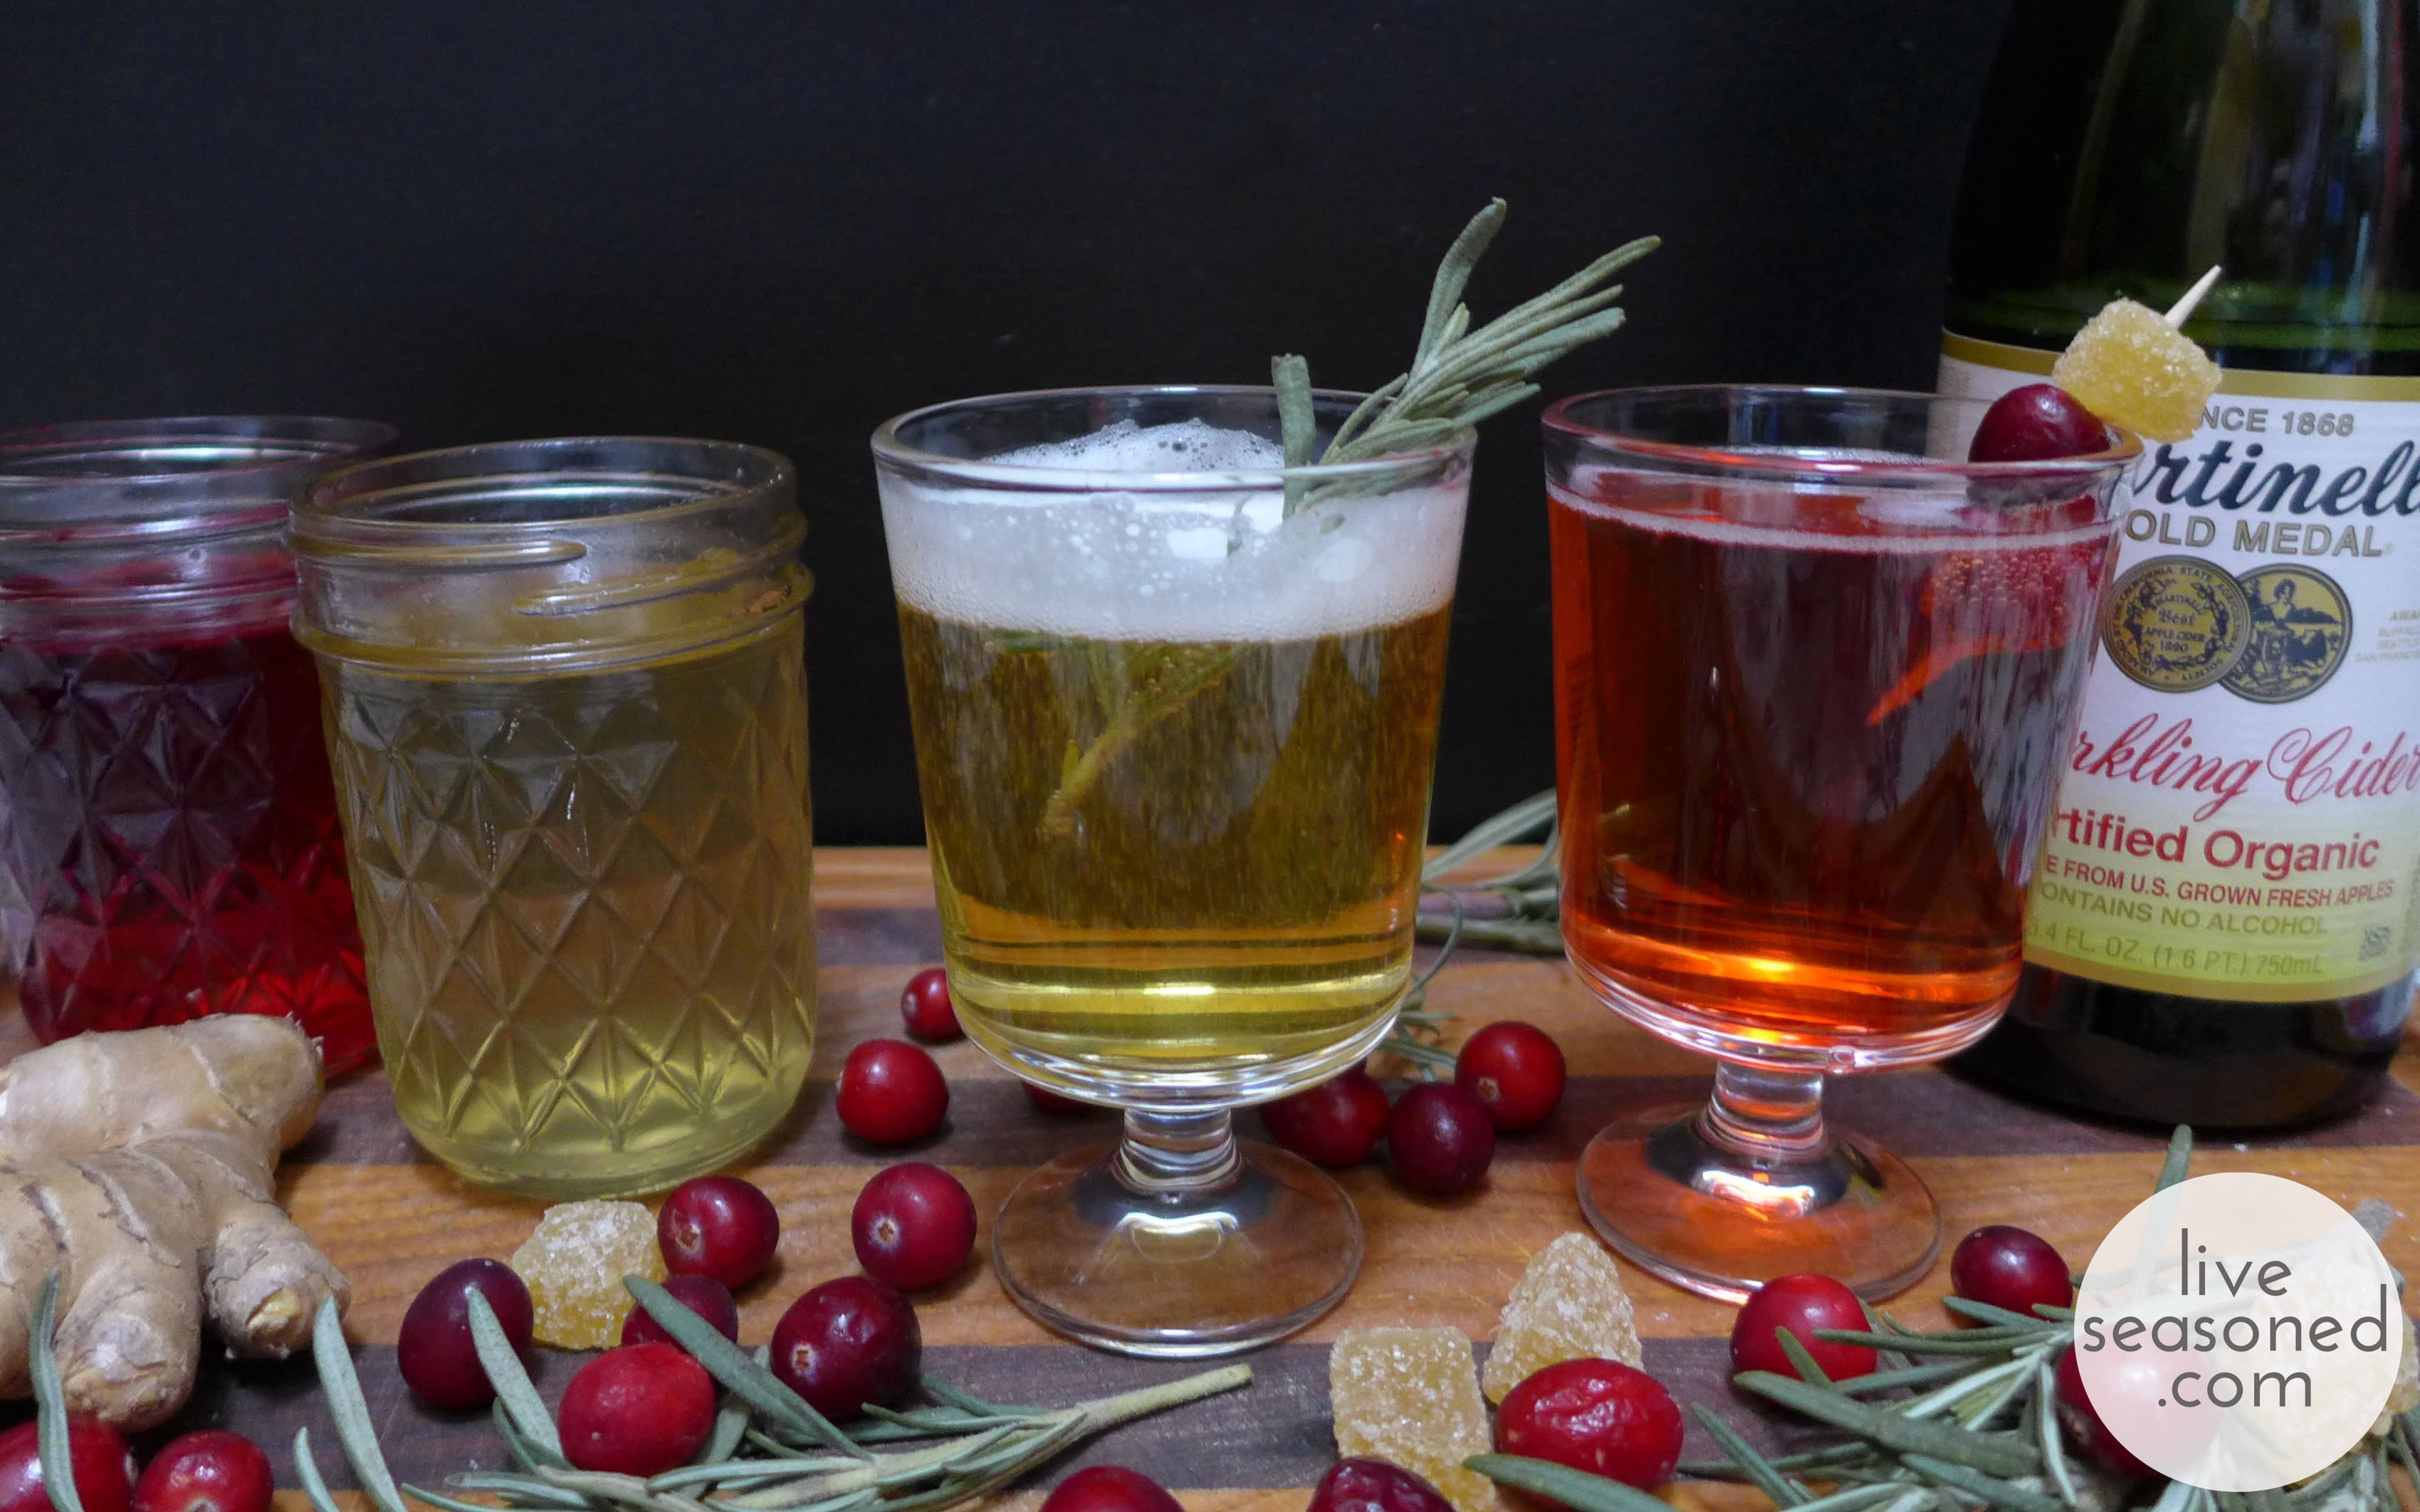
If your holiday dinners are anything like ours, there will be at least one bottle of non-alcoholic sparkling cider or grape juice on the buffet. We may have outgrown the kids’ table, but we haven’t outgrown the kids’ bubbly. This year we suggest adding a bit of grown-up flavor to your juice in the form of cranberry and ginger-rosemary simple syrups, creating mocktails worthy of the adult table… of course, we won’t bat an eyelash if you add a touch of your favorite vodka or gin too!

liveseasoned_fall2014_thanksgivingmocktails14_wm

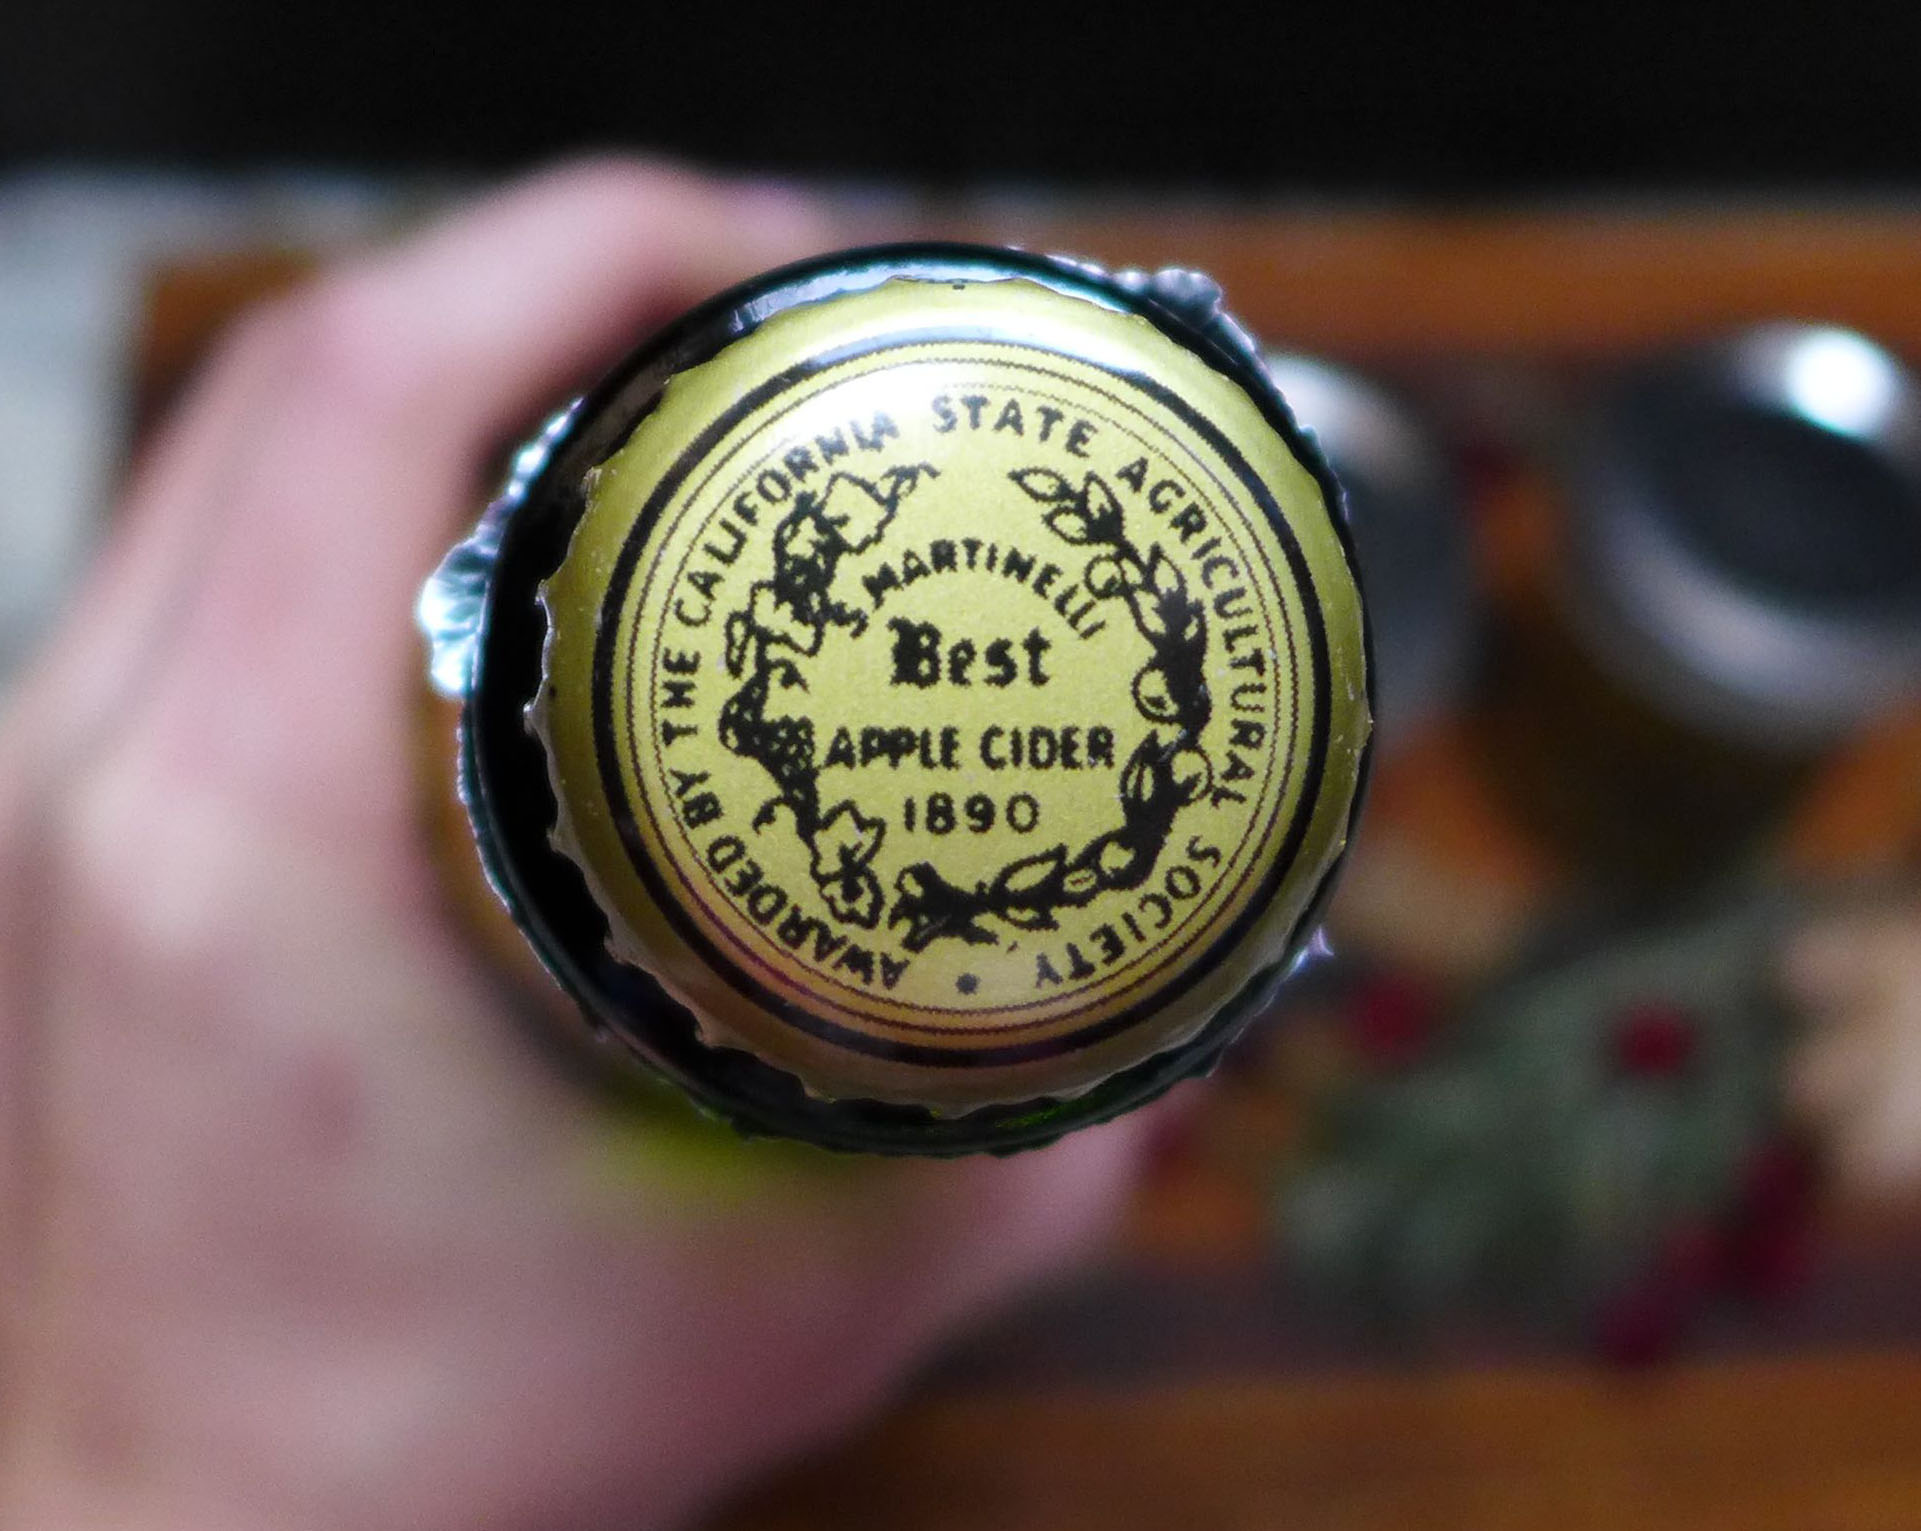
Each of these drinks gets their flavor from Martinelli’s Organic Sparkling Cider and an infused simple syrup. We’re sure your holiday menu is already full, so we purposefully kept these mocktails simple to make using ingredients that we always have on hand for Thanksgiving. As such, there’s no need to add an extra item to the mile-long grocery list, and if you’re short on time, you can assign the syrup-making to the first guest to walk through the door.

liveseasoned_fall2014_thanksgivingmocktails13_wm
liveseasoned_fall2014_thanksgivingmocktails6_wm

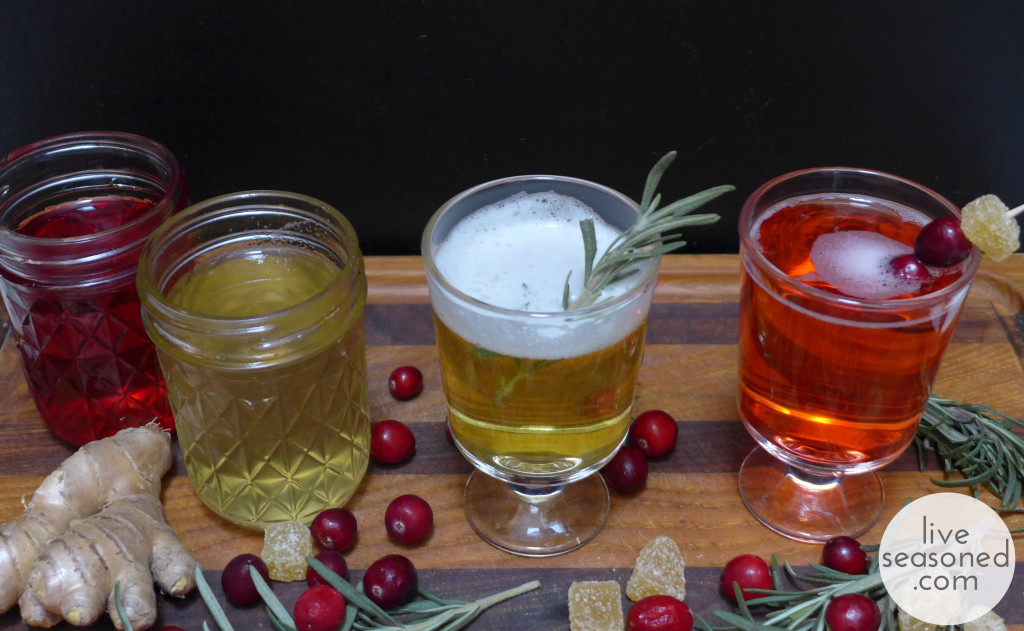
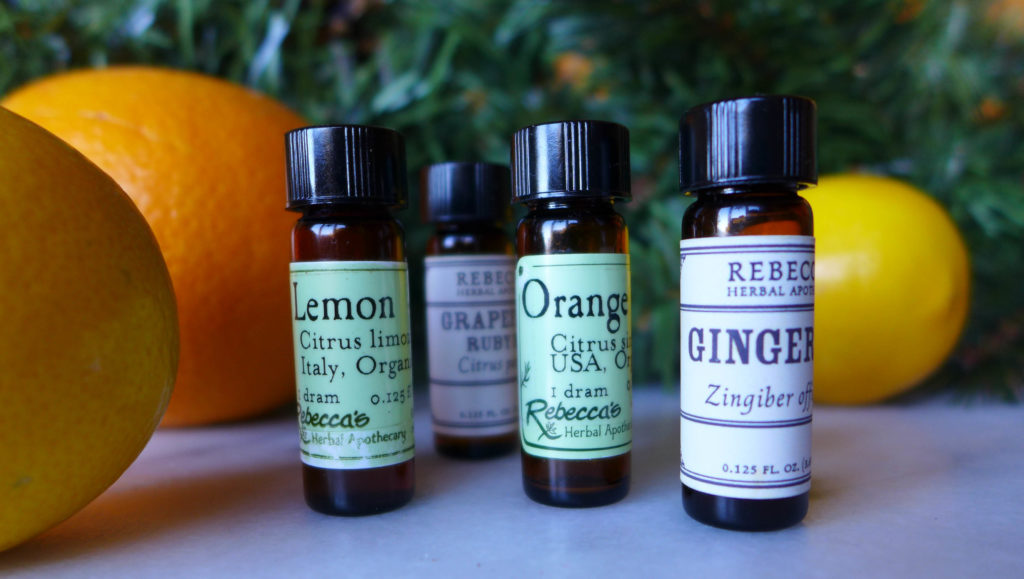
 Rosemary-Ginger Simple Syrup

  • 1 cup sugar
  • 1 cup water
  • 3 sprigs rosemary
  • 4-5 1/4 inch slices fresh ginger
  • Place all ingredients in a sauce pot, bring to a boil and then let simmer for about 1-2 minutes until sugar dissolves. Remove from heat. Strain the rosemary and ginger from the syrup once it cools.

Cranberry Simple Syrup

  • 1 cup sugar
  • 1 cup water
  • 1 cup cranberries, coarsely chopped
  • Place all ingredients in a sauce pot, bring to a boil and then let simmer for about 1-2 minutes until sugar dissolves. Remove from heat. Strain the rosemary and ginger from the syrup once it cools.
liveseasoned_fall2014_thanksgivingmocktails9_wm

Time to Mix!

The Martinelli’s on its own is too sweet for my taste and adding these simple syrups would create a drink that would make my teeth hurt, so I always start by cutting the cider 50-50 with seltzer water. I would suggest you do that, or, if you’re the drinking type, take our suggestion and add vodka.

  • 1 part sparkling cider
  • 1 part seltzer water
  • 1 Tbsp simple syrup
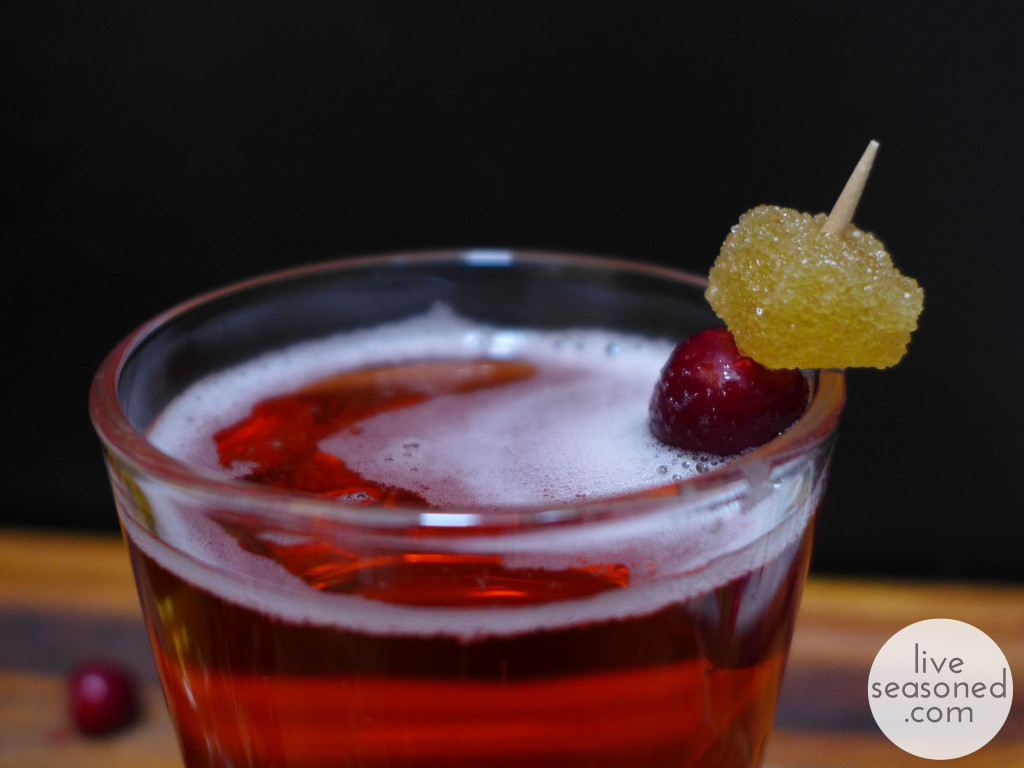
  • rosemary, fresh cranberries, and crystallized ginger for garnish

Place all ingredients except the garnish in your glass and  give it a gentle stir.

liveseasoned_fall2014_thanksgivingmocktails3_wm

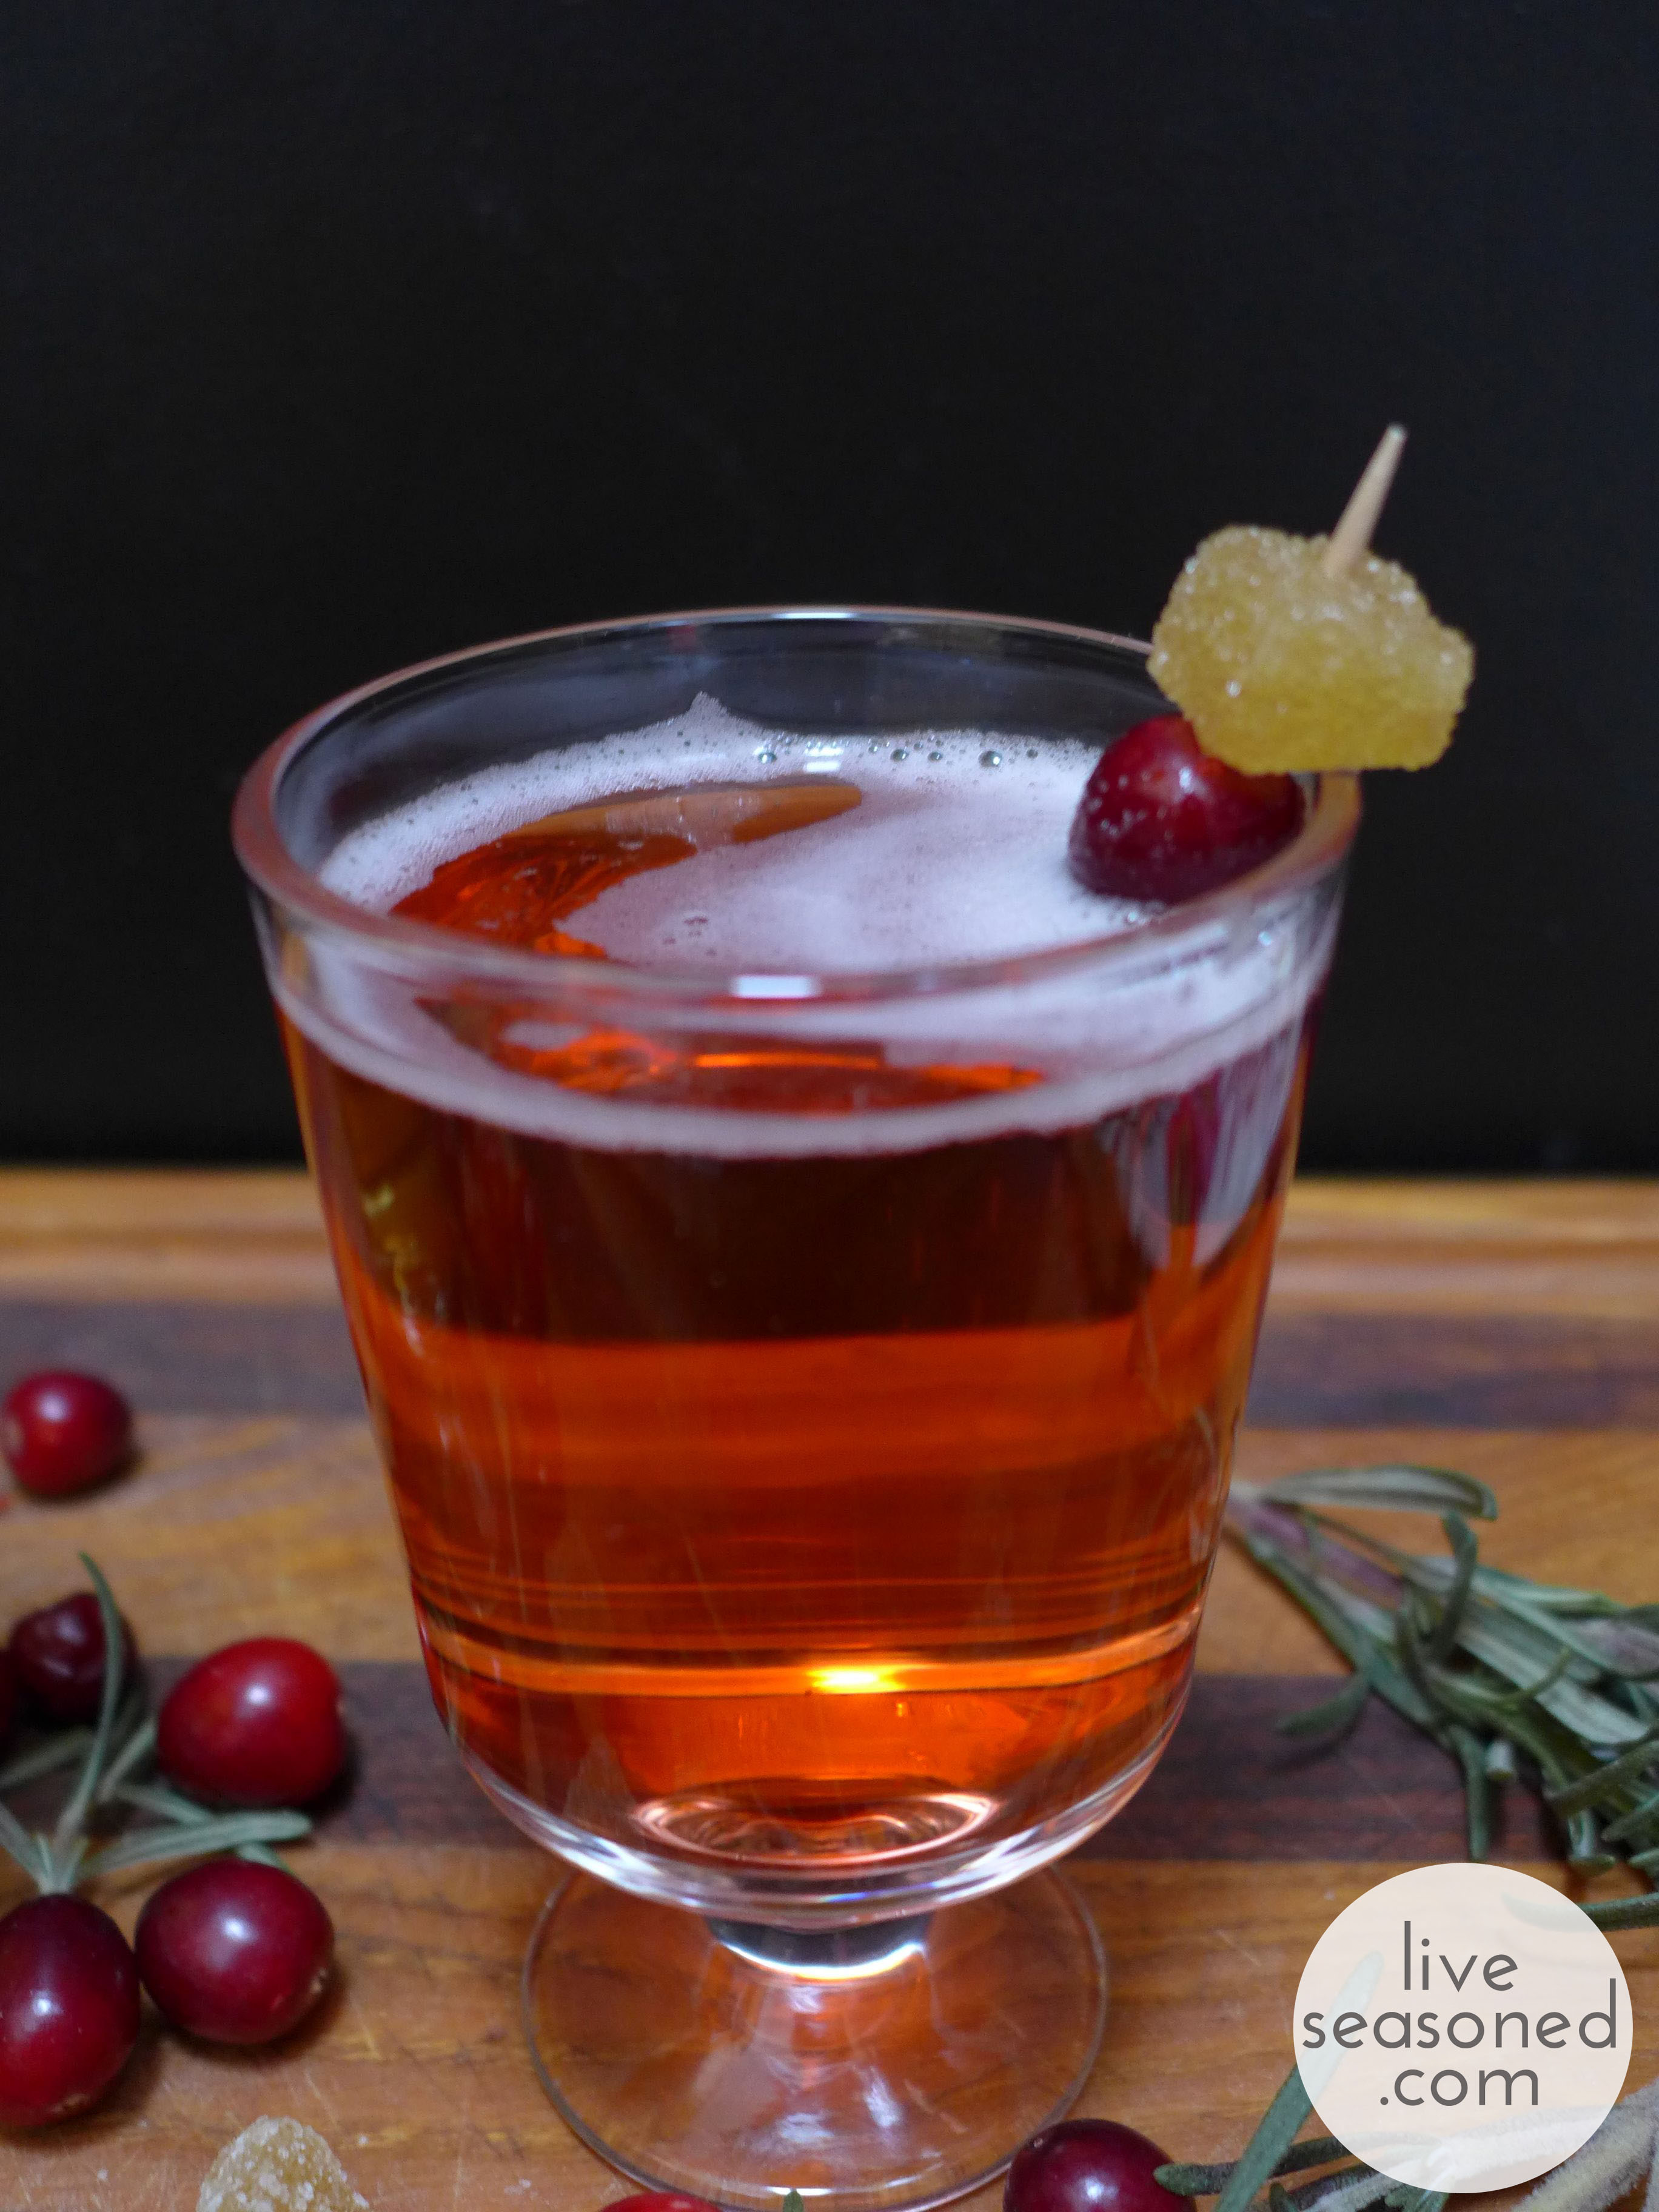
I think my favorite part is coming up with the garnishes! Is professional garnish-er a job? If so, I’m available for your next party. A note about buying the ginger: I never keep crystallized ginger on hand, because it always seems to dry out and get hard before I have a chance to use it. Instead, I buy only what I need for any recipe from the bulk foods section of the grocery store. On this particular day I only bought 8 or 9 pieces; considering my love for buying in bulk, this seems silly, but it’s always so nice having fresh and soft crystallized ginger for a recipe.

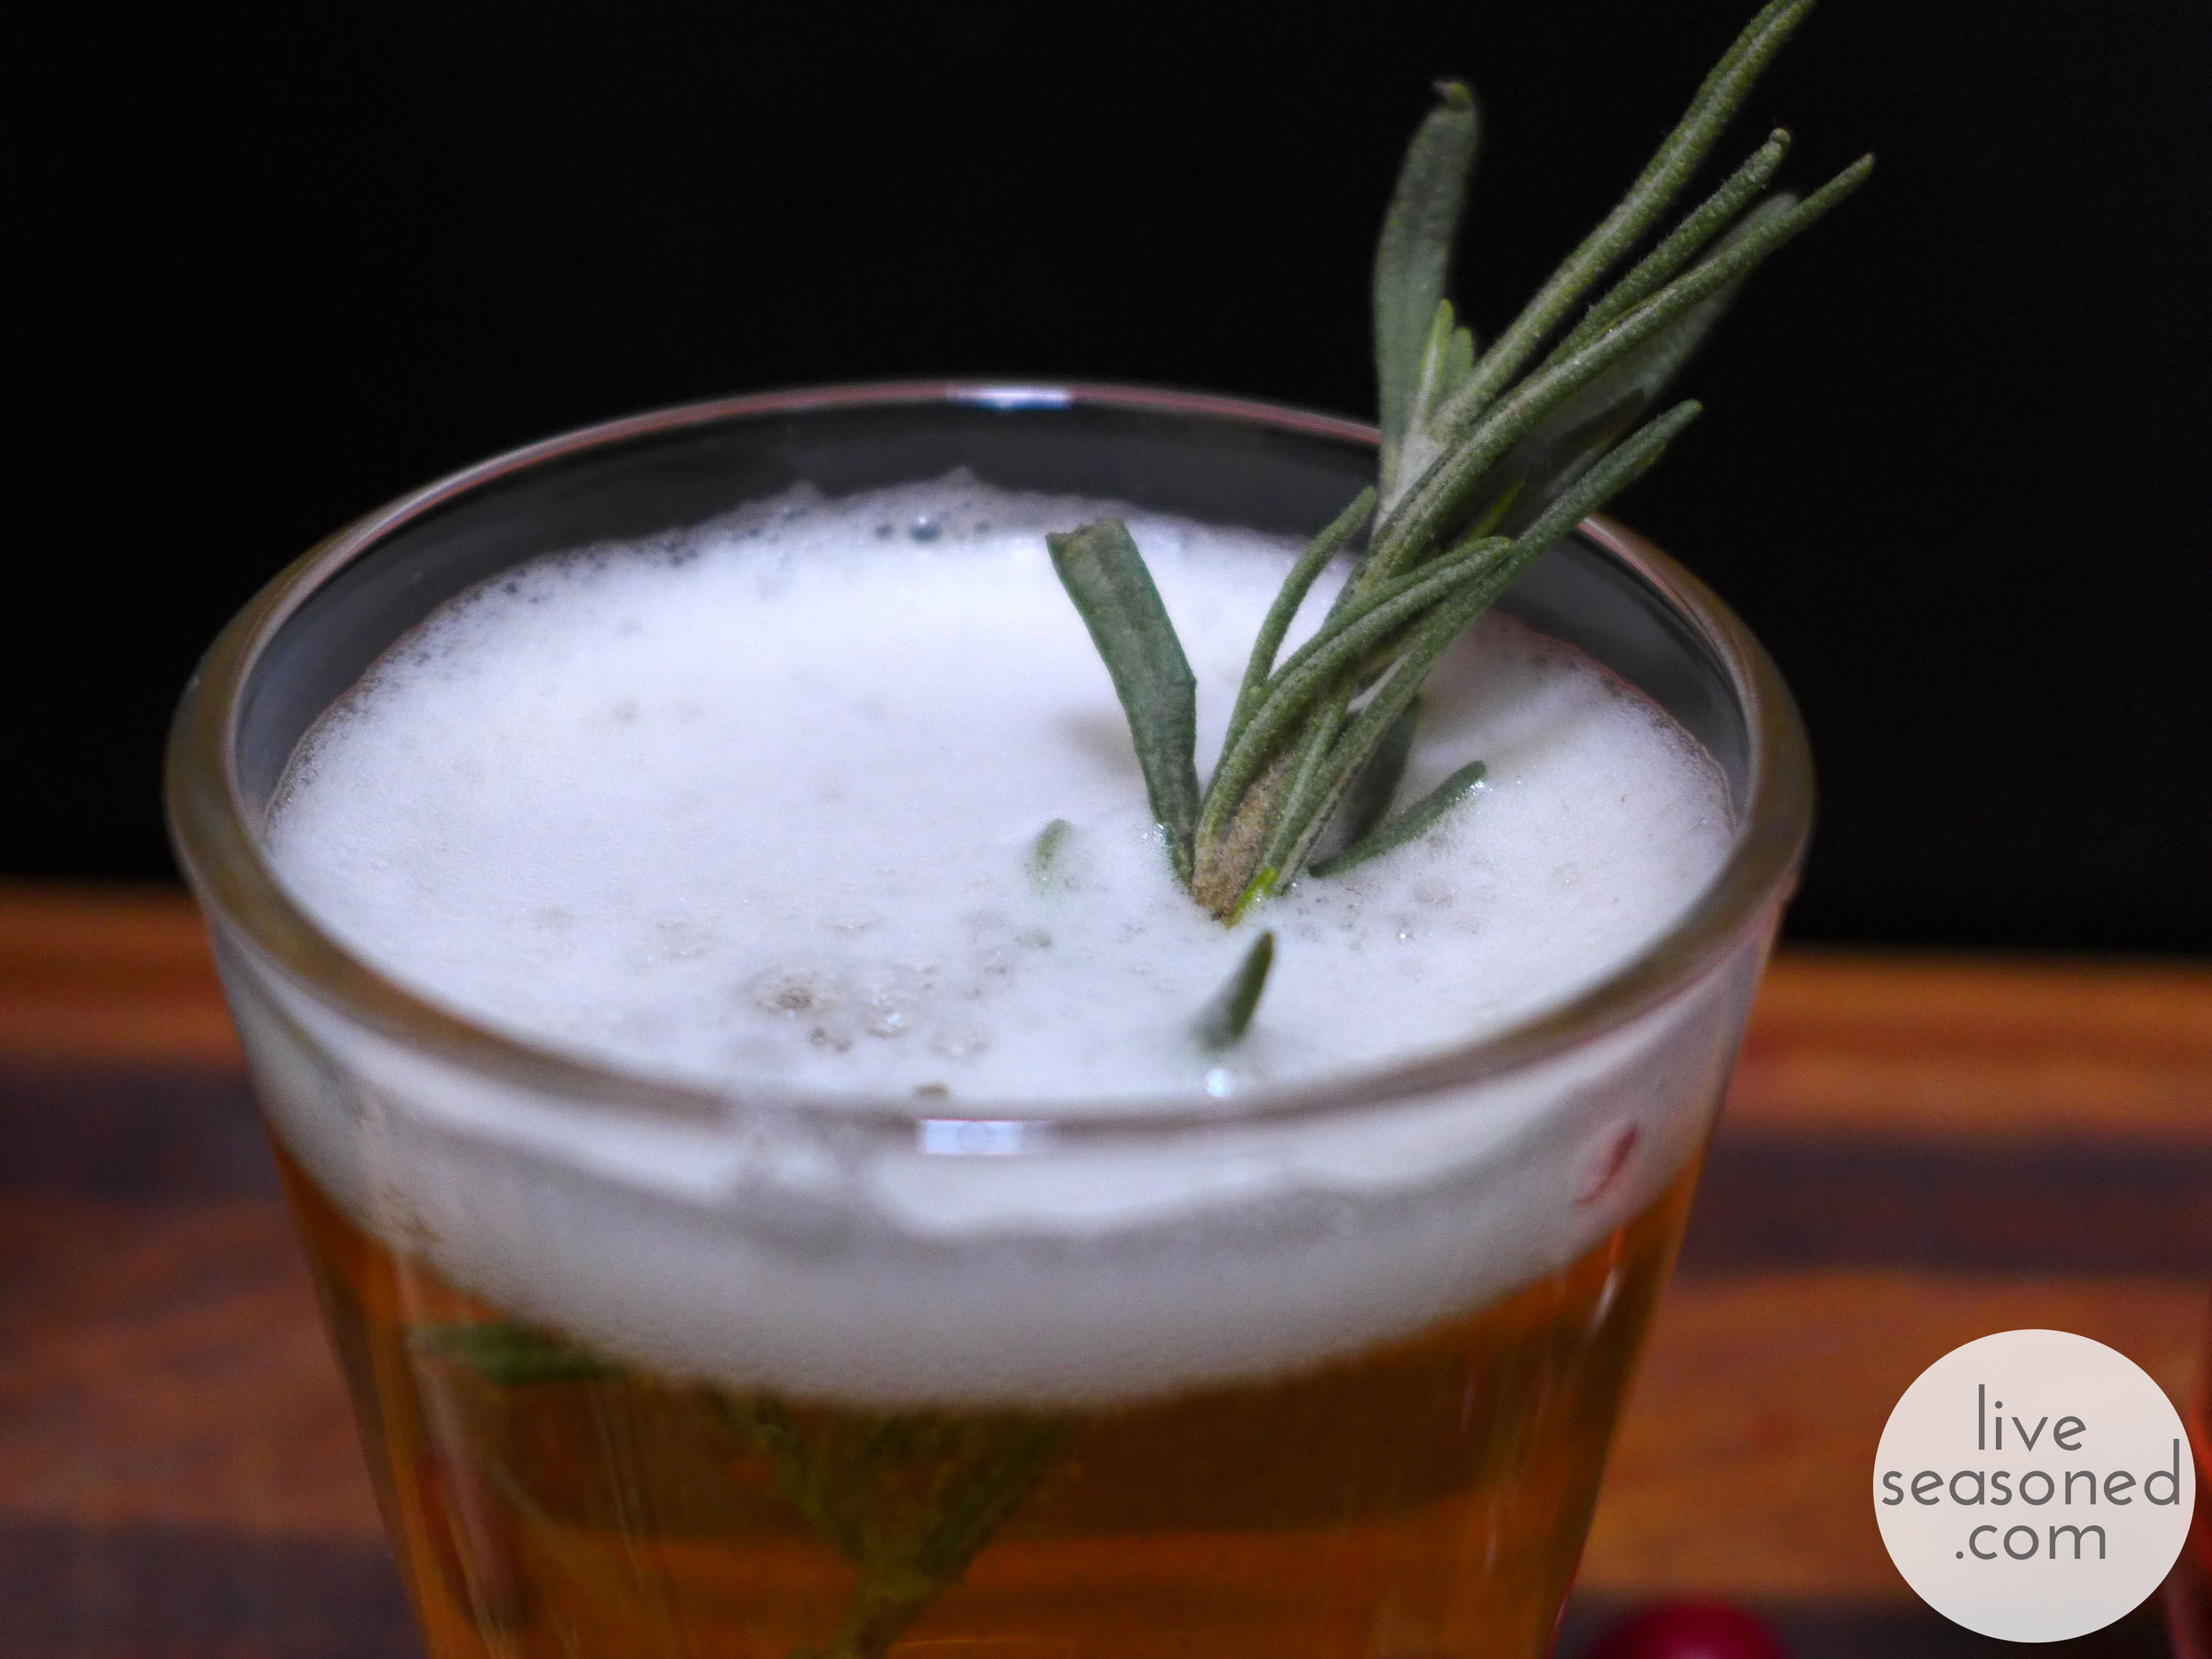
In the ginger-rosemary drink I used a sprig of rosemary. It matched the flavor of the drink, and the green and gold combination looked beautiful. My rosemary stems were a bit flimsy, but if your rosemary stems are firm, use them to skewer some of the cranberries and ginger.

liveseasoned_fall2014_thanksgivingmocktails2_wm

For the cranberry drink I put a couple of cranberries and a piece of crystallized ginger on a toothpick. Even though there’s no ginger in the drink, the sparkling gold candy looked so pretty on top of the red berries. Don’t you think?

liveseasoned_fall2014_thanksgivingmocktails1_wm
 
liveseasoned_fall2014_thanksgivingmocktails7_wm

Of course, even if you don’t have time to mix up these syrups, just adding a bit of garnish to your sparkling cider will make every feel special! Especially if you add something like the sprig of rosemary ~ each time your guests take a sip of cider they’ll get an added bonus with the rosemary aroma.

liveseasoned_fall2014_thanksgivingmocktails4_wm