
If you haven’t grown your own food yet, we think herbs provide one of the easiest ways to begin gardening. Herbs can be grown indoors or outside, whichever you prefer. Once they get growing, they’re relatively low maintenance, and you can begin harvesting almost immediately. I recently moved to an apartment with no yard so I began an indoor herb garden. This post contains a few things I’ve learned about growing herbs indoors, and that terra-cotta pot painting tutorial we promised is at the end of the post!
There are a few things that can go wrong, but if you purchase plants (instead of seeds) and pots that have good drainage you’re off to a great start. Of course, seeds can give you great results too, but they require more time until you can harvest your herbs and more precise conditions as the wee little seedling develops.
Personally, I love terra-cotta, but whatever pots you choose, make sure they have drainage holes in the bottom. Don’t forget to pick up plates or saucers to catch the draining water. When filling your pot, start off with a couple inches of pebbles, rocks, sand or whatever drainage material you have on hand. Add a few inches of potting mix on top (this will provide some nutrients) and then add your herb and top off the pot with more soil. Pour a big glass of room temperature water (you don’t want to shock your plants with cold water) over each planted herb and place them where they’ll get the correct amount of light. Monitor your plants a little bit each day until you really get to know them that way you’ll spot the first sign of any troubles that come your way. Who am I kidding, you’ll have no troubles, just herbs, lots and lots of healthy herbs!


A few tips:
- Windowsills may be too hot or cold for your herbs. I have mine on a shelf about a foot away from the window so they don’t get scorched or wilted with the change of seasons.
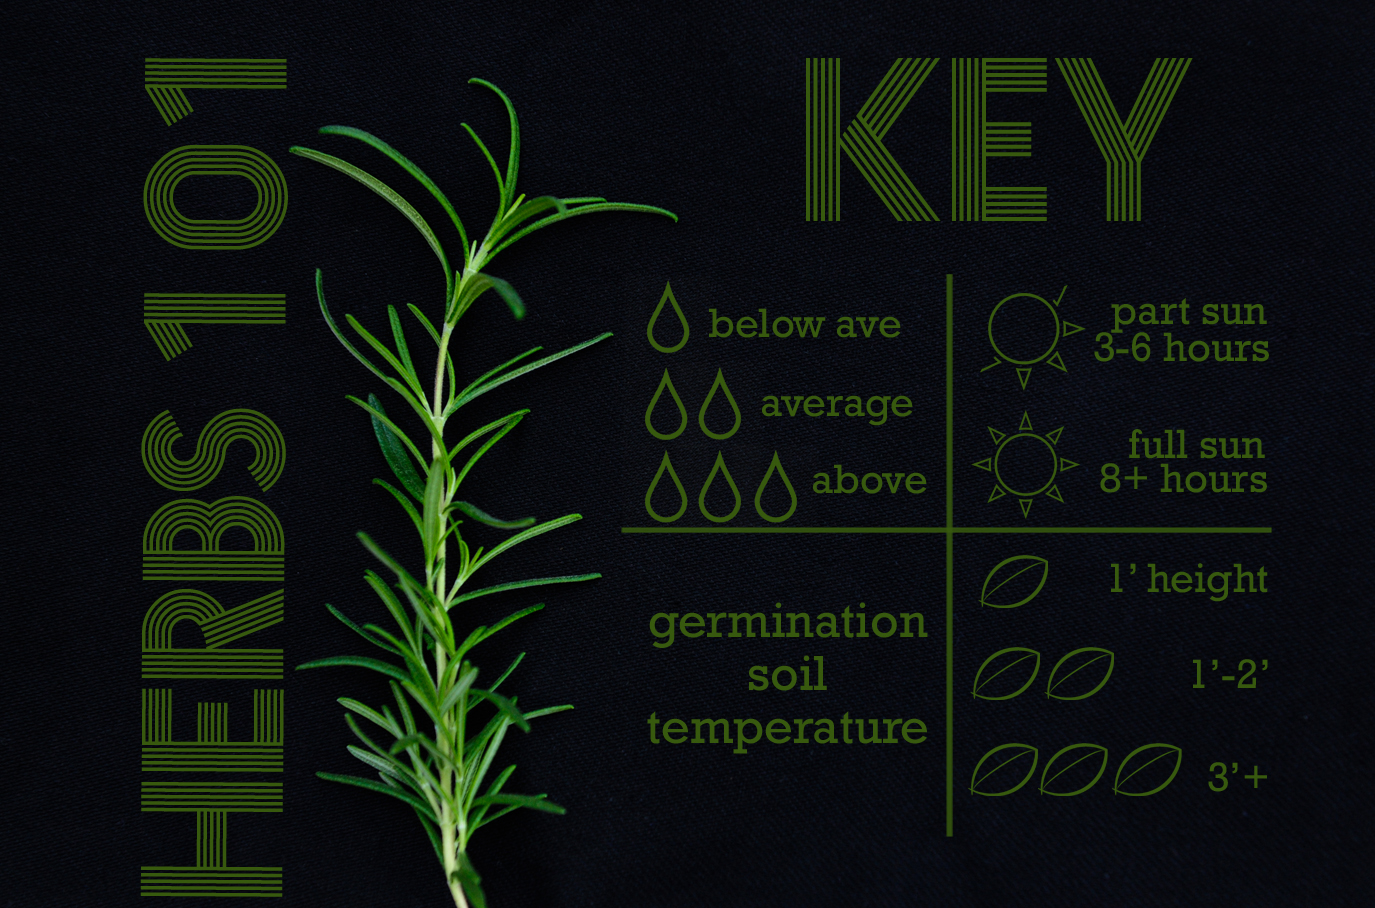
- Not all herbs will hang out on the same shelf. Some require full sun, while others prefer only partly sunny conditions. Think about the light in your home when determining the best spot for your plants.
- Water your herbs in the morning so that the stem, roots and soil has time to dry throughout the day. This will prevent root rot. Also, aphids and other tiny bugs like the dark moist conditions that arise when you water in the evening.
- Don’t let the herbs sit in a saucer full of water. This will cause root rot.
- There’s no exact science to watering. It all depends on the pot, plant, temperature and humidity in the air, but if you pay attention to your plants you’ll realize when they need a drink. A good test is to stick your finger about an inch into the soil – if it’s dry give it a drink.
Growing herbs is an easy way to add fresh flavor to your cooking year round. We have dozens of suggestions for go-to recipes for each herb, but unfortunately we haven’t gotten around to posting them all yet, so here are some seasonal recipes from around the web to get you started:
Basil- Spring Pesto, Summer Caprese Salad, Fall Pasta, and Winter Basil and Ricotta Stuffed Shells.
Cilantro- Spring Cilantro Ginger Drink, Summer Salsa, Fall Sweet Potato Tacos, and Winter Cilantro Lime Rice.
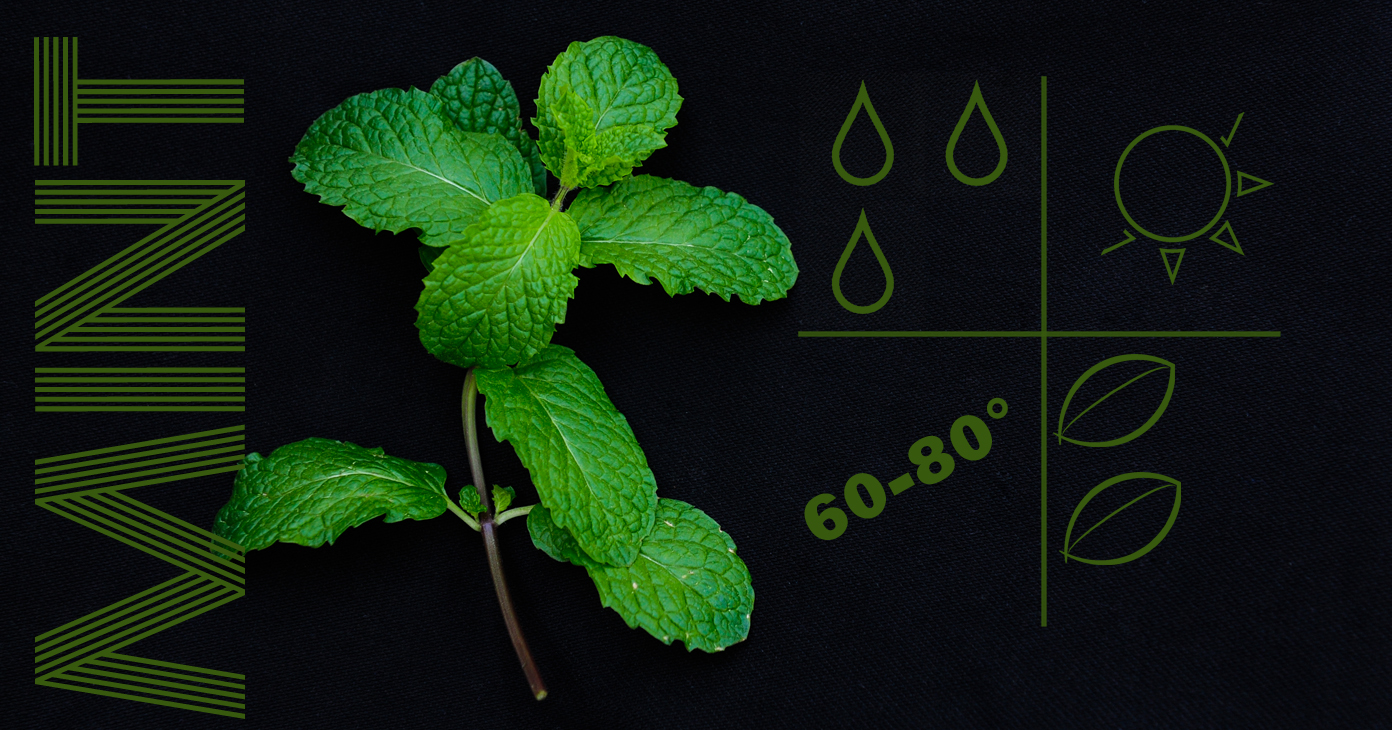
Mint- Spring Minestrone Soup, Summer Watermelon Salad, Fall Mojitos, and Winter Flatbread.
Oregano- Spring Greek Salad, Summer Garden Herb Salad, Fall Three Bean Chili, and Winter Turkey and Feta Stuffed Peppers.
Parsley- Spring Corn and Potato Soup, Summer Collard Green Tacos, Fall Basmati Rice Chickpeas, Currants and Herbs, and Winter Black Bean Burgers.
Rosemary- Spring Vegan Rosemary Scones, Summer Bloody Marys, Fall Sweet Potato and Rosemary Soup, and Winter Wild Salmon.
Sage- Spring Butternut Squash Ravioli, Summer Grilled Veggies, Fall Sage Stuffing and Winter Sage Soap (for gifts, not eating!).
Thyme- Spring Lemon Thyme Cocktails, Summer Herb Crackers, Fall Pumpkin Mac and Cheese, and Winter Roasted Chicken and Asparagus Pasta.


Painting terra-cotta pots is a great way to add a little character to your herb garden and patio. Like I said, I love terra-cotta. They’re great for your plants and they get prettier with age. I didn’t feel like waiting for the natural patina of moss and minerals to develop on my pots, so I started the party with some acrylic paint. Painting terracotta is relatively straightforward. There are two routes you can head down: long lasting sealed designs or imperfect aging patterns. I went with imperfect aging because I knew sealing my pot would restrict it’s ability to fully aerate and insulate my plants. I also look forward to seeing moss and minerals appear on the clay and sealing would combat those desired effects, but I digress.


Supplies:
- terracotta pots
- medium grain sandpaper
- sponge stencils (optional)
- paint brush
- acrylic or latex paint
Instructions:
- Lightly sand the entire surface of the clay pot. Wipe it clean with a damp rag (the rag should turn red from the terracotta dust). Let the pot dry. Set the pot upside-down on a cylindrical container like an oatmeal or breadcrumb container.
- Choose a pattern or design and paint a thin coat onto the pot. You can paint freehand or use a stencil or sponge to create your desired design. I’ve found that three thin coats of paint work the best.
I wanted a bohemian and aztec feel so I used gold paint and sketched out a few tribal-looking designs. I made sure the designs were made up of simple shapes so I could easily reproduce them over and over. I had nifty dry sponge sheets that I cut the shapes out of and used to stamp all over my pots. I painted the second and third coat with a paintbrush so I could even out the edges and smooth out the bubbles made by the sponges. There you have it. Easy, breezy, painted pots.
Admiring my painted pots and petting my herbs (yes, I pet them daily) really brings joy to my little apartment. The herbs smell delicious, especially the rosemary, and they’re great to run my fingers across after I’ve been cooking (garlic fingers-ick) or cleaning. The great thing about an indoor herb garden is that you can always move it outside when the time comes. You can simply take the pots out or you can plan to plant them in your garden when they are hardy enough. I hope you try your hand at one or all of these flavorful herbs (or others-I didn’t forget about you dill) this season. They’ll bring green into your home and flavor onto your dishes.
Do you already have an herb garden? We would love to hear about it here or see it on instagram – tag @liveseasoned .
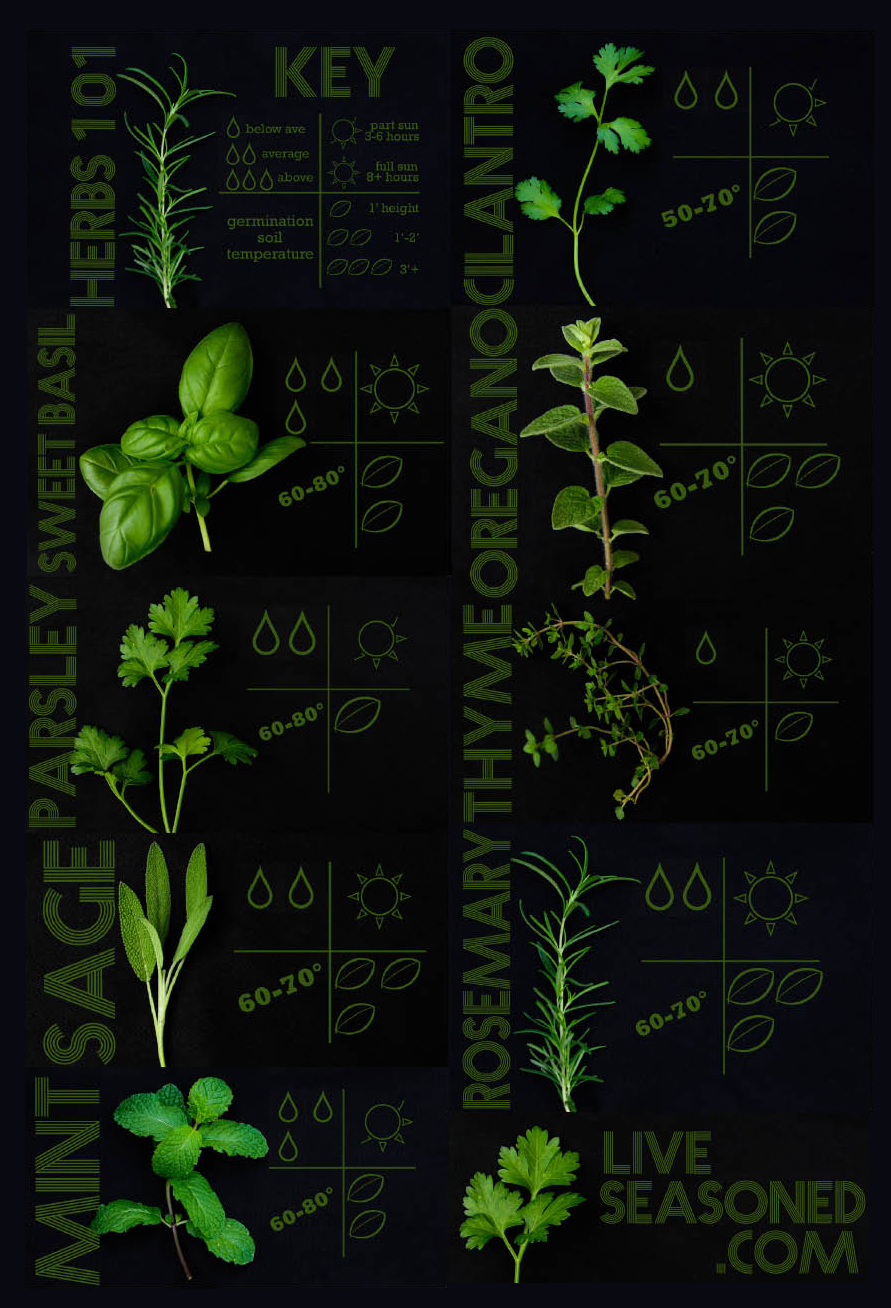
If you liked our little herb directory, we put it together into one, big document that you’re welcome to download, print, pin, and generally reference as you begin your herb adventure. Enjoy!
Nice info graphics. Sarah’s doing?
Yeppers Peppers.