Camp Kitchen Snafu

Sarah recently shared detailed lists for setting up your camp kitchen and your backpacking kitchen. I think we can all agree that one of the most essential items on those lists is the stove. It’s essential for hot coffee in the morning, teas at night, eggs for breakfast, ramen for dinner. Should I go on?

We spent many years backpacking with our homemade beer can stoves (thanks, pop!). When we started car camping more regularly, the mini burner on a gas canister was a great option. Sarah’s a recent convert to the Jetboil system. The nice thing about each of these stoves is that they’re relatively small! They can easily fit in your camp box/bag, ensuring that you never leave home without them (bit of foreshadowing there).
tetons7

Now that we’re a family of four, we’ve made the leap to a Coleman camp stove. It’s definitely not an option for a backpacking trip, but it’s perfect for car camping, especially with a group. You can use larger pots and pans, have multiple items cooking at once, and you don’t have to worry about balancing a tippy pot, which is clutch with a couple of crazy kids.

Unfortunately, we FORGOT THE STOVE on our last trip. I can’t remember when we realized our mistake. Maybe on the drive? Maybe when setting up the van that first night? Either way, with little hesitation we knew we could rise to the occasion and camp without the stove.

Whenever we’ve mentioned this blunder to people, they’ve all asked or assumed that we would run out and buy another stove. Admittedly it crossed our minds, and that’s because it’s so hard to imagine a weekend without a stove.

tetons8

But really, it’s not that bad, and here’s how we handled it. The first step was to decide what we could live without and then find alternatives to the items that were absolutely necessary.

The Essentials:

  • coffee : we can’t live without it. Sure, there’s the ritual of a warm cup of coffee in the mornings. That’s nice, but for us, caffeine was our main concern. We bought a bottle of free-dried coffee crystals and made Nescafe Frappes all weekend. Knowing this recipe is up there with knowing how to escape a grizzly bear attack or how to cut off your arm in an avalanche. Life or death.
  • hot breakfasts : again, nice, but there are options. We bought a variety of yogurts and called it a day. This was particularly a hit with the kids because the sweetened yogurts are an indulgence that they rarely get at home.
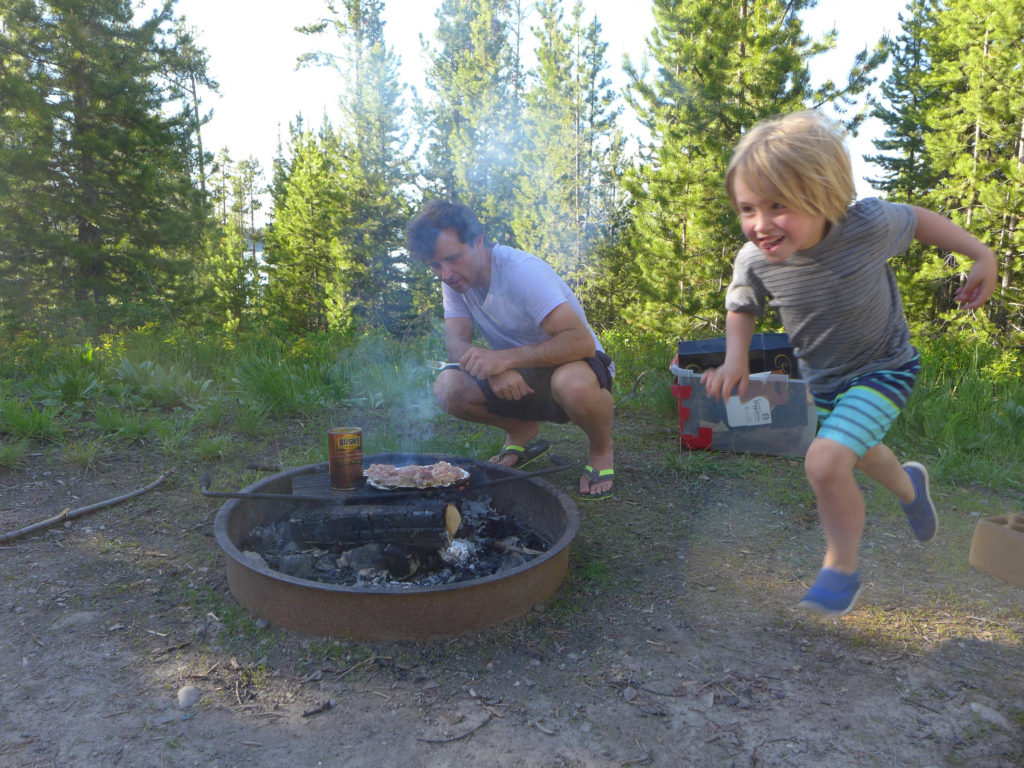
  • dinners : this is where we had to do a bit more thinking, but were still able to make it work. Almost all campsites that we visit have a removable grill that fits over the fire ring. We grilled hotdogs one night and chicken thighs another. With the chicken we heated up a can of baked beans, and together that was one of those dinners that tastes gourmet because you’re eating it in the woods have a long day outside. Other nights we made tasty picnic platters with hummus, salami, cheese, etc.

We often pack no-cook lunch options, so that was always an easy meal. The boys didn’t get their regular hot chocolates for breakfast, but they were just as happy with cold chocolate milks.

At the end of the trip, it was fun to have this little snafu success under our belt. On a personal note, it was nice to work through this situation in front of the boys, giving us a real-life “problem” to solve together.

And now we’ll always travel with a jar of instant coffee in our camp bag.

Backcountry Backpacking Kitchen

live seasoned hoh river trail-1-3

Earlier today we shared Car Camping Kitchen Essentials and now we’re back with backpacking must haves. When it comes to backpacking you basically want to get away with as little gear as possible. Below is what I take on any standard backpacking adventure.

Backcountry / Backpacking Kitchen Essentials

  • Jetboil Stove
  • Windscreen
  • Fuel + Extra Fuel
  • Cookset (The Jetboil comes with a cooking cup)
  • Pot grabber (The Jetboil comes with a sleeve)
  • Bear-proof Food-storage canister
  • Water purification system
  • Water bottle or bladder
  • Bowl + Mug
  • Spoon + pocket knife
  • Matches/lighter
  • Biodegradable soap
  • Tiny sponge

Notes about gear options

The Stove – this is a very personal decision. How many are you cooking for? Are you crafty? My pop has used this DIY stove for over a decade and loves it. I bought this lil’ guy when I was backpacking solo a lot. Recently I’ve used the Jetboil a lot and I really like it so that’s what I linked to here.

Bear Proofing Measures – will depend on your location. In most National Parks out west, bear canisters are required and available to rent for super cheap. I have researched bear canisters for hours and still haven’t come to a conclusive decision so I haven’t purchased one yet. Now that I’m typing this, I bet there are some used ones floating around out there that I could buy. I’ve already invested in this bear bag so you could see why I’m not jumping into another investment.

Water Purification System – there are several options and I really don’t know what’s best for you. I rely on the tablets. I don’t mind that they take thirty minutes to dissolve. I have owned a SteriPen in the past, but it failed on me. I’m still upset about it.

Backpacking on the Hoh River Trail to Blue Glacier

live seasoned hoh river trail-2

Hiking the Hoh River Trail to Blue Glacier is an epic weekend adventure and one I haven’t stopped thinking about for a full year. The route is an out and back trail and comes to 37 miles round trip with about 3,700 feet of elevation gain. The highest point on the trail is at 4,300 feet where you’ll stop to eat lunch and gaze at the big Blue Glacier. The Hoh River Trail starts in a temperate rainforest, progresses to an alpine meadow, and then arrives at a dramatic Blue Glacier.

There are plenty of websites that will give you the play by play step by step of this hike, I won’t do that, but I will tell you why you should absolutely schedule this into your summer, give you a packing list, and menu, and any other helpful bits.

live seasoned hoh river trail-1-3

You Should Definitely Hike The Hoh River Trail Because…

  • It isn’t crowded. Walk fives mile in and the crowd diminishes. You will see a few dozen people past the ten mile mark, but they’re all as committed and awesome as you are.
  • The variety of landscapes are outstanding. Temperate rainforest. Subalpine meadow. Subalpine meadow basin. Montane forest. Mothafckin’ Blue Glacier.
  • It’s an epic two-nighter and an even more enjoyable three-nighter.
  • You can climb around on enormous trees, take a cool dip in the Hoh River, and then hike through snow on your way to the glacier.
  • It’s the perfect summer hike – not too hot and definitely not cold.
  • Water is plentiful and honestly you don’t even have to poop outside – there are several outhouses on the trail.
  • You’re hiking up close and personal to a glacier, but it isn’t a technical hike. The hardest part is probably taking it slow down the ladder (shown in the photo below).
  • The trail is extremely easy to follow.
  • There is opportunity to see wildlife, haaaay, mountain goat!

live seasoned hoh river trail-7

If You’re Doing it in Two Nights – Do This:

Hike as far as you can on day one. We started quite late and ended up hiking in the dark for a few hours, but we made it all the way to Lewis Meadow. You could even hike further than that to really set you up for success on the Glacier day. On day two, we left everything we had at the campsite except for water, warmth, and lunch. You could take your things with you, drop them at a campsite further down the trail and then continue on to the glacier, but we really liked our initial campsite and we wanted a shorter day (11 miles!) on day three. Day two was loooong, but the benefit of an in and out trail is knowing exactly what you’ll have to hike once you turn around and head back, so there were no surprises. Also, since you hike up, up, up to the Blue Glacier, the second half of day two is all downhill until dinner time.

live seasoned hoh river trail-1

Packing List

  • Backpack
  • Tent
  • Sleeping Bag
  • Sleeping Pad
  • Compass
  • Map
  • Fire Starter 
  • Permits
  • Sunglasses
  • Hat
  • Bandana
  • Quick Dry Towel
  • Beanie
  • Underwear x2
  • Socks x2 (Wool/Synthetic)
  • Long Sleeve
  • Short Sleeve/Tank Top
  • Pants
  • Shorts
  • Swimsuit
  • Rain Jacket
  • Fleece
  • Puffy
  • Thermal Underwear
  • Gloves
  • Hiking Boots
  • Chacos
  • Toilet Paper + trowel
  • Contacts/Glasses
  • Hand Sanitizer
  • Toothbrush/Paste
  • Jet Boil
  • Fuel 
  • Bowl
  • Cup
  • Spoon/Fork
  • Pocketknife / Multitool
  • Sawvivor
  • Water Bottle/Camel Bak
  • Water Filtration System
  • Bear Canister
  • Lantern
  • Headlamp
  • Trekking Poles
  • Bug Spray
  • Nylon rope
  • Sunscreen

live seasoned hoh river trail-6live seasoned hoh river trail-4

Menu

  • Oatmeal
  • Coffee – Starbucks Via
  • Tuna packets
  • Mayo packets
  • Salt + Pepper
  • Miso/Ramen soup packets
  • Dried Seaweed / Dried Mushrooms
  • Pita bread/crackers
  • Pasta
  • Alfredo dried sauce packet
  • Pesto dried sauce packet
  • Dried Fruit
  • Jerky
  • Trail Mix
  • Chocolate Bar
  • Gatorade Mix

live seasoned hoh river trail-3

If you’re considering this hike, here are a few great resources to read before you head out:

You’ll definitely need a permit – check the NPS website for more info.

Washington Trails Association has a good write up.

Here’s the Hiking Project’s take on it.


live seasoned hoh river trail-5live seasoned hoh river trail-9

Grand Tetons & String Lake Loop

This June we’re all about camping! We’ve talked about scoring free campsites on BLM land, 24 hours in Canyonlands NP, camping in Tofino, BC, and what to pack for some good camp meals.

tetons1

In my opinion, there’s nothing like this view of the Grand Tetons.

tetons5

I camped here for one chilly night about a decade ago, and that view of the mountains rising out of the water stuck with me ever since. Fortunately, these mountains and their reflection are just as majestic as I had remembered. Come along for our quick trip back to the park.  Continue reading

Devil’s Garden Utah & 5 Reasons to Visit National Parks in Winter

Winter doesn’t stop us. Read about winter hiking, winter van camping, winter photography, snowshoeing, and winter hammocking. Oooo and here’s a link to our favorite winter adventuring jacket.

Feeling cooped up? We know it’s technically Spring now, but if you’re wondering what to do with your last few weeks of what feels like winter, we have a solution for you. Go visit a National Park or Monument before they get hella hot and busy. Here are five reasons why you should visit a national park this winter. Added bonus? We included all the info on Devil’s Garden located in The Grand Staircase of Escalante, Utah. It’s the perfect place to head off to before it gets too hot.

devils garden live seasoned utah-19

Continue reading

Sarah’s Favorite REI gear

29527630_10156084750611217_1792587095_o

Happy Monday! I had originally planned on sharing my gear essentials for rainy days, but I realized it’s REI dividend season, which means 20% off one full-priced item and 20% off one REI garage sale item until April 9th! We aren’t sponsored or affiliated with REI in any way, but we do love supporting the store and using the great gear we buy there. With that in mind, I thought it was a good time to run through all my essential pieces of REI gear incase you were looking for something to spend that dividend on.

If you’re not one of REI’s 17 million members, you should seriously consider it. It’s a one time fee of $20 that will repay itself time and time again. Below are links to my favorite items and what I use them for. Of course, I own so many more items than this, but below are my ultimates, pieces I use pretty much every week and never leave home for an international trip without. Let’s start from the feet up..

Continue reading

Visit Arches National Park & Moab, Utah

live-seasoned-2016-moab-arches-utah-2

It’s Wednesday, you’re half way through the week that means you deserve to procrastinate by looking at pretty pictures of Moab, Utah. I’ve only visited Moab once, but I have not stopped thinking about it since. People are shocked by my profound love of Utah, but if you’ve never been, you need to stop yappin’ and start packing. After all, a few of the most scenic national parks are located there.

The following photos were taken at Arches National Park. Standing in the midst of such vibrant colossal rock formations was surely grounding. Upon entering the park, I read the history of Arches then spent the next several days trying to imagine the landscape as it changed throughout the ages. I believe connecting with the landscape and witnessing earth’s transformation is a powerful conservation tool for current and future generations. Getting to know and appreciate the natural beauty in the world will surely encourage you and others to be an active participant in securing these spaces for future generations. If you haven’t visited Arches yet, call a few buddies or load the family into the car and experience history, geology and immense beauty this year.  Continue reading

Mt. Judah Hike

We like a good hike, and every once in a while we have the chance to hike slow, take pictures, and share the adventure with you. This is our first hike in California, but you can check out some of our previous Colorado hikes here.

liveseasoned_summer2015_mtjudah27_title

mt_judah_hike1

Trail Location:

We found this particular hike in a book of trails that was in the house, but you can easily find information about it here and here. The trail is in the Northern Sierras, near Truckee, CA, and it’s just 4 miles from the Soda Springs exit on Route 80. It’s proximity to the highway makes it an easy and worthwhile stop if you’re on a road trip. There is ample parking in the lot next to the Sugar Bowl Academy (we visited in summer, I’m not sure if the parking situation changes when school is in session). From there, you have to take a short walk down the side road to get to the trailhead. You could also drive down that road and park at the trailhead, but I’m not sure how crowded that area gets on the weekend.

liveseasoned_summer2015_mtjudah4 liveseasoned_summer2015_mtjudah5

Trail Overview :

The total distance for this hike is about 4.5 miles. You begin on the Pacific Coast Trail, hiking towards the Sugar Bowl Ski Resort, and on one of the runs is where you’ll bump into the Mount Judah Trail. You could take a left there and head up the trail, but we continued on the PCT and took the second intersection with the Mount Judah trail (there are only two points of intersection). Whichever way you connect to Mount Judah, you’ll end up hiking the one initial PCT section both in and out to the parking area.

This hike is marked as moderate in the trail guides, and I would agree. The most difficult portion is the initial (and final) ascent (decent) on the PCT. The terrain is rocky, the trail relatively narrow, and the incline steep, but after those switchbacks, the rest of the trail is much less rocky with a more gradual climb. The trail covers a total elevation gain of about 1000 ft.

Side note : someone in our group was concerned about going on this hike with a bum knee, then Calder’s sister reminded them that they would be hiking with a septuagenarian, a pregnant lady, and a lady with a baby… if our rag-tag bunch could handle this hike, then most readers probably can too!

Continue reading