Wildflowers

What are weeds, anyway? I was helping a friend garden when she asked that question. She didn’t want to weed her flower/shrub beds and didn’t really mind the look of the weeds.

Weeds are the opportunists in the plant world. Spreading their seeds far and wide with the hope that something grows. And if there’s a bare patch of dirt getting some water and some sun, it’s likely that something will grow. In terms of ecological succession, most weeds are often considered a “pioneer species”; the first to arrive on a bare patch of dirt.

queen_annes_lace3

Success! Says the weed.

Those opportunists know that they have to act fast. Reach for the sun! Spread out those leaves! Grow just enough roots to get the water you need, because life can be short. Quick, make some seeds and let them fly!

IMG_8964

IMG_8963

To the gardener this can be a problem because the weeds are taking the sunlight, space, and water that should be helping your slower-growing showy plants. The ones that are putting much of their energy into beautiful flowers and the roots below ground that will allow them to come back year after year. With enough time, weeds can choke out a previously well-manicured flower bed.

Weeds are flowers too, once you get to know them. -A.A. Milne

queen_annes_lace

But, I have a secret, in my garden there are always some weeds worth keeping. This bunch of Queen Anne’s Lace didn’t exist when we moved it. Isn’t it beautiful? I saw them growing and turned my back. As other plants started to suffer, I transplanted them to a safer place and left the weeds alone. And now, look, this is the most prolific flowering patch in my garden.

FullSizeRender (3)

The weeds know what they’re doing, and if left to stay, they’ll put down some hardy roots and pay you in beautiful, bountiful blooms. Success!


Garden Update : The Pond

Throughout this summer, I’m documenting our garden. How it’s growing, what we’ve planted, and any changes we make to the space. Here’s my introduction to the bulk of our flower and veggie beds here.

Ugg, we’re such lazy bloggers lately! I realized that if I didn’t put this post up soon, then I’d miss my window of opportunity for pond introduction photos. Without further ado ~

When we lived in PA, I experimented with a few water gardens on our deck. Click here to read more about those experiments and the Thai water gardens that inspired my experiments.

With this house we inherited a small pond. It’s not something that either Calder or I would want to instal in our yard, especially in such a dry area where it seems a bit frivolous, but since it’s here, I’m so excited to expand my water gardening to this bigger space!
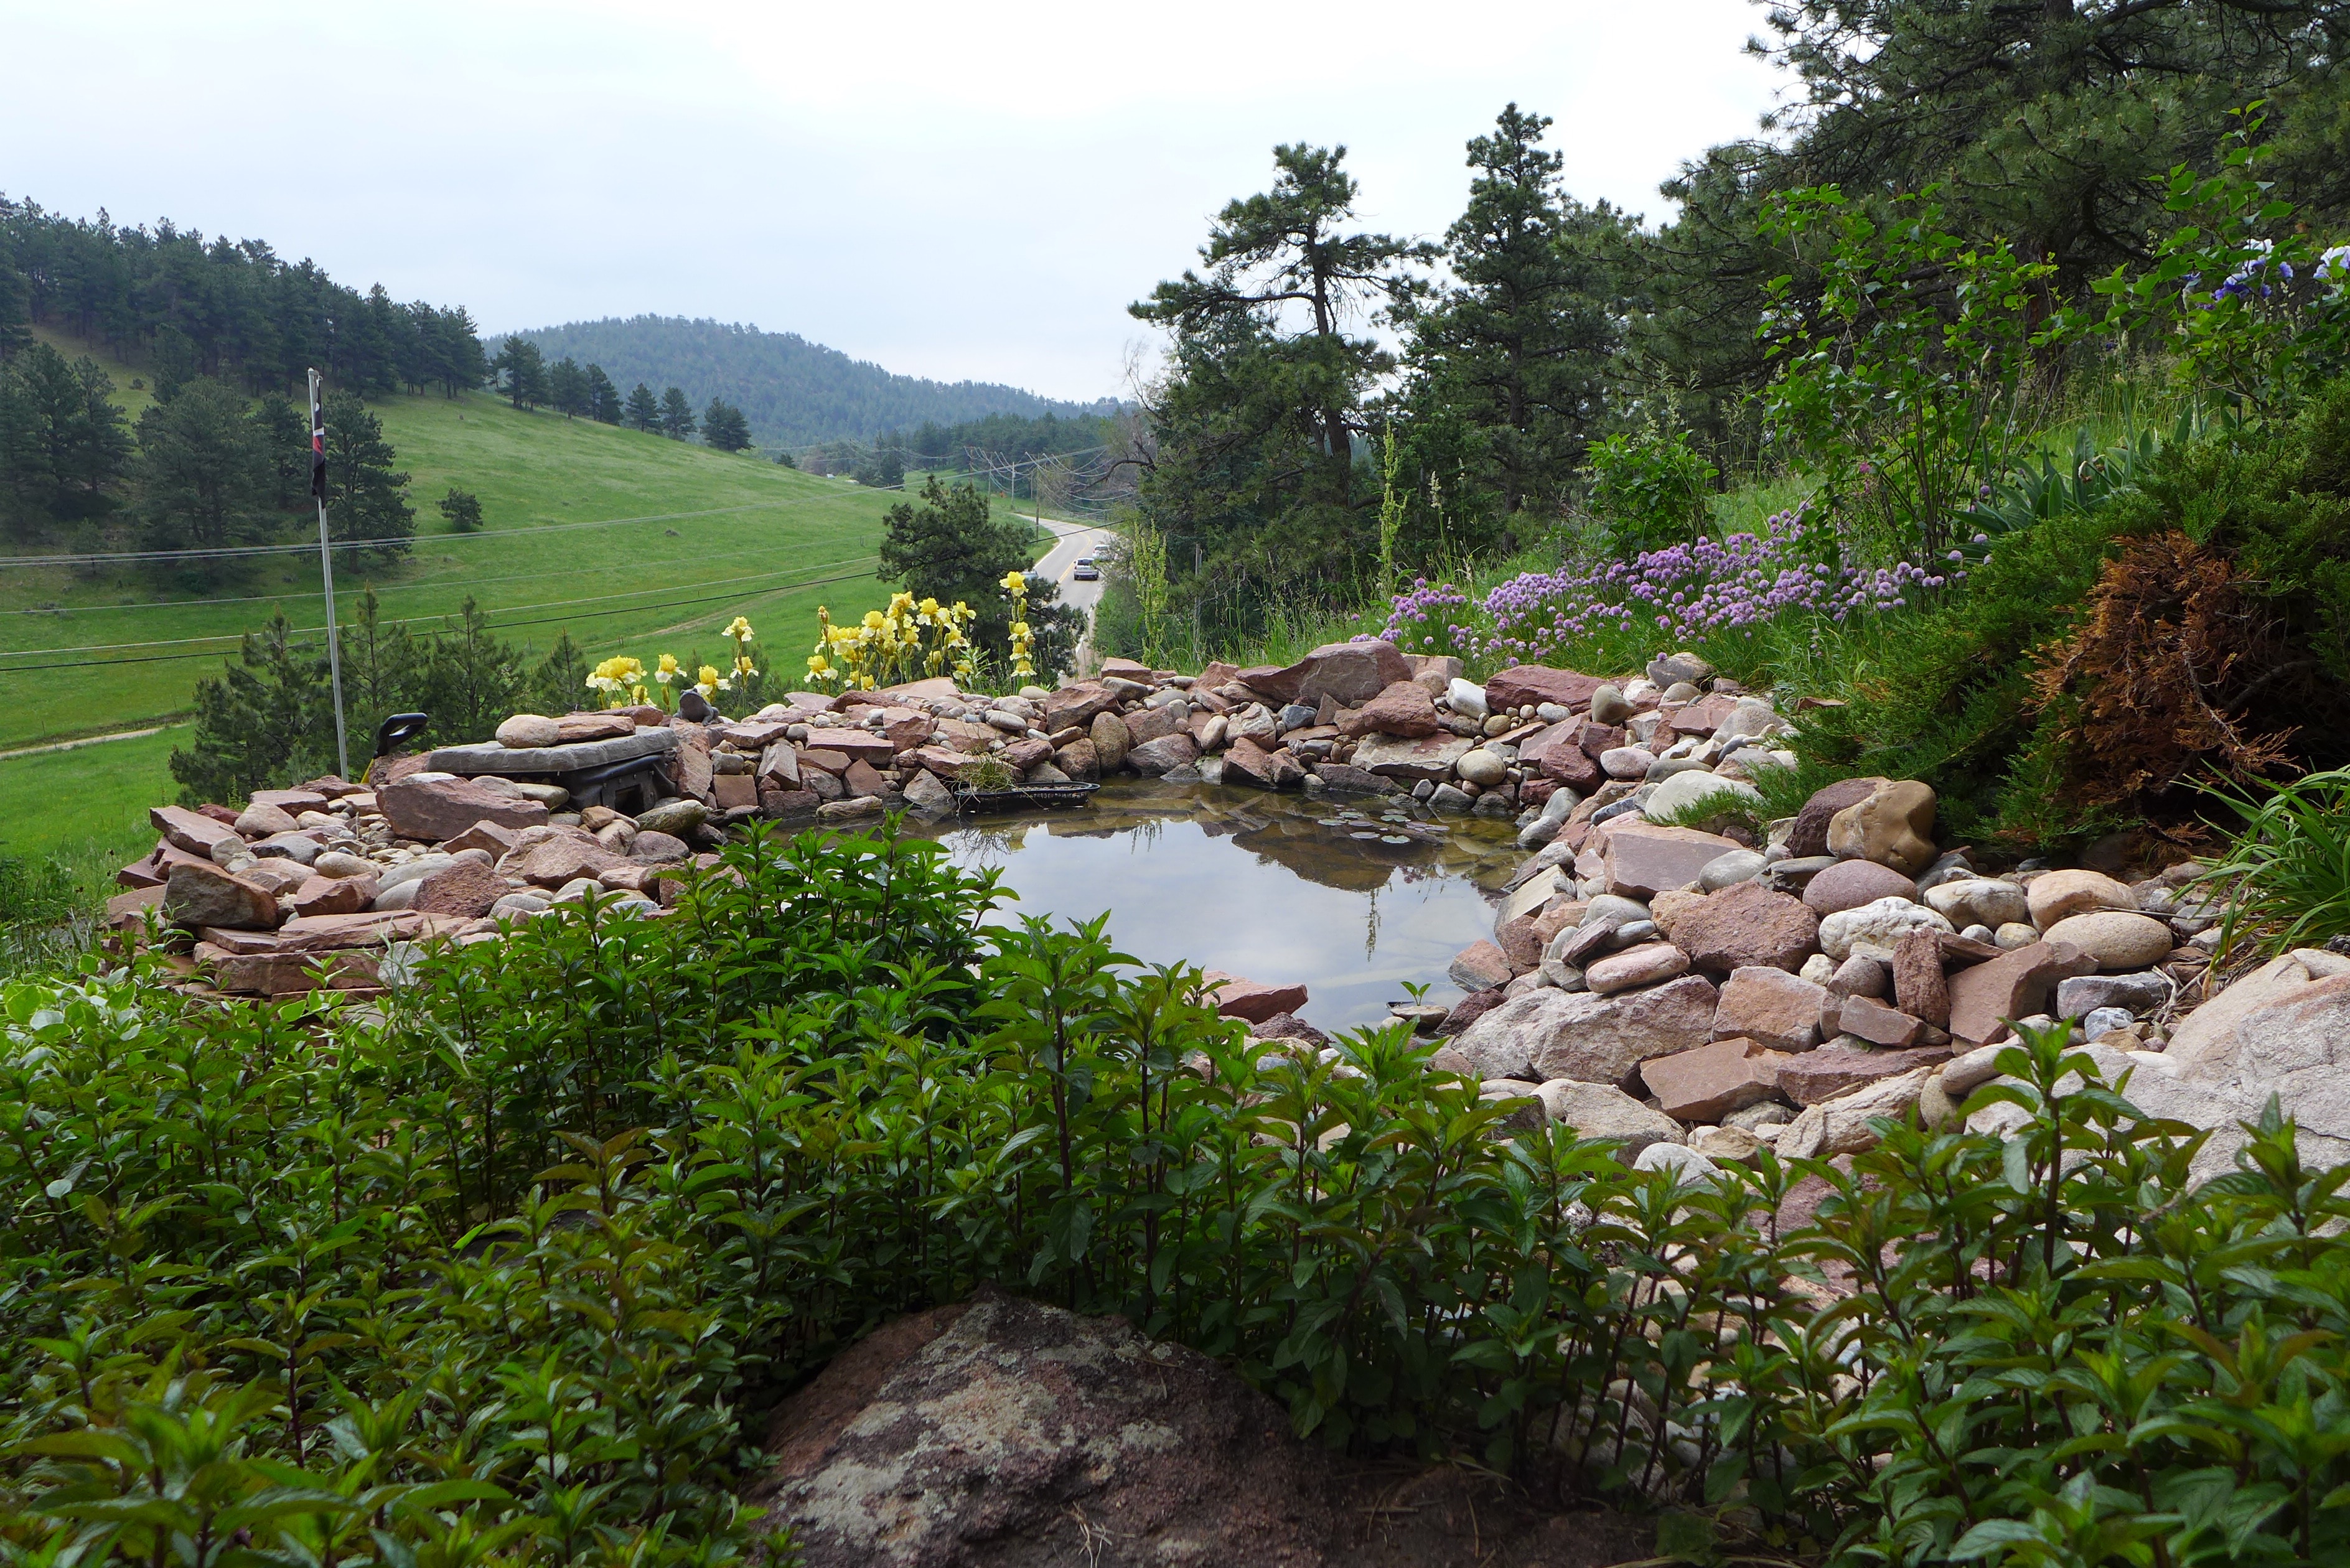
pond - 1

The Pond

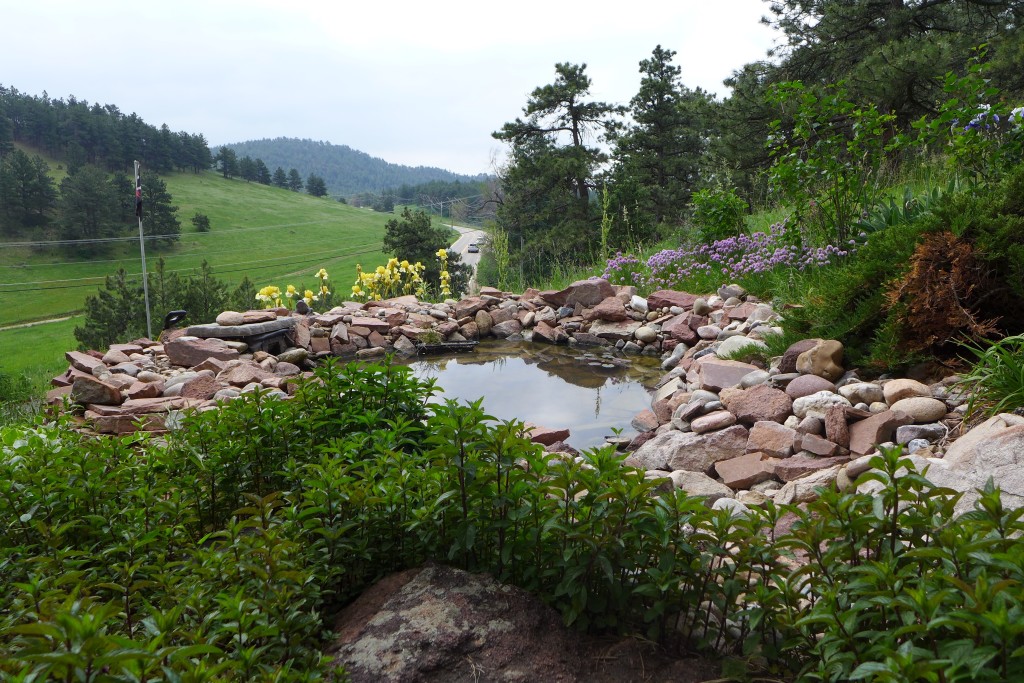
This pond is created using a waterproof rubber liner that is then covered with rocks. The pond is about 10 feet from our deck, and between those to spaces is a flagstone path with mint growing between the rocks (that’s what you see in the foreground above). The pond has a filter and pump system that pump water to a waterfall that’s about 6 feet high and 10 feet away from the pond. The water then trickles down a stream and into the pond. Last season we turned on the pump once (right after cleaning it), but then never used it again. This summer we’re hoping to tweak it slightly and use it a bit more, but I’ll discuss that feature in a future post.

Spring Cleaning

Both last year and this year we started the season by draining the pond and spraying it down to try to remove as much algae and silt as possible. I didn’t photograph that process, but realized I should next year. We learned a lot of things last year that made what was at least a 12-hour project the first time just a 2-hour jaunt this time.

We drain the pond with a big hose using this technique. You just fill the hose with water, submerging one end in the pond water and putting the other end at a lower point, letting gravity do the rest.

With a pond of our size, it takes a while for it to drain completely, so while it’s draining, I get to work removing the algae. I drag a large pitchfork through the water, picking up sheets/strings of algae that I then dump outside of the pond. As the water level goes down, I’ll hook another hose up to a water source and start spraying down the rocks on the side of the pond, trying to remove any algae and slime on them.

Once the pond is almost completely drained, you have to be careful that the draining hose doesn’t lose suction. It’s just a pain because then you have to fill it with water and get suction going again to get any remaining water. During this phase, I’m almost constantly spraying fresh water onto and between the rocks to wash out as much silt, slime, and algae bits as possible.

I don’t remove every bit of gunk from the bottom of the pond, but once I’ve done a fairly good job, the process is done and I start filling it again with fresh water.

pond - 1 (2)

Algae

If left unchecked, our pond came become overgrown by string algae. From what I understand, the algae is not a danger to us or other organisms, but cosmetically, it’s a bit unsightly and makes the pond look more like a swamp than an oasis.

One of the reasons that our pond seems to be a prime target is because it gets a lot of direct sunlight throughout the day, and just like other plants using chlorophyl to make their food, sunlight will encourage growth. I was told that I could eliminate the algae and have crystal clear water by adding bleach to the pond, but this is only a solution if I don’t want to have any other plants or animals growing in the pond (and if I don’t mind dumping bleach into the environment, which I do). There are a few other solutions, so this summer I hope to keep you updated with my algae successes and failures.

In addition to physically removing the algae (as described above) and using an algaecide (discussed below), I can try to physically limit the amount of sun reaching the water’s surface. One easy way to do this is by adding water plants that will grow on top of the water, so that’s what I’ll be experimenting with this summer.

pond - 1 (1)

Mosquitos

Because of the cool weather in the mountains and the lack of standing water in our dry climate, the mosquito population in the mountains is generally low. That said, we don’t want this pond to become a mosquito breeding ground. There are a few ways to avoid that.

Generally, mosquitos will successfully breed if they have access to the surface of still water and if nothing eats the larva. If we keep the waterfall on, this would agitate the water enough to deter mosquitos from laying their eggs. It’s unlikely that we’ll do that because of the noise, energy use, and increase in water loss that would happen. Another option is to cover the surface of the water in plants so that it’s hard for the mosquitos to lay their eggs. I’m going to attempt to cover most of the water with plants (more below), but it’s unlikely that we’ll completely cover the surface. If I do achieve relatively good plant cover, then I would love to add a few goldfish to the pond, and they would help to eat the larvae. So, there are some options, but they aren’t guaranteed to work at this point in our pond’s lifecycle.

So, for now, we’ve decided to add Mosquito Bits to the water. The mosquito pellets/dunks contain BTI, which is a bacteria that is toxic to the larvae and will kill them. The dunks are considered safe and non-toxic (when used correctly) for all other animals.

pond - 1

Plants

This year I’m hoping to do some experiments and expand the variety of plants that I grow in the pond.

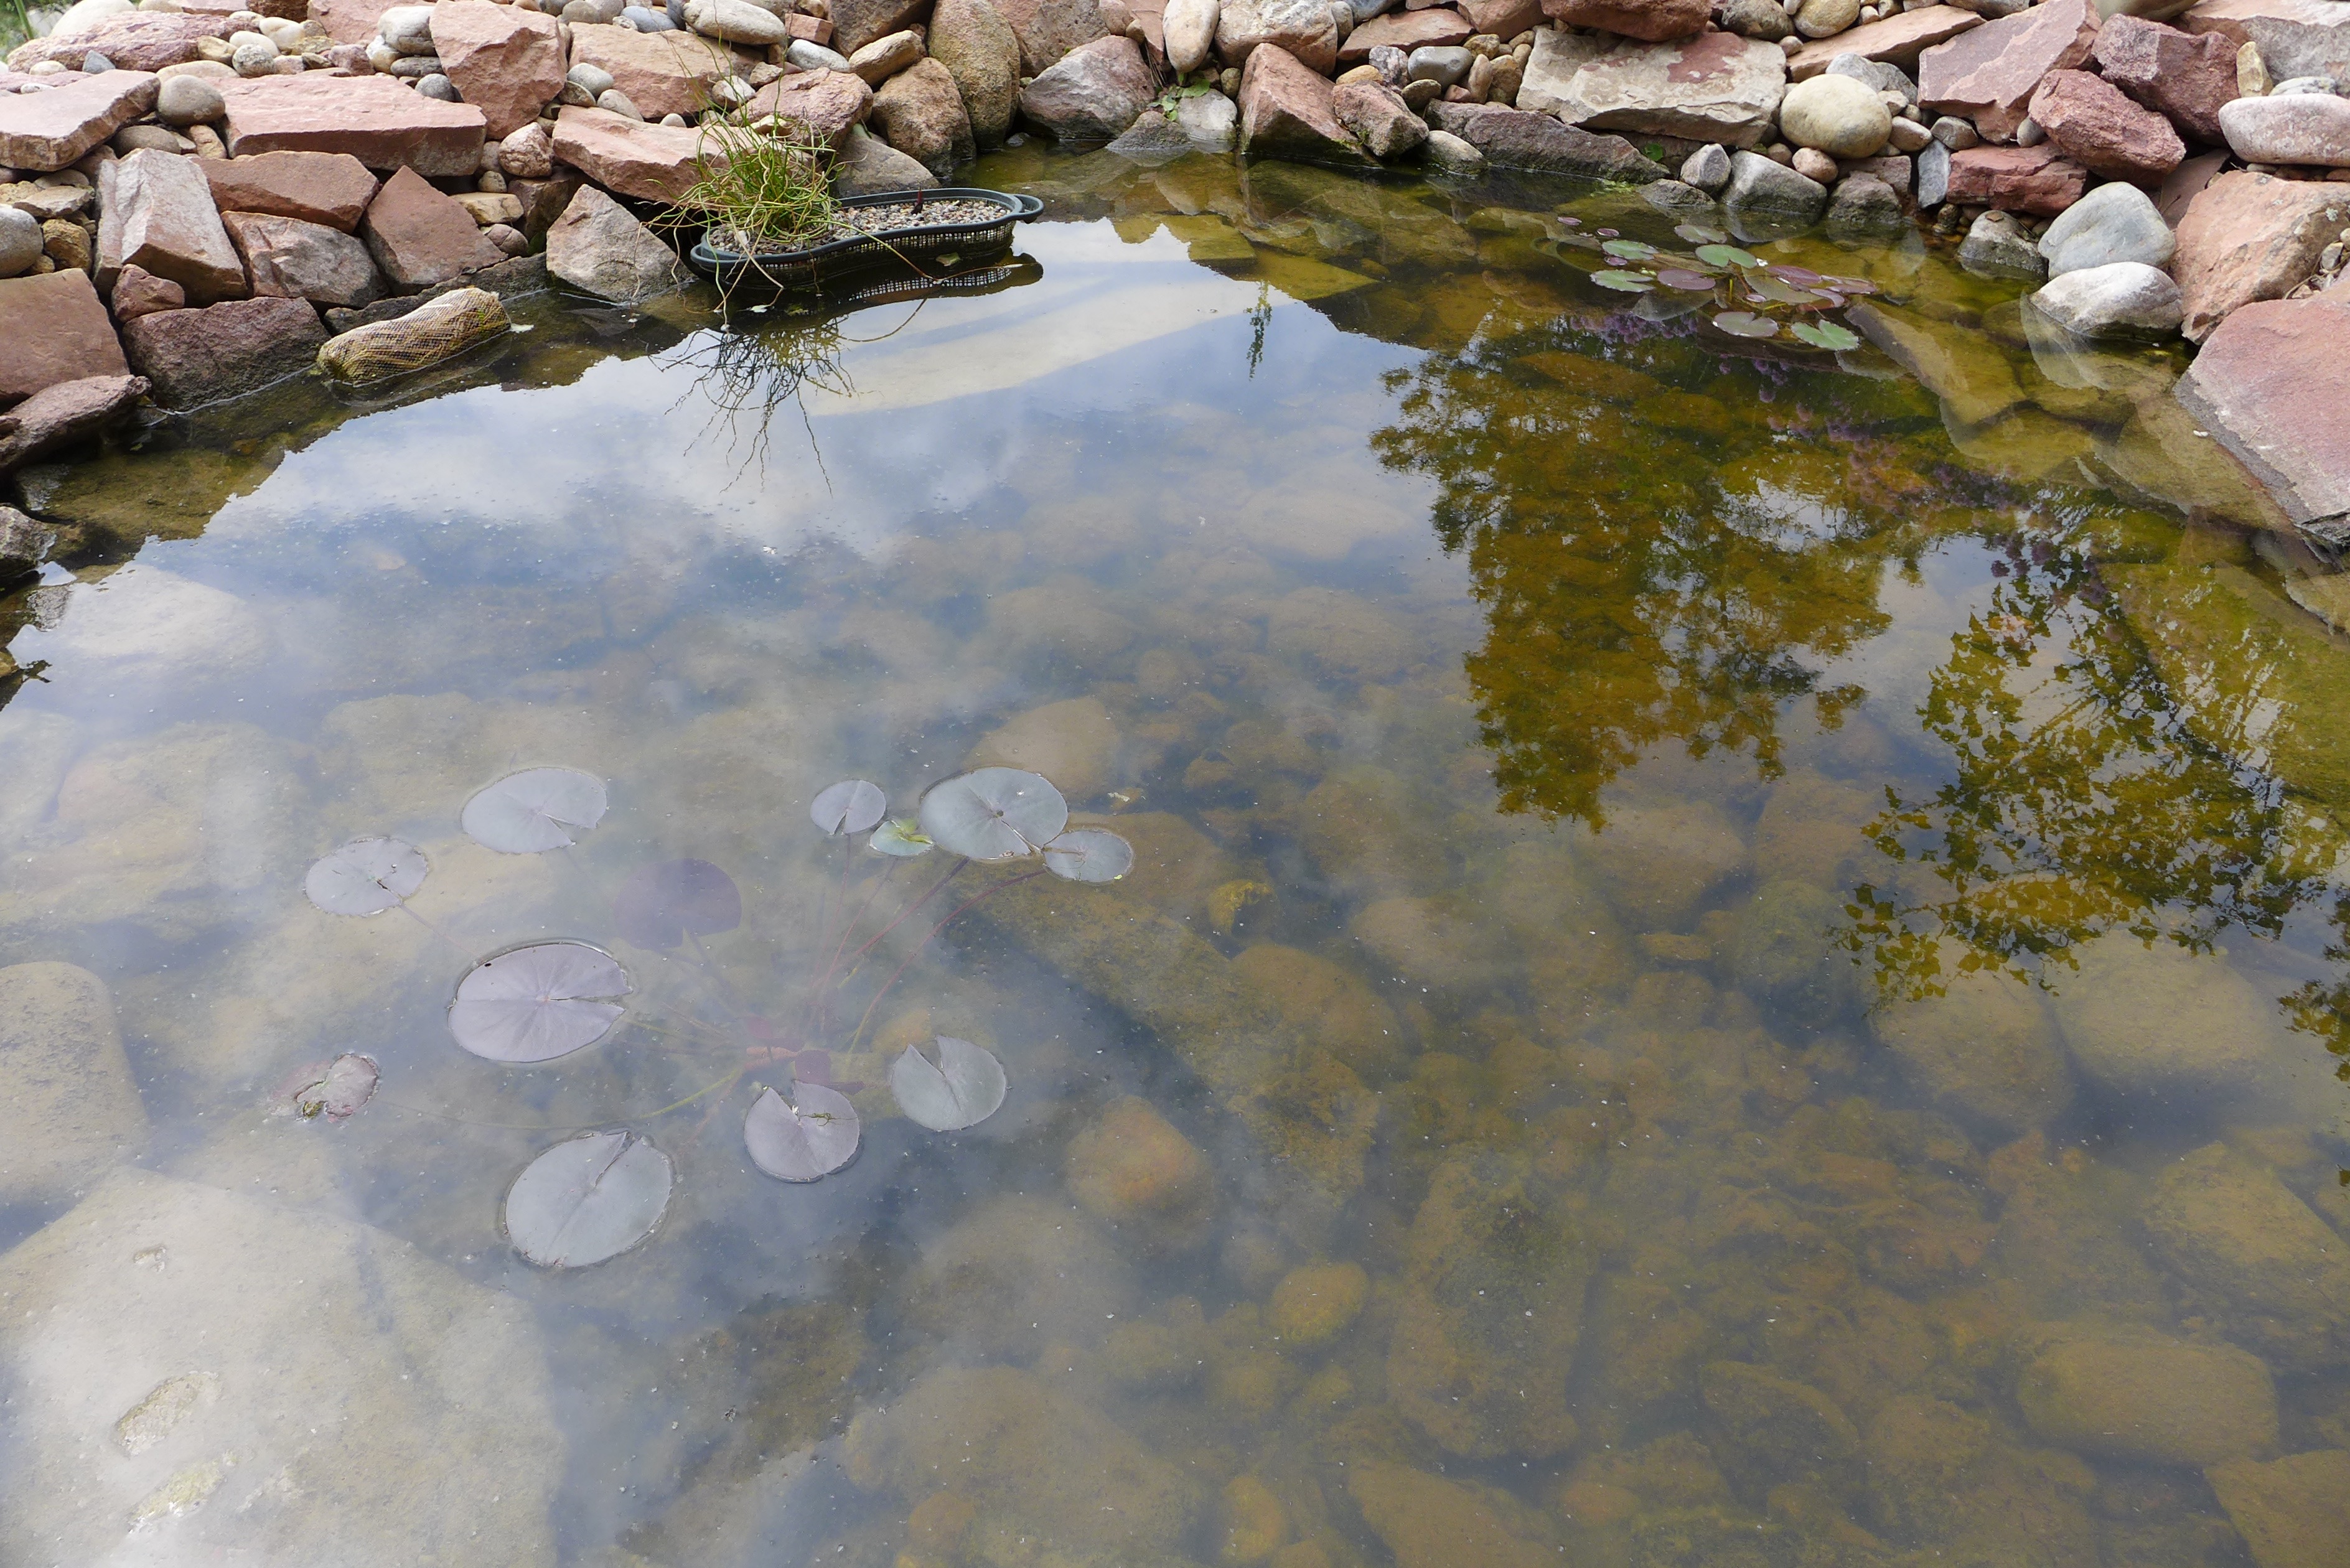
Right now our pond contains two groupings of water lilies. Both are made up of lilies that I put in the pond last summer and they successfully spent the winter out there. Not only did they survive in our little pond, but they thrived, multiplying successfully in their pots. This year I repotted them and added another one that came as a dry root from Home Depot. I bought that one because it was so much cheaper than the live plants and I wanted to grow it as a test this year to see how well it does.

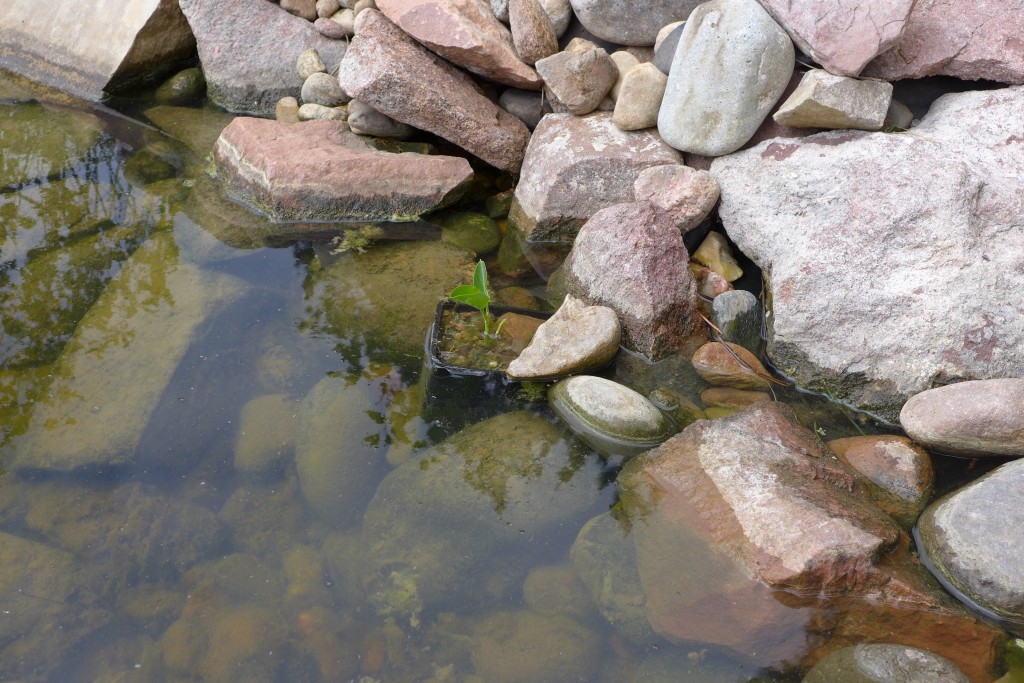
I’ve also added a curly rush, two canna lilies (from dried roots), and another mystery lily that I picked up in the pond section at Home Depot. You can see the leaves of the mystery lily just starting to sprout in the photo above. All of these plants live on the “margins” of waterways ~ along the edge where their roots may be submerged in water, but their stems and leaves aren’t. So I have them in pots near the surface of our pond. It isn’t the most beautiful presentation, but I’m hoping that the floating plants will disguise the pots, and if they plants are successful, then I’ll come up with a better solution next year.

I was going to use duckweed as a floating plant to cover the water surface, but I wasn’t happy that the batch I received in the mail. So just this week I placed an order for fairy moss (it’s the small floating plant growing in the photo above), and a couple of water lettuce (another floating plant that is larger, like a small head of lettuce, and multiplies like crazy).

~

That’s our pond in early spring. I’m hoping to get some lush growth from the plants this year. I would love to add a couple of goldfish, knowing that they will be super attractive treats for birds (thus wanting some good plant cover for them to hide under). We have a couple of frogs out at the pond now; we hear them but can never see them! Last year they laid eggs, so we’re hoping for another batch of tadpoles this year.

I’m excited to keep you updated as the pond grows and evolves this summer!

Garden Research

Doesn’t the first hint of warm weather make you excited to plant something? It could be something small like a pot of flowers on your stoop or in a windowsill box. Or, you may have bigger plans this year ~ are you dreaming of a full veggie garden with a bed of flowers for picking?

coneflower_july_2012

If all goes according to plan, this time next week we’ll have moved into a new house (eek!). It has a huge deck, and many tiered beds for planting. Some of the beds have perennials, but from what we understand, some are open for annual plantings. With temps in the 60s and 70s this past week, I’m so excited to make planting the beds and flower pots one of my first new-house projects. And while I know it’s not time to plant yet, these early spring days are a great time to start doing research.

Continue reading

Mosquito-repelling Plants

I know it seems a bit late in the season to do a planting post, but by now many gardens have reached their peak, and this is when I find myself wandering around neighborhoods looking at the yards and getting inspiration for next year. So, if you’re a planner like me, I thought you might like to hear about how we put the flower beds around the beach house’s outdoor shower to work for us.

liveseasoned_summer2014_mosquito3

The Eastern Shore area is known for its mosquitos. There have been years when we’ve visited Chincoteague and find ourselves running from the car to the front door and still having dozens of mosquitos on us! Or times when we’ve camped and can see the little insects perched on our tent waiting for their next meal. Needless to say, we were prepared for the mosquitos when we moved over to Saxis and ready to put up a fight in order to enjoy the outdoor shower.

liveseasoned_summer2014_mosquito

The shower is located at the back of the house, just around the corner from the back door that opens into the kitchen. We created one flower bed that fills the space from the back steps around the corner of the house to the shower. We also made this a garden area that transitions from herbs (for use in the kitchen, but working double-duty as mosquito deterrents) to our ornamental and aromatic mosquito garden. When it came to picking plants, we went with ones that would do well in this location, which was pretty easy since it’s a sunny spot right next to the hose, so water and light were not constraints. There are a lot of plants that repel mosquitoes, but we were particularly interested in the ones that do double duty, either as edible herbs or as fragrant flowers.

liveseasoned_summer2014_mosquito4

Fortunately for us, it seems like the constant spray of water from the shower head keeps them at bay while it’s on. But adding these plants helps to further deter mosquitos from the area which is nice as you’re walking to and from the shower and when you’re in the stall getting undressed and dressed without the water running.

Mosquito-repelling Plants

  • catmint
  • creeping thyme
  • lavender
  • lemongrass
  • lemon-scented geranium (the citronella scented variety has been shown to be ineffective)
  • mint
  • rosemary

liveseasoned_summer2014_mosquito6

How do these plants work their magic? They each have aromatic compounds, the same ones that make these plants appealing to us, that repel the mosquitos.

As a result, many of the plants on our list work best when their aromas are released, either by rubbing or crushing their leaves. We planted the rosemary, lemon-scented geranium, and lavender closest to the edge of the bed (leaving some room for them to expand). The idea being that people will brush these plants with their legs as they walk from the steps to the shower, releasing the plants’ aromas. The mint is in pots and in a particularly well-gaurded corner of the bed (trying to tame its wild growth). Their fragrance is released every day around happy hour when we’re out there picking leaves for mojitos. The creeping thyme is planted in the small space between the cement slab and the base of the shower; the perfect location for people to step on it and release its fragrance as they are getting into and out of the shower. The lemongrass is planted along one edge of the shower providing a simple natural screen on the side that is most public.

liveseasoned_summer2014_mosquito5

I also included catmint on our list, but didn’t plant this in the shower garden area. It’s a tall plant and didn’t fit in well with the design for this small corner, so we put it on the other side of the back porch. It’s a surprisingly useful plant, with compounds that are 10 times more effective than DEET at repelling mosquitos! With results like that, I had to at least mention it in this post.

liveseasoned_summer2014_mosquito9

And, of course, if mosquitos are a problem in your yard, one of the best things you can do is to make sure you empty any standing, untreated fresh water. For example, all of those road ruts from your off-roading escapades and the holes you made looking for that buried treasure? Fill them in. Be a leader, not a breeder.

mosquito_poster

Mosquito poster from Wikimedia commons.

In Season: Succulents and Air Plants

Screen Shot 2014-06-13 at 2.10.54 AM

I love a good tillandsia.  I’ve killed quite a few in my day, but after doing a good bit of online research, I think I’m finally ready to raise a few sixty.  That’s right, I purchased $85  worth of air plants.  I came across this great wholesale site so how could I not, right?!  The site looks pretty simple and almost unprofessional, but that is what screamed *bargain* in bright lights!  My package came on time, my order was complete and the plants were in great shape.  If you’re thinking about raising a little an enormous air plant family, that is the site to start.

Shannon, from Very Shannon, compiled an inspiring air plant display roundup.

I love these wall mounts by NiaCraft.

Right now I have my sixty plants spread out on my dining room table and about a dozen in glass bottles.

This weekend, I’m going to experiment with this type of display and maybe even something along the lines of this.

Succulents are right up there with air plants.  They are easy to propagate so you can have a whole squad of succulents too! I’m in the process of propagating a bunch of chicks and hens and jade plants.

One day I’ll have an entire wall of succulents – by the end of the summer hopefully I’ll have something like this.