
As you may know, I’m obsessed with photography. I have a degree in photojournalism from Temple University and I have been working in some sphere of the photography world for the past five years. I’m the first to admit that you do not need a degree in photography in order to take great photos. In my spare time, I teach photo classes to adults who would like to become more comfortable with their DSLRs and photography in general, and I thought it would be helpful to start sharing that information here as well. Today is the first installment of Photography 101.
Photography can become quite overwhelming because when it comes down to it, there is a lot to learn. The good news is, you do not need to learn it all right away! Today in Photography 101, I’m going to go over four important tools for shaping light in your photographs. These four components: aperture, shutter speed, ISO and white balance are the key to creating a beautiful photograph. Once you have a clear understanding of all four, you can begin experimenting, breaking out of your comfort zone and using the MANUAL setting every time you are out and about. You are smarter than your camera, which is why you are probably frustrated with the AUTO setting. Follow along and learn how to understand the relationship between light and photography.
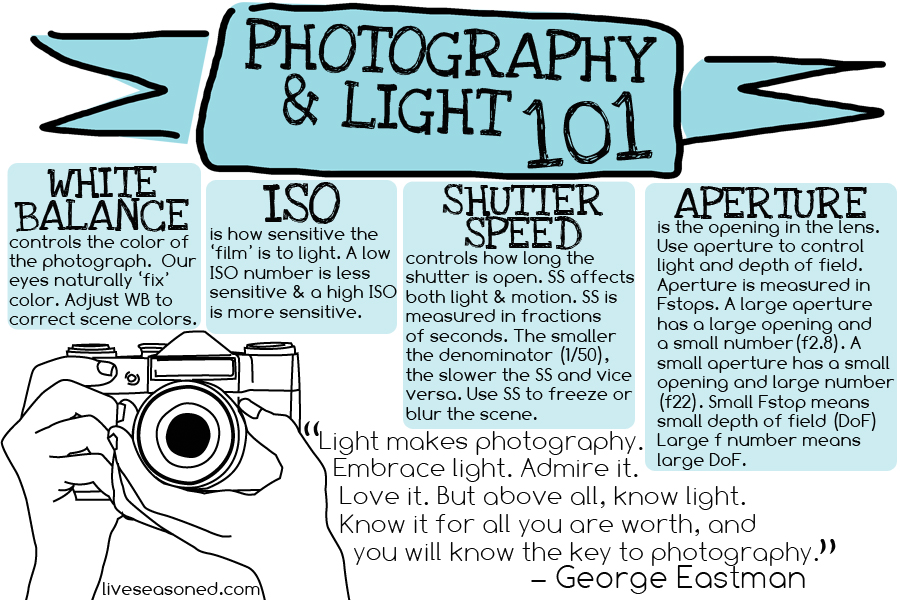
Aperture:


Aperture is quite simply, the size of the opening in the lens that allows light to reach the sensor. Use aperture to control light and depth of field. Aperture is measured in F-stops. The words aperture and F-stop are used interchangeably. If you hear someone say, “what F-stop are you using?” or “what aperture are you shooting at?” know that they mean the exact same thing. A large aperture has a large opening, but it is denoted by a small number(f2.8). This seems a little counter-intuitive, but you’ll get the hang of it. A large aperture with a large opening lets in a lot of light. A small aperture has a small opening and is denoted by a large number (f22). As you change your aperture in one direction or another, the opening or aperture gets larger or smaller. I mentioned that aperture also controls depth of field. A large aperture (lots of light, small F-stop number) has a shallow depth of field. A small aperture (less light, high F-stop) has a deep depth of field. It may be hard to identify middle of the road apertures, but large apertures (f1.4, f2, f2.8) have a super shallow depth of field and small apertures (f11, f16, f22) are crisp from the foreground to the far off horizon. Before taking a photo, decide how you would like to portray the scene. Is everything important or do you want to focus on one thing? Then decide which aperture will best represent your vision.


Shutter Speed:
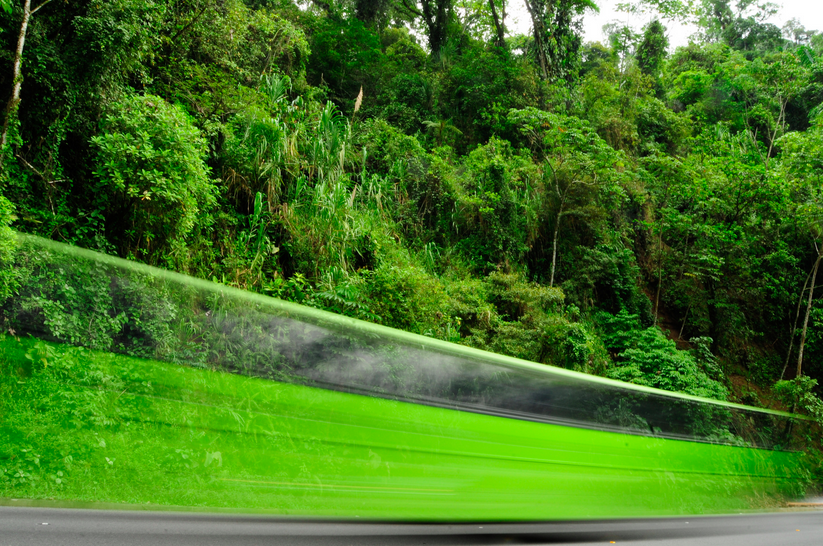
Shutter speed controls how long the shutter is open. Shutter speed affects both light and motion. Shutter speed is measured in fractions of seconds, and the numerator remains constant at 1. The smaller the denominator (1/50s), the slower the shutter opens and closes and the higher the denominator (1/500s), the faster the shutter speed. A slow shutter speed lets in more light. A faster shutter speed lets in less light. Shutter speed also affects motion. A fast shutter speed freezes motion while a slow shutter speed blurs motion. Think of shutter speed kind of like blinking. When you open and close your eyes in quick succession you see a freeze frame of the outside world. When your eyes are open for longer periods of time you see objects moving across the horizon. Note that shutter speeds below 1/50s will appear a bit soft or blurry if you do not use a tripod because it picks up and records the shake of your hands. Before taking a photo ask yourself if you would like to freeze the scene or show movement. Are you freezing the action at a track meet or are you showing the flow of water at Niagara Falls?


ISO:


ISO means International Organization for Standardization and was invented back in the days of film photography. ISO basically means how sensitive the film is to light. A low ISO means the film is less sensitive and you guessed it, a high ISO means the film is more sensitive to light. Low ISOs (100, 200, 400) are also less grainy or noisy, while higher ISOs (1600, 2400, 3200) have more visible grain. It is best to keep your ISO as low as possible, but depending on the situation you may want or need to use a higher ISO. If the scene is bright or reflective (outdoors, daytime, blizzard, middle of the ocean) definitely use a low ISO number. If the scene is dark (church, cave, party, indoors at night) you may have to use a higher ISO. Sometimes it doesn’t make sense to (or you cannot) use a larger aperture or slower shutter speed, that’s when it’s necessary to use a high ISO. I like to change my ISO upon immediately changing scenes or settings. That way I know I am getting the highest quality photo (lowest grain and noise) that is possible in each setting.
White Balance:
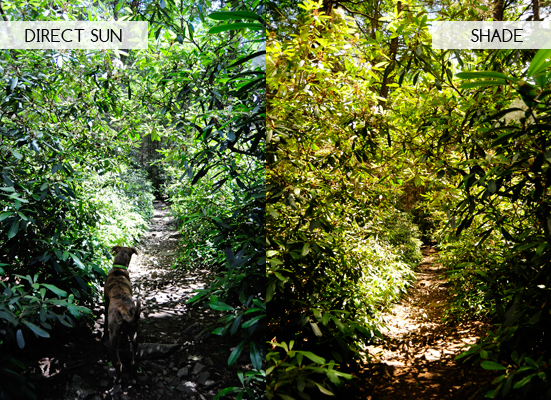
White balance is used to control the color of the photograph. Different light temperatures change the way colors appear on film. Our eyes and brain “fix” those differences for us so that a white sheet of paper appears white no matter the setting whether it be under fluorescent light, tungsten light or outside on a sunny day. Cameras cannot differentiate “true” white so we must tell it each time we change the setting we are in. Most cameras use auto white balance in each scene, but if you take the time to change the white balance depending on what light you are shooting in, the colors will look more true to life. Just like ISO, I like to change my white balance every time I begin taking photographs in a new setting. The settings you’ll most likely find on your camera are:
- Auto- the camera will adjust the WB shot by shot. Sometimes it looks great, but other times it is way off.
- Fluorescent- compensates for the cool or blue light of fluorescent lights.
- Tungsten- compensates for the warm or orange glow of incandescent lights.
- Direct Sunlight- adds a little saturation to compensate for harsh direct sunlight.
- Cloudy- compensates for gray days by warming up the photograph.
- Shade- compensates for the cool blue light of shade by warming up the photo.
- Flash- compensates for the cool harsh light of flash.


Now that you have a better understanding of aperture, shutter speed and white balance, let’s talk about how they come together to create the perfect exposure in your photograph. Understanding the exposure triangle is the first step in shooting in MANUAL mode. ISO, aperture and shutter speed all shape how light enters and interacts with the camera. We learned that:
- ISO measures how sensitive the film is to light.
- Aperture is the size of the opening when the camera is taking a photo.
- Shutter speed is the amount of time the shutter opens and closes.
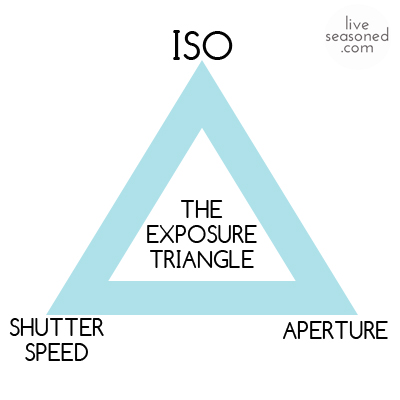
The relationship in the exposure triangle is often described like a window. Imagine you’re standing at a window. The size of the window is the aperture. A big window lets in a lot of light and vice versa. The shutter speed is the amount of time the shutters or blinds on the window are open and the ISO is akin to wearing sunglasses (ie: your eyes become less sensitive to the light coming through the window). I like to describe the exposure triangle relationship in terms of the human eye. The shutter speed is like blinking. If you blink quickly, the scene freezes, if you keep your eyes open you can see movement and blur. The aperture is like squinting. We squint to see things far away or in detail (small aperture) and in turn let it less light. Sometimes we open our eyes wide and kind of ‘zone out’ where we focus on very little and let in a lot of light (large aperture). Lastly, we use different tools to increase or decrease our light sensitivity. Sunglasses decrease light sensitivity (like low ISO) while night vision goggles increase sensitivity (like high ISO). Now you can see how these three elements relate to one another in terms of light and making a great photograph.
I like to think about what I want to portray in my photographs and adjust the setting that is most important for achieving that first. I know I need a fast shutter speed if I want to freeze a group of soccer players. It’s sunny outside as well, so I can use a low ISO. Then I’ll adjust the aperture to achieve the right exposure on my light meter. I took the photo and it turned out great, but now I want to highlight only one soccer player instead of having the whole team in focus. If I want a shallow depth of field I need to use a large aperture. It’s still sunny so my ISO can remain low, but now my camera is letting in too much light. I’ll need to increase the shutter speed even more to have the proper exposure for the photograph. As you can see, shooting on manual mode is a step-by-step process. Once you grow accustomed to different settings and scenes, making adjustments to correct the exposure will become much easier.
I always tell my students that the best way to learn is to make mistakes and get frustrated. If you are not taking bad photographs, you are not challenging yourself enough. So get out there and attempt to take the photographs you really want to capture. Don’t be discouraged when they don’t turn out just right, but get a little frustrated. That means you truly care about the art of photography and you want to improve your skills. Let us know what scenes or instances are giving you trouble and we will post a tutorial to help you improve.
In the future, Photography 101 will cover all types of topics like portrait photography, night shots, nature and travel photography, learning your DSLR and delving further into the depths of aperture, shutter speed, ISO and white balance. If there are any topics you would like to see featured in Photography 101, be sure to leave a comment below.
thumbs up teacher sarah! for your next lessons, I was wondering if maybe you could talk about some basic photo composition techniques and lighting. I need a photographer’s perspective on finding good light during the day and just more about light 🙂
Great idea! Sometimes you know how to work the camera, but not the scene! I’ll be sure to cover both those topics in future lessons.