
A treat for your Valentine’s Day sweetie! Whip up a batch of homemade marshmallows this week!
Seeing homemade marshmallows make the internet rounds and knowing how much my husband loves them (caffeinated marshmallows were a stocking stuffer hit!), I was excited to test my kitchen skills and make whip up a batch. 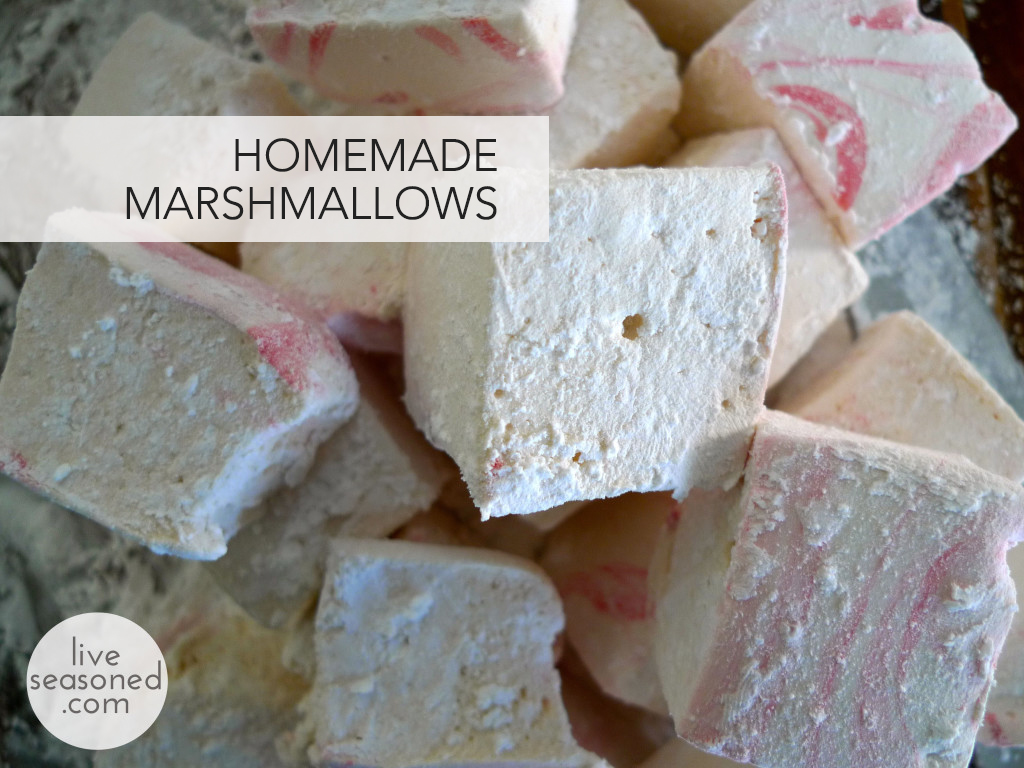
The recipes all seem simple enough, but there was still something daunting about turning sugar into perfectly puffed squares and not ending up with my hand stuck to the magazine inserts like Chevy Chase in Christmas Vacation (need a reminder?). With a free day, and all of the ingredients on hand, I am now a homemade marshmallow convert ~ they are so easy to make! And addictive! Although, while in the middle of this sweet adventure, there were a few moments of panic.
A few tips before you get started on your homemade marshmallows ~
- Read the entire recipe. This is a no brainer, but I find it’s particularly important when you should have certain pans prepped ahead of time or when you’ll be dealing with super hot or messy ingredient transfers, both of which occur here.
- Make sure you have the proper tools on hand. This recipe requires heating your sugar, water, milk mixture to a bubbly 250F. Make sure your thermometer reads that high (candy thermometers do, some meat thermometers don’t).
- Don’t aim for perfection, especially when transferring the marshmallow fluff from the mixing bowl to your prepared pan. If you try to scrape every bit of sticky fluff off of the beater and out of the bowl you’re going to end up with a cobweb of sugar covering your kitchen. Instead, just aim for one big transfer (i.e. one scrape of your rubber spatula around the mixing bowl), and leave whatever doesn’t come out as a sacrifice to the kitchen gods.
I’m using a corn syrup-free recipe that I found on the Clever Carrot. I like it because it seemed to be one of the simpler recipes out there. On the other end of the spectrum is Smitten Kitchen’s recipe which includes whipped egg whites (being a Smitten fan, I’m sure her’s are great, but if I can get great homemade marshmallows without separating eggs, I’m going to do it!).


Homemade Marshmallow Ingredients :
- 2 cups sugar
- 1/2 + 1/4 cup water
- 1/2 cup evaporated milk
- 3 Tbls gelatin (3 packets)
- 1 Tbls vanilla extract
- cooking spray
- 1 cup powdered sugar
- 1/2 cup corn starch
- Optional: food coloring
Equipment :
- electric mixer
- 8×8 pan
- candy thermometer
- parchment paper
- sharp knife
- saucepan
- sifter
- Prepare your pan : coat it generously with cooking spray and cover with parchment paper. I tore off a piece of parchment that was larger than my pan and just pushed it into the pan, folding the corners slightly to minimize bunching.
- Place a 1/2 cup of warm water and the gelatin in the bowl of your mixer, letting the gelatin soften while you prepare the sugar mixture (about 10 minutes ~ see my note below).
- On low heat warm the 1/2 cup milk, 1/4 water, and 2 cups sugar, whisking until the sugar dissolves. Once the sugar has dissolved, bring the mixture up to a boil and then immediately reduce the heat to a steady simmer.
- Continue to simmer the sugar mixture until it reaches 250F. This should take about 10-15 minutes, but may take more or less time depending upon the size of your pot and your burner temperature.
- Carefully pour the hot sugar mixture to the bowl of your mixer with the gelatin and mix on low. Once the gelatin is incorporated (I waited about a minute), increase the mixing speed to high, add the vanilla, and let the magic happen ~ the hot sugar mixture is originally a tannish color, but as air is incorporated into it, it will turn white. Continue mixing until the marshmallows have tripled in size and are a shiny white.
- If you want solid-colored marshmallows, you can add some food coloring and give them a final spin in the mixer. If you want marbled marshmallows, add a few drops of food coloring to your pan, pour in half of the mixture and give it a swirl until you get the marbling you want. Add the remaining half of the mixture, top with a few more drops of food color and swirl it in.
- Pour the marshmallows into your prepared pan and let it sit overnight ~ at least 8-12 hours. It was a busy weekend in our house, so I waited about 20 hours before moving on to the next step.
- Mix the powered sugar and corn starch together in your sifter. Sift a generous layer over the top of the marshmallows and onto a cutting board. Remove the marshmallows from the pan, and you should be able to peel the parchment paper right off (setting the slab of mallow down on the powdered cutting board).
- Time to cut! Dip your sharp knife into the powered sugar mixture, and cut your marshmallows. For the cleanest cut, press straight down, and do not using a sawing motion. I found that the marshmallows cut very easily, and during each cut while my knife was still in the marshmallows, I would add some of the powered sugar to the cut to minimize any chance that the two pieces would stick together as I pulled the knife out (I never had a problem with this. I’m not sure if it was due to the powered sugar or if it wouldn’t be a problem anyway).
- Generously coat your cut marshmallows with the rest of the powered sugar, store in an airtight container, and enjoy!


A note about the gelatin step : this was my major moment of panic. I prepped the gelatin, but then my sugar mixture was taking a bit longer than 10 minutes to heat up, enough time that my gelatin had become jello. I was worried that it wouldn’t mix into the marshmallows and I would have fluffy sugar with jewels of gelatin, luckily (magically?) everything worked out perfectly. I mention this, because if the same thing happens to you, soldier on, it should all work out. The next time I make these, I may get the sugar started on the stove and then prep the gelatin… but I may not, because why fix it?
When I make my next batch, I may try using cooking spray and a non-stick pan. I’ve seen a few chefs do this, and it just eliminates the parchment without any additional mess.
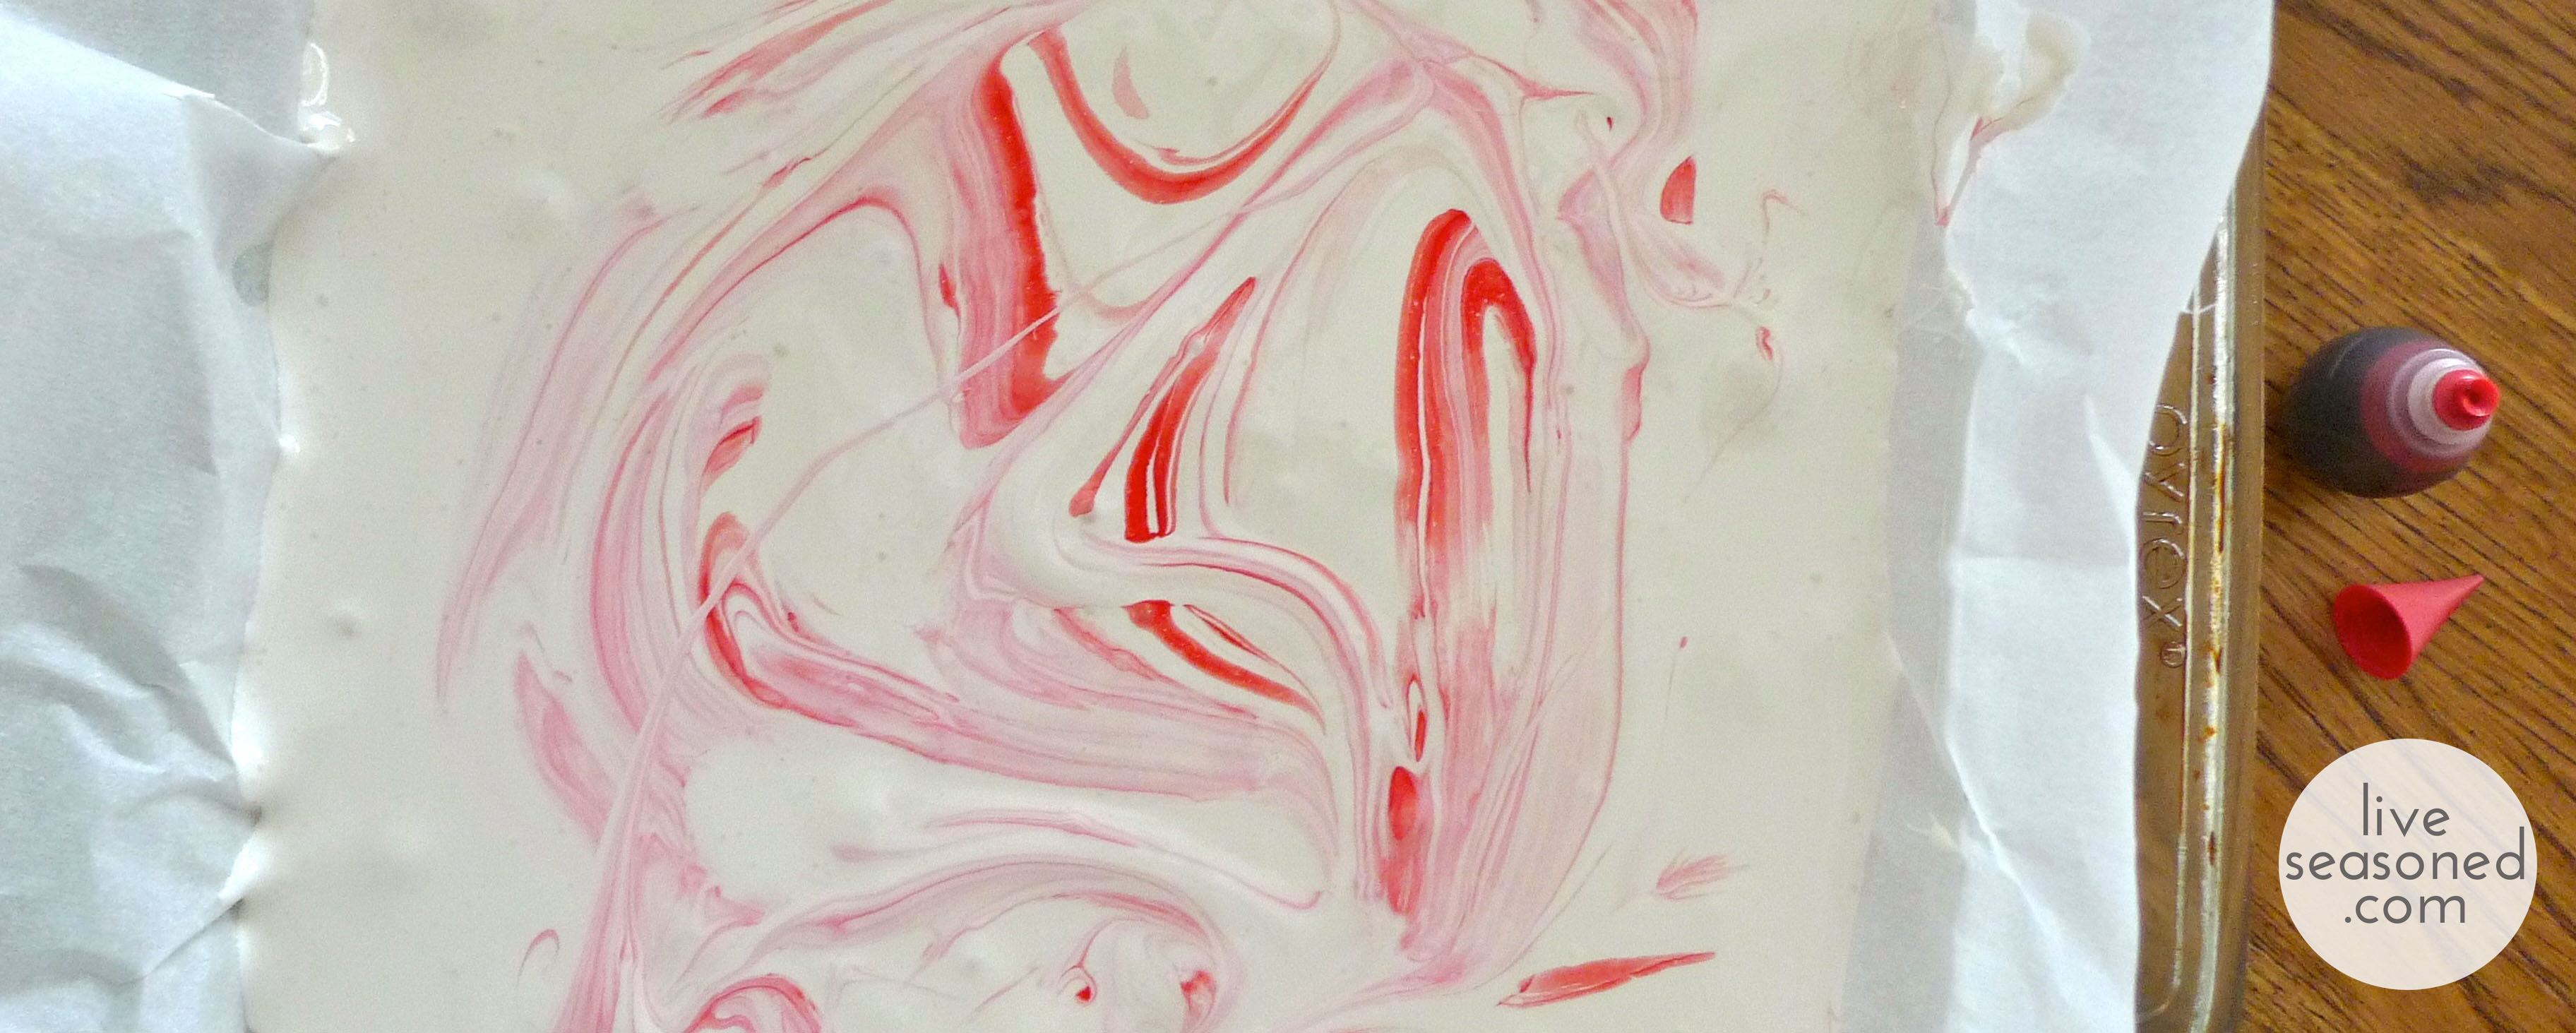
I want to be more intense with my marbling. I was a bit too conservative here because I didn’t want to over-mix and end up with pink marshmallows, but next time I want to go for some seriously red ribbons throughout.
I also want to experiment with flavors ~ mint, almond, orange! Imagine an orange marshmallow in your hot chocolate. yum.
Finally, I like the idea of big squares of marshmallow, but if you’re thinking that you want to cut yours into shapes using cookie cutters, then you would be better off using a larger pan (9×13) so that your marshmallow slab is thinner. I think it would have been a real bear to cut these with a cookie-cutter since they were so high.

What about you? Have you made marshmallows, do you have any hints or tips to share? Any tips for hiding these so that there are a few remaining for a Valentine’s Day hot chocolate, because they are going fast!
Last time I tried making marshmallows was probably 5 or 6 years ago and a complete disaster. I guess I should try again!
Yes! Try again, I just kept to this simple recipe and couldn’t believe how well they turned out. And what’s exciting is how much everyone in the house is excited for more. Calder and my mom keep throwing out ideas for our next round, so I’m sure we’ll have a follow-up post or two!
Hi Katie! Your marshmallows look fantastic- love the pink! Thanks for including my recipe in your post. Glad you liked the recipe 😉
Hi Emilie! Your recipe has become a hit in our house! I’m so glad we found it. Best wishes for the new year!