5 ways to go the f to sleep

live-seasoned-2016-malaysia-by-saleem-ahmed

Does sleep elude you? I’ve been there. Most times it’s due to stress or other irregular factors, but sometimes I just can’t fall the f*ck to sleep even if it’s imperative. First things first, put your damn phone down, unless you’re trying to sleep right now.. in that case, read on:

  • Read a book – reading is my first snooze move. Pick a book that you’d like to read, but is either a little bit beyond comprehension or slow moving. Whatever you do, don’t grab a nail-biter because then you’ll definitely be up all night. I usually pick up something by one of my heros, John Muir, when I want to induce drowsiness. His writings are basically a peek into his diary, interesting, but at times long winded and wordy. No offense Mr. Muir!
  • Write in a journal – if you’re not a big reader, try writing before bed. If I go this route, I usually jot down a quick recap of my day, while also mentioning what I plan to do the next day. Writing in a journal is an easy way to do a brain dump of sorts. Flush out anything you’ve been needing to say or express and leave it in your journal instead of your mind while you get ready for bed.
  • Breathing meditation – pranayama (sanskrit word for breathing) is an amazing tool for relaxation. Even if you’ve never tried pranayama before, you’re capable, it’s simply being mindful of the breath. Lay on your back with one hand on your heart and the other on your stomach. Take a deep belly breath in while you count to four, hold for two seconds then exhale long and slow for four seconds. Repeat this breath cycle without letting your mind wander, continuously focusing and counting your breath until you feel relaxed and ready to slip into a slumber.
  • Yoga nidra – yogis everywhere are probably rolling their eyes since yoga nidra is waking sleep and therefore one isn’t necessarily meant to snooze midway through, but I have to admit that I fall asleep nearly every single time.  It’s actually a problem, but at least I’ve discovered a great way to drift off to dreamland.  There are actually a few yoga nidra recordings meant to put you to sleep and here’s one that’s particularly good. Everyone is different though, so seek out recordings that speak to you and make you feel relaxed. Remember, you don’t need recordings specifically geared towards sleep since all nidras are calming and will likely put you into some type of trance state.
  • Conduct a full body scan – this is my favorite way to encourage sleep and something that I use quite frequently. Start by shaking out your limbs and settling down onto your mattress. Get comfortable. Mentally tell yourself to relax each body part, starting with a segment of the body and disecting it into smaller parts from there.  It should sound something like this, “relax your right foot, relax your big toe, relax your second toe, relax your third toe, relax your fourth toe, relax your baby toe. Now relax the top of your foot. Relax the bottom of your foot. Relax the ball of your foot, the arch and the heel of your foot. Now relax your ankle, etc…” I recommend breaking down each body part as much as possible, but you can focus on larger part groups (ie the right leg instead of the right shin, calf, knee, back of the knee, etc) if sleep is less elusive for you.

That’s how it’s done folks! Fall asleep faster with these five natural nap inducers.

*Photo of a famous Sarah Schu power nap in a ridiculously dirty Malaysian guesthouse captured by Saleem Ahmed.

Easing Into Yoga : A Relaxing Morning Stretch Series

Want more yoga and exercise? Become a woods warrior, try this lower body workout, then end the day with bedtime stretches that relieve lower back pain. Check out my 200hour yoga teacher training experience and read about the school I attended here.

live seasoned relaxing yoga

If you’re reading this at posting time, good morning! Start your day off right with a relaxing series of stretches that are perfect for the morning time.  This routine starts in child’s pose, moves to all fours then up into downward facing dog, but don’t stress, you’ll be back down on the mat in no time.  Start each day by adding length to your spine, stretching out those hips and quads, and opening your chest and shoulders, you’ll be happy you did and it will take less than fifteen minutes.  This whole routine is meant to be a casual flow so once you’re familiar with the poses, move in and out of positions with fluidity.

Continue reading

Rishikul Yogshala Yoga Teacher Training Schedule

Take a look inside Rishikul Yogshala’s 200 hour yoga teacher training in Pokhara, Nepal.liveseasoned_fall_nepal yoga teacher training7

liveseasoned_fall_nepal yoga teacher training12

liveseasoned_fall_nepal yoga teacher training4 liveseasoned_fall_nepal yoga teacher training9  liveseasoned_fall_nepal yoga teacher training13 liveseasoned_fall_nepal yoga teacher training16 liveseasoned_fall_nepal yoga teacher training18 liveseasoned_fall_nepal yoga teacher training20

Sarah here :

Today marks my fourth full day of yoga teacher training in Pokhara, Nepal.  Only one more day and then I have a whole half day to myself on Sunday!  Because we’re squeezing a 200 hour training into 28 days, the schedule is absolutely packed.  I thought it would be fun to share it here to give you an idea of what I’ve been up to the past week.

  • 5-5:30AM Morning Tea
  • 5:30-7 Hatha Yoga
  • 7-7:15 Tea Break
  • 7:15-8:15 Pranayama aka breath work
  • 8:15-9 Yoga Nidra
  • 9-10:30 Breakfast
  • 10:30-11:45 Yoga Philosophy
  • 11:45-noon Tea Break
  • noon-1PM Mantra Yoga aka chanting sanskrit
  • 1:15-3 Lunch & Rest aka Lunch and shopping at my new favorite store
  • 3-4 Yoga Anatomy
  • 4-6 Ashtanga Yoga
  • 6:15-7:15 Meditation – Today the theme was self love. It was so amazing.
  • 7:30-8:30 Dinner

So that’s that. Lots of learning, practicing and tea all day long.  Each teacher is inspiring and full of knowledge.  I feel extremely lucky to be here and that feeling carries me through the long days.  If you’re wondering how we fill three and a half hours of asana practice, just imagine holding each pose for an excruciating amount of time and then repeating that four or five times.  As much as I hate holding wheel for ten breaths, it’s kind of nice to go into each pose slowly with so much detailed instruction.  Today we worked on handstands and arm balances in the morning and in the afternoon so. many. down. dogs.

I’m pretty sore, but as of today, I can honestly say I’m having the best time of my life.  The days are long, but they’re powerful and magical and I cannot say enough wonderful things about my teachers.  Each and every session I am reminded why I chose to train in the east with Indian teachers, my new yoga family.  I can’t wait to share more about this trip, if you have any questions, just ask!


Bedtime Stretches To Relieve Lower Back Pain

Want more yoga and exercise? Become a woods warrior, try this lower body workout, then end the day with bedtime stretches that relieve lower back pain. Check out my 200hour yoga teacher training experience and read about the school I attended here.

liveseasoned_sp15_BedtimeBackYoga-19 Ohhhh lower back pain and pressure. How many times have I groaned, moaned and cursed at you?  In fact, here I sit, back throbbing and hips aching, worrying about my future.  I have to admit, I don’t stretch or do yoga each day like I should and it’s evident in the way I feel when I lay down at night.  While these eight bedtime stretches are not a cure for lower back pain they help sooo much! Instant relief.  My tightly, tangled ball of rubberbandy back muscles relax into alignment and allow some comfort before bed. If you’re in the same back pressure out your ass predicament, go stretch out!

Continue reading

SUP – Stand Up Paddle-boarding

Have you tried stand up paddle-boarding (SUP) or know anyone who owns a board?  I’ve noticed more and more stand up paddleboards popping up in magazines over the past few years, usually mentioned by a fit celebrity or cited as a workout.  I had no idea there was a magazine specifically dedicated to SUP and it wasn’t until last year that I saw one with my own two eyes.  I was eating dinner at a restaurant in Seattle and out on the calm water a couple was watching the sunset from their SUP.  I was so envious!  If you’ve ever watched the sunset over the water you know what an amazing view it is, now imagine being on the water while it’s setting. Breathtaking.  Apparently I’m not the only newbie to SUP.  According to the 2013 Outdoor Participation Report, “Stand up paddling had the highest number of new participants in the past year. More than half of stand up paddling participants tried the sport for the first time in 2012.”

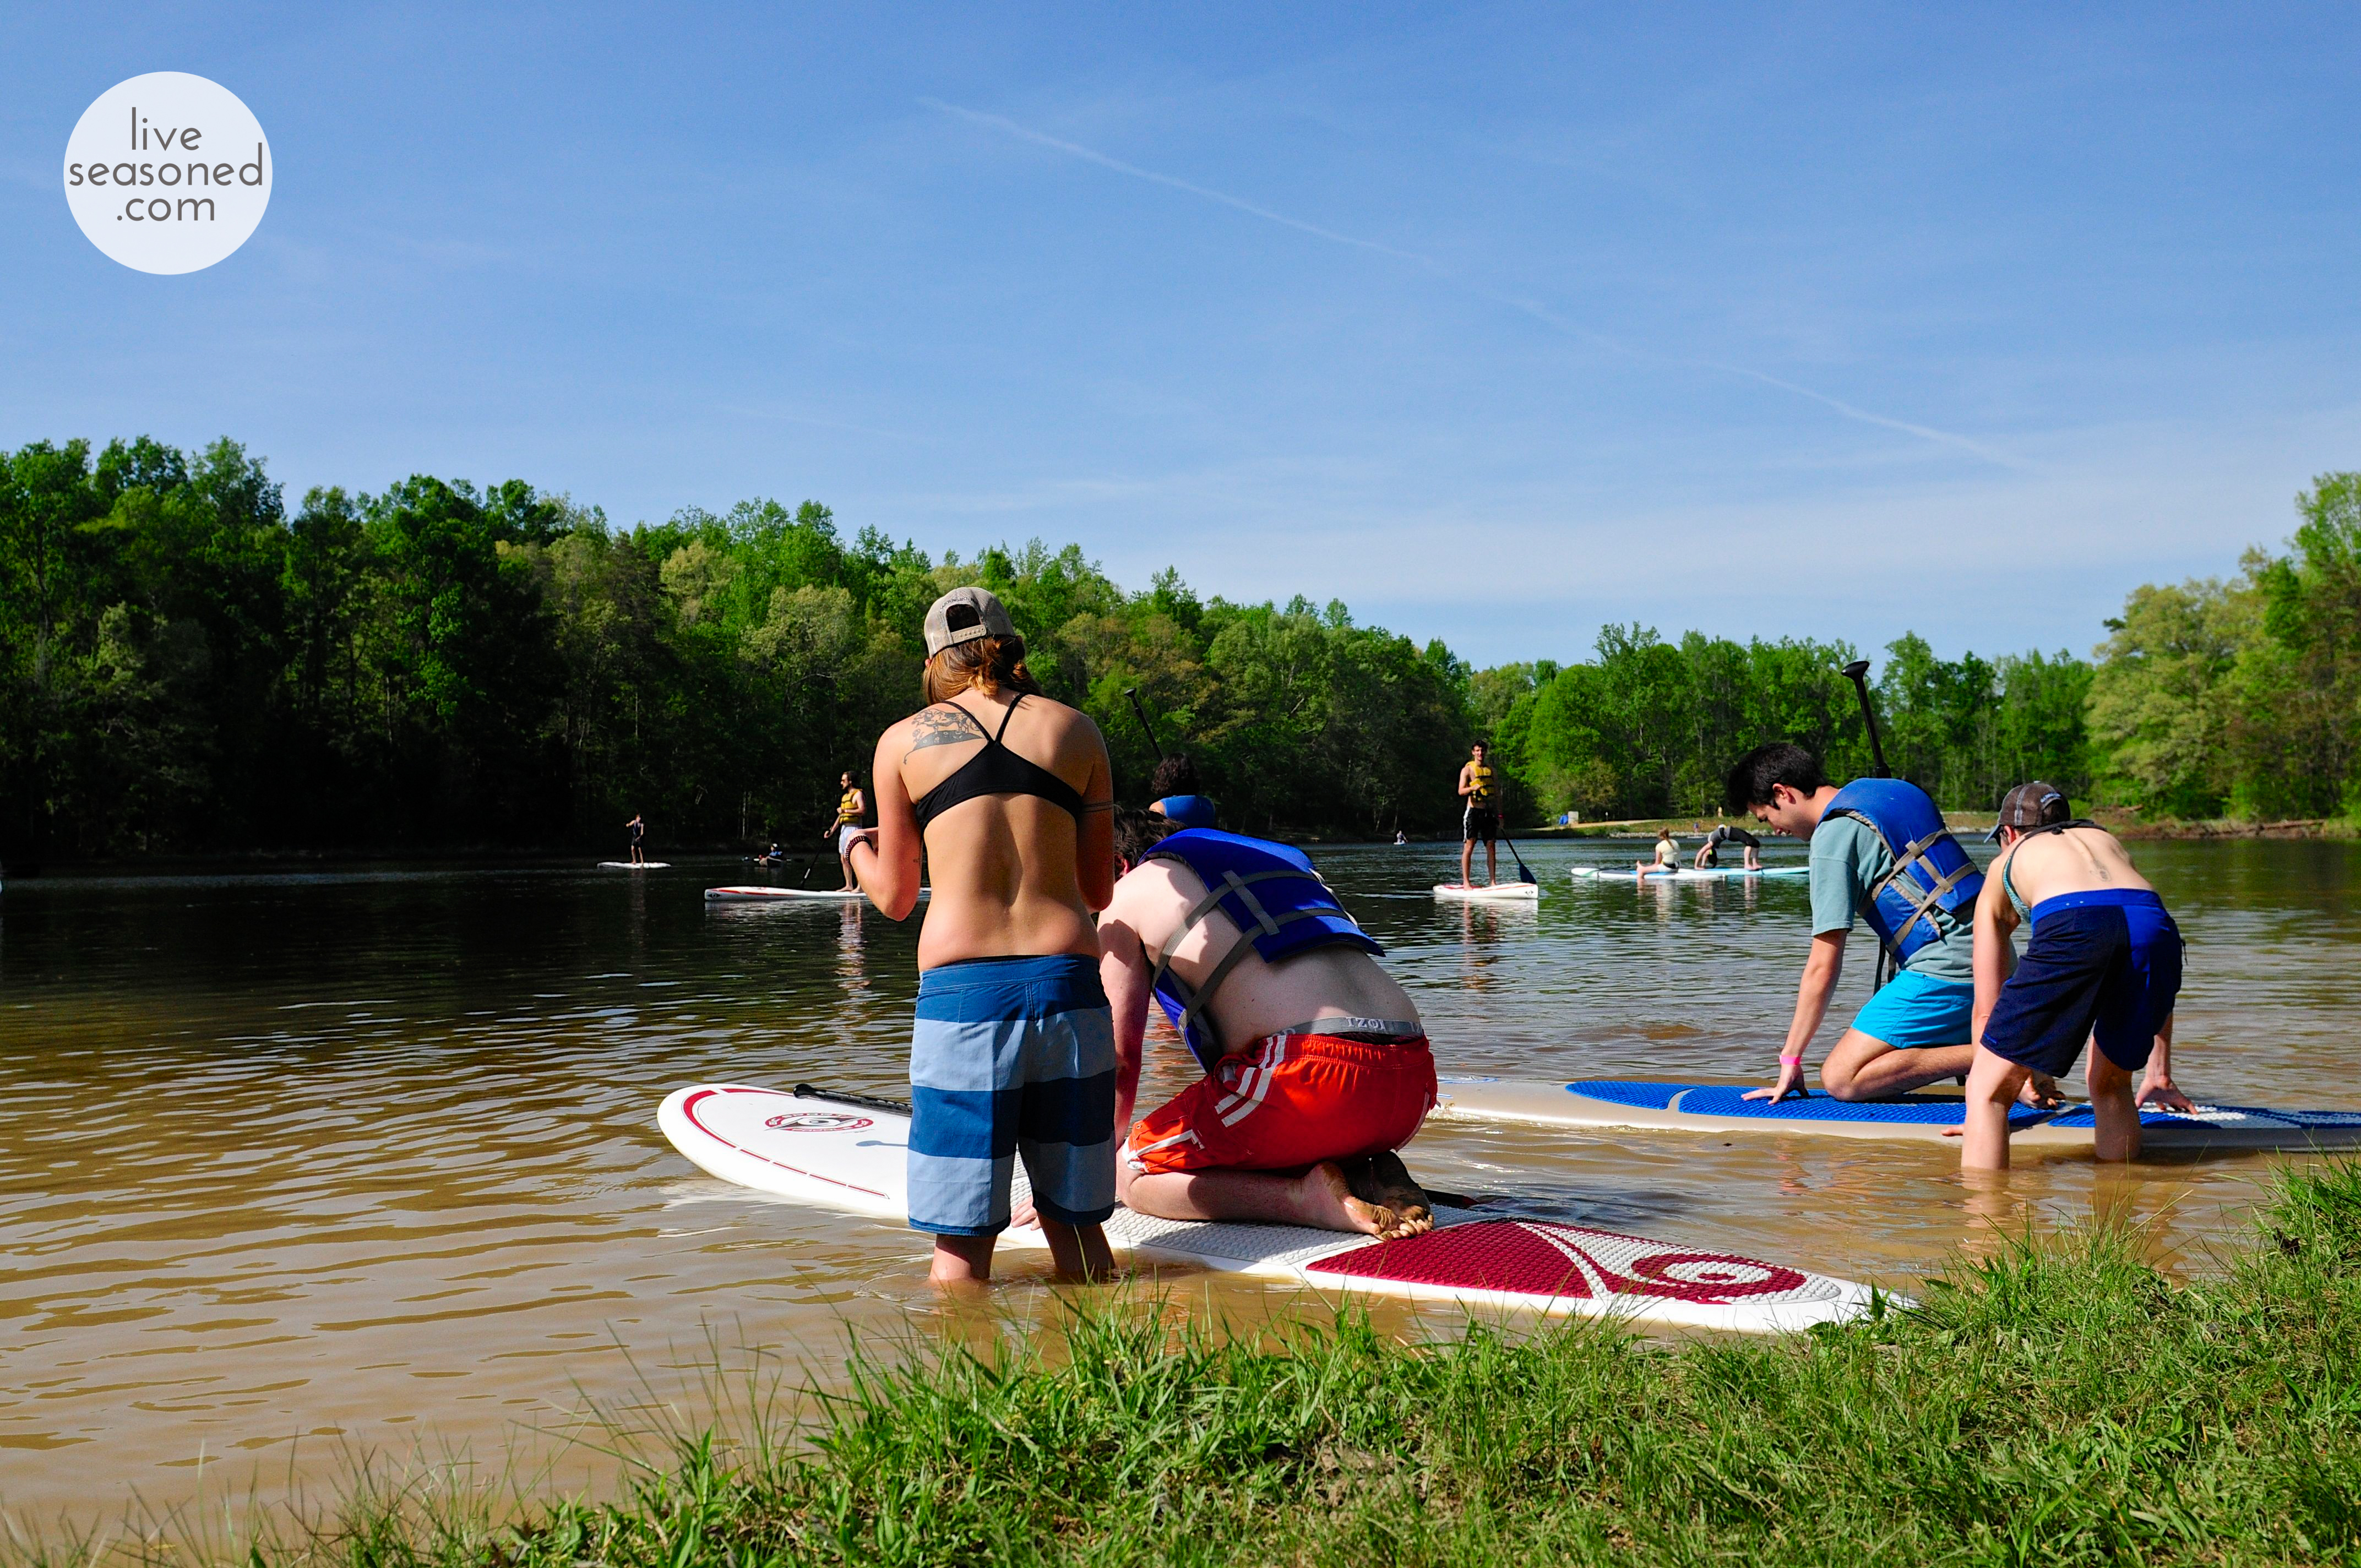
Even though I had a lot of interest in SUP, I didn’t get the chance to try it for myself until this past weekend.  My local outdoors store, Townsend Bertram & CO, hosted an event along with BIC (yep, the same people that run the pen game have a big hand in water board sporting equipment) to introduce SUP to those of us who have never tried it.  There’s a large number of lakes and rivers in NC, not to mention the Outer Banks area, so what better place to entice people to get into SUP? At least that’s what I thought when I signed up for the free event.

liveseasoned_spring2014_SUP-5-3

K and I headed to the lake on full hoagie-bellies (that’s sub-bellies to you [katie here: haha, Calder and I argue about this all of the time, thanks for the data!])  excited to try something new.  Once we checked-in we were assigned a number.  The friendly folks at Townsend Bertram & CO would periodically call out numbers, which was the cue to step on down to the waterside.  First the paddle was adjusted for height.  You raise your arm straight up into the air, but let your wrist hang limp.  The top of the paddle handle should just touch your palm.  Then the instructors picked a board depending on our height, weight and intended use.  There are different boards for racing, yoga, surfing and just plain paddling around.  K and I both tried standard boards the first time out.  He was on a 10’6” while I was on a 10’4”.  I wasn’t that nervous about the whole thing, but I think K thought it was going to be harder than it was.  I only saw one person out of 70 fall the entire day!  You simply wade out into the water, hoist yourself onto the board and then kneel in the center of it.  After you feel comfortable kneeling and paddling you can stand up and off you go.  K liked it so much that he went out a second time on a slim racing board.

Before I tried SUP I was excited about the idea, but thought it was a bit redundant since I already owned a kayak. Once I was on the board, I fell in love! It’s much different from kayaking and maybe it seems selfish, but I want one of these too.  Unlike kayaking, you’re much higher than the surface of the water so you’re able to see farther.  As a photographer, I really like that about SUP. I also like that you can easily see where you’re going.  Instead of just paddling blindly through the water, the more detailed view allows you to anticipate different currents, depths and passages.  I also love that SUP works your core and more of your upper body than the kayak.  I tire very easily in my kayak because I have a relatively weak chest and shoulders, but my core is solid, which made SUP less challenging and more enjoyable for me.  You can also hop off your SUP when waters get rough and choppy as opposed to flipping over in a kayak, which scares a lot of folks.

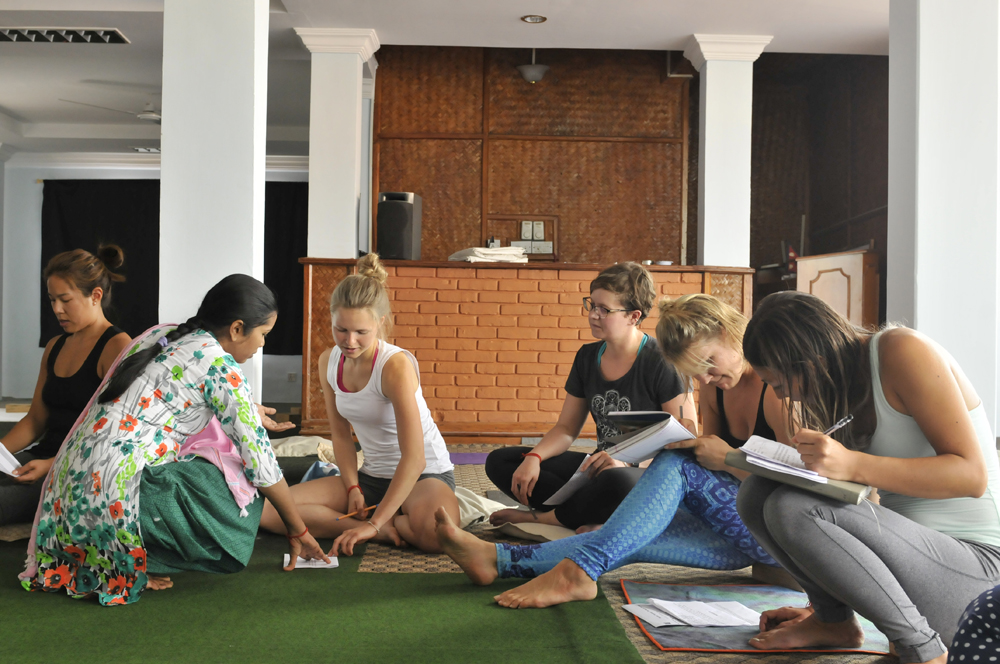
I love that SUP doubles as a surfboard and for that matter triples as a floating yoga mat!  You know the Seasoned sisters love yoga and if you don’t, we tried to tell you here and here.  At the event on Sunday I also ran into Allison from LYFSUP. In short, LYFSUP is dedicated to building the SUP community around Jordan Lake and in Chapel Hill, NC and beyond, and they are dedicated to protecting water & natural resources, donating a percentage of their profits to the cause.  Allison has an impressive background in surfing and SUP so it’s no wonder she’s committed to bringing it to the area.  LYFSUP offers  SUP yoga classes, which is what I had the chance to see on Sunday at the lake.  Allison and her stepdaughter Haley went out on the water and demonstrated a mini yoga flow for me!  It looked so relaxing and at the same time more challenging and complex than yoga on solid ground.  After watching the ladies practice side plank, chair, down dog and sun salutations out on the lake, I started calculating a budget to see how quickly I could buy a board!  My family has a home in Virginia, just a few yards from the water, so I could already envision switching my daily yoga practice to SUP yoga.  Imagine how tranquil and relaxing it must be to practice while gently floating along *sigh*.  In the meantime I’ll take a couple of Allison’s SUP yoga classes and hopefully by next year a board will be mine.

I do think the boards are a little bit pricey, but that may be because I’m used to buying boats and equipment with more to it.  Since SUP is a newer concept to me, I think I’m having a hard time justifying such an expensive purchase on just a board (even though I know it’s so much more than that!).  Like I said, it really is a SUP, surf board and yoga mat all in one.  The boards I used on Sunday were top-of-the-line, but I did find some for as low as $600 and even $400, but I can’t attest to the quality.  The ones I saw Allison of LYFSUP using were even more impressive and perfect for practicing yoga so I’m excited to get the opportunity to try one out for myself during her class (the board and anchor rental is only $5 extra).  After perusing the internet and seeing so.many.options. I think it would be a good idea to rent several different kinds and really get a feel for the type of board that’s right for you.  In my family, we often split recreational purchases like this, making it extra important to research the boards to find one board that can fit everyone in the family.

liveseasoned_spring2014_SUP-4

If you are new to SUP like myself, you should do a quick google search and see if any sporting good stores, outlets or parks in your area rent out boards.  I was surprised to find out that there are several rental venues in my area and near the Outer Banks too.  It’s a great way to explore, and who doesn’t love a new adventure?

I feel like I’ve become mildly obsessed with SUP in a matter of a few days.  I promise this post isn’t sponsored by anyone (although I wish it was, helllllo free SUP).  I tend to bounce around from one expensive hobby (backpacking to rock climbing and always photography) to the next so I’m really trying to reign myself in on this one.  I can already see myself buying a board during end-of-the-summer clearance sales.  So be it.  All the better to photograph the sunset with, am I right? [katie again : you have me convinced!]

If any of you are in my area, Chapel Hill, NC, let’s take a SUP yoga class together!  I’m doing it either way so why not join me?  Back to daydreaming about SUP in tropical locations for me…

Become a Woods Warrior

Want more yoga and exercise? Become a woods warrior, try this lower body workout, then end the day with bedtime stretches that relieve lower back pain. Check out my 200hour yoga teacher training experience and read about the school I attended here.

liveseasoned woods warrior

Become a woods warrior.  Nope, not the kind that wields a sword, instead the kind that smiles peacefully and stretches deeply.  Warrior pose is also known as Virabhadrasana (vira=hero, bhadra=gentle, asana=pose).  You can be a warrior anywhere, but I believe the woods to be the calmest and most inspiring space for these stretches.  There’s nothing like holding warrior one while you gaze up at your fingertips and see the tops of tall trees swaying in the wind.  You have the overwhelming sense of feeling grounded yet flexible like those limbs.  Then comes warrior two where you can pause and gaze miles past your fingertips.  The forest gives you ample spaces for exalted (reverse) warrior so you can stretch and lengthen until you’re as limber as the trees that surround you.  I love looking down at my environment in warrior three.  It gives me time to take in the dry leaves and tiny bugs as I breathe, balance, lengthen and stretch with all I’ve got.

live seasoned woods warrior yoga poses-9

After recently completing a month-long yoga challenge, I was a little bored with the warrior poses.  I was eager to move on to harder, more intriguing postures, but I realized that isn’t the yogi way.  It’s important to be present with each pose, no matter how many times you’ve practiced.  The more you appreciate the present, the more space you create for improvement and appreciation.  Of course, the same is true with life.  The more we focus on the task at hand, the more we come to contribute, improve, appreciate and love what we’re doing.  So even if you’ve practiced warrior one, two, and three a thousand times, try them all again and appreciate their presence in your life and your ability to stretch and strengthen your body.

A few tips:

  • Wear stretchy pants or shorts so you can practice your fullest expression of each pose.
  • Pick a relatively flat and non-slip surface.
  • Move into each pose slowly and with intention.  Think about each part of your body in order to achieve the proper alignment.
  • Breathe deeply and evenly through your nose.  If the pose seems tough, focus on your breath.
  • Try each pose for a couple breaths and then go back and hold them longer if you’d like.
  • My form isn’t perfect so don’t just peep at the pics – read through each warrior before practicing.


live seasoned woods warrior yoga poses-7live seasoned woods warrior yoga poses-2live seasoned woods warrior yoga poses-1

Warrior One

  • Stand up straight with your feet together, arms down by your sides, and palms facing forward.  Inhale and as you exhale, step your right foot forward about 4 feet.  Reach your arms upwards (perpendicular to the floor) as you rotate your palms to face each other and actively reach through your fingertips towards the sky.  Breathe as you roll your shoulders down and back into their sockets.
  • As you inhale, make sure your heels are aligned and turn your back foot (left) out 45-65 degrees to the left (anywhere from 9 o’clock to 11 o’clock). Exhale and rotate your hips and torso to face forward while grounding into your back leg.  You’ll probably have to pull your left hip forward and your right hip back.  Try to square your pelvis as much as possible, this is difficult (especially if you have tight hips like myself) and won’t happen overnight. I like to bring my arms down for a moment, touch both my hips and direct them towards the front of my invisible mat.
  • Keep your back foot firmly planted and as you exhale, bend your right knee over the right angle so the shin is perpendicular to the floor and your thigh is as close to parallel as possible.  You may have to scoot your front foot forward a little bit if your knee is tracking over the front of your ankle (you never want that to happen). Your back leg should be straight and your heel should be touching the ground.
  • Anchor yourself firmly with both legs, even though your front leg is probably burning a little more, your weight should feel equally grounded.  Inhale as you reach towards the sky, look up at your fingertips and those beautiful trees and reach some more.  There can be a slight bend in your back.  You can also bring your palms together overhead and spread your fingers if you’d like.
  • Relax into warrior one with strength, breathing deeply for thirty seconds to a minute.  To release, straighten the front leg while bringing the back leg forward to meet at the front of your invisible mat.

live seasoned woods warrior yoga poses-6live seasoned woods warrior yoga poses-8live seasoned woods warrior yoga poses-3

Warrior Two

  • Starting from warrior one (with your right foot forward), rotate your left arm back and your front arm forward so they create a straight line (parallel to the ground).  Keep a tall spine and feel strength radiating from your core.  At the same time rotate your hips and your back toes outward.  Your shoulders should be stacked directly over your hips and your left toes should be pointed towards the left side of your invisible mat (perpendicular to your right toes) .  The heel of your front foot should line up with the arch of your back foot.
  • Sink lower into your lunge and exhale while relaxing your shoulders.  Just like in warrior one, the weight should be distributed evenly in your legs, which means the outer edge of your back leg is pressing firmly into the ground.
  • Even though you’re actively reaching forward and backwards with your arms, they should be slightly relaxed not rigid.  I like to imagine a string tied to each middle finger, knowing I could sway my abdomen forward and backward if someone came along and pulled either string.
  • When you’re properly aligned, look out over the edges of your front fingertips.  Keep your gaze soft and your face relaxed.  Hold the pose for thirty seconds to a minute all the while breathing deeply. To release, rotate the arms upwards and the back toe and hips forward to return to warrior one and then straighten the front leg while bringing the back leg forward to meet at the front of your invisible mat.

live seasoned woods warrior yoga poses-10live seasoned woods warrior yoga poses-5live seasoned woods warrior yoga poses-4

Exalted or Reverse Warrior

  • Starting in warrior two, simply rotate the front palm towards the sky and slide the back palm gentle down your back thigh.  Inhale the front arm towards the sky, reaching and lengthening the front side of your body while your back hand extends lower on your thigh and eventually calf.  You don’t want to put any weight on your back hand, instead use your abdominal muscles and right hand to lengthen and raise your heart towards the sky.  Gently gaze up at your fingertips while keeping your neck relaxed.
  • Deepen the lunge in your front leg and breathe deeply for up to thirty seconds.  To exit, return to warrior two, warrior one and then straighten the front leg while bringing the back leg forward to meet at the front of your invisible mat.
  • *If you’d like to go into a half bind in reverse warrior, bring your lower hand around your back and place your fingertips in your front hip crease.  Make sure you keep a deep lunge and your upper body uplifted.

live seasoned woods warrior yoga poses-11live seasoned woods warrior yoga poses-12

Warrior Three

  • Starting from warrior one, simply (ok nothing is simple about this pose) tilt your upper body forward about 45 degrees and simultaneously straighten your front leg while you gently push forward and lift your back leg.  The goal is to look like the letter T.  Your hips should be squared towards the ground.  Stretch your arms forward so they’re parallel to the ground while you flex your back foot and push backward.  I like to imagine a wall directly behind me that I’m pushing against with my heal.  You don’t want your shoulders to sink below your hips so engage your core muscles and lengthen your arms while you gaze at the ground.  Hold this for up to thirty seconds, which is a major challenge, and gently release back into warrior one. To release, straighten the front leg while bringing the back leg forward to meet at the front of your invisible mat.


Now you’re well versed with warrior and equipped to take your calming strength out into the woods.  I hope you enjoyed a magnified look at these important postures.  I’m sure you’ll find yourself in one, if not all four, of these poses during any vinyasa class.  And remember that everyone’s body looks and works differently even though we’re all made up of the same parts, which means everyone’s warriors will differ slightly.  Embrace yours, whatever it may look like today and leave it in the woods when you’re finished.  It may look different tomorrow, embrace that too!

Lower Body Woods Workout

Want more yoga and exercise? Become a woods warrior, try this lower body workout, then end the day with bedtime stretches that relieve lower back pain. Check out my 200hour yoga teacher training experience and read about the school I attended here.

live seasoned lower body woods workout-1 copy            
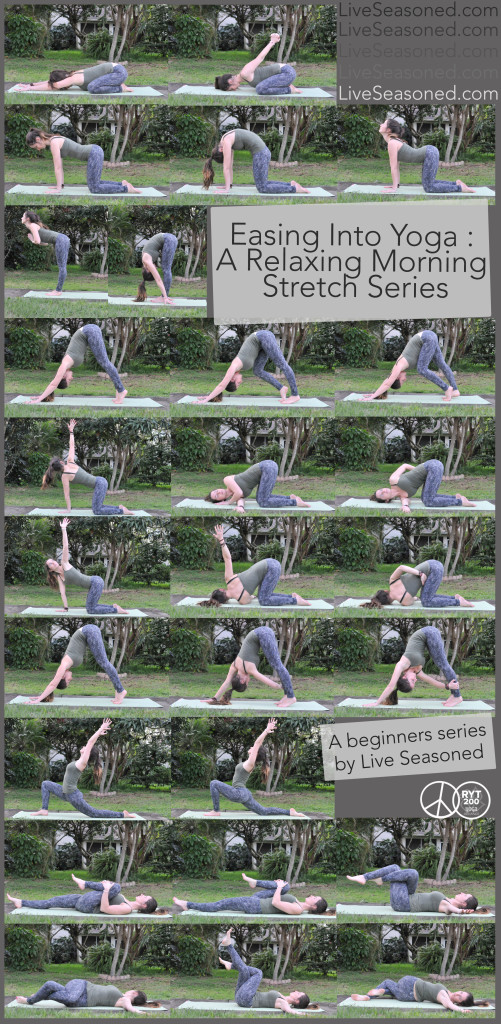
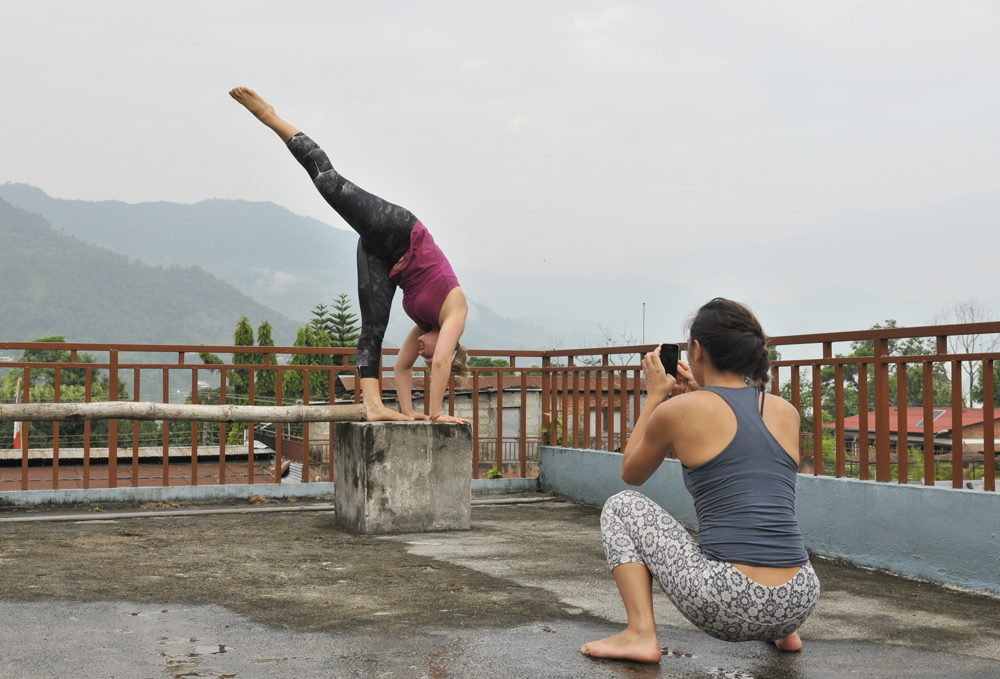
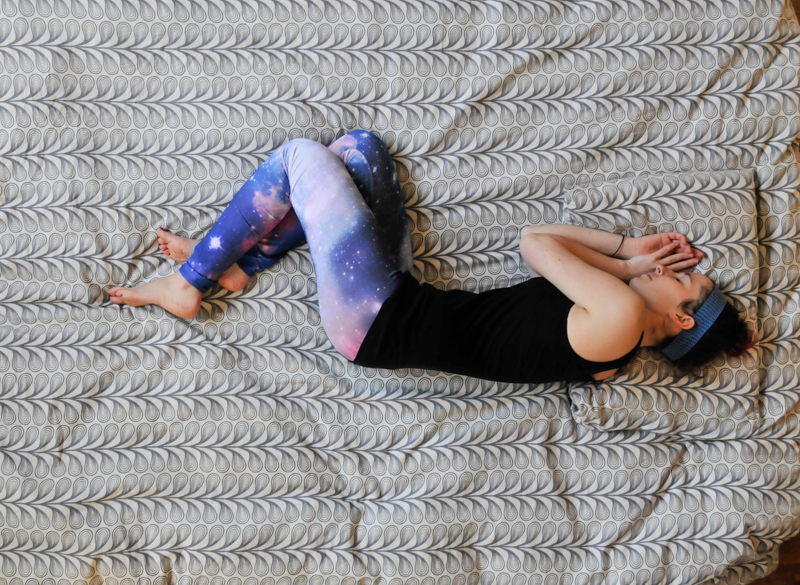
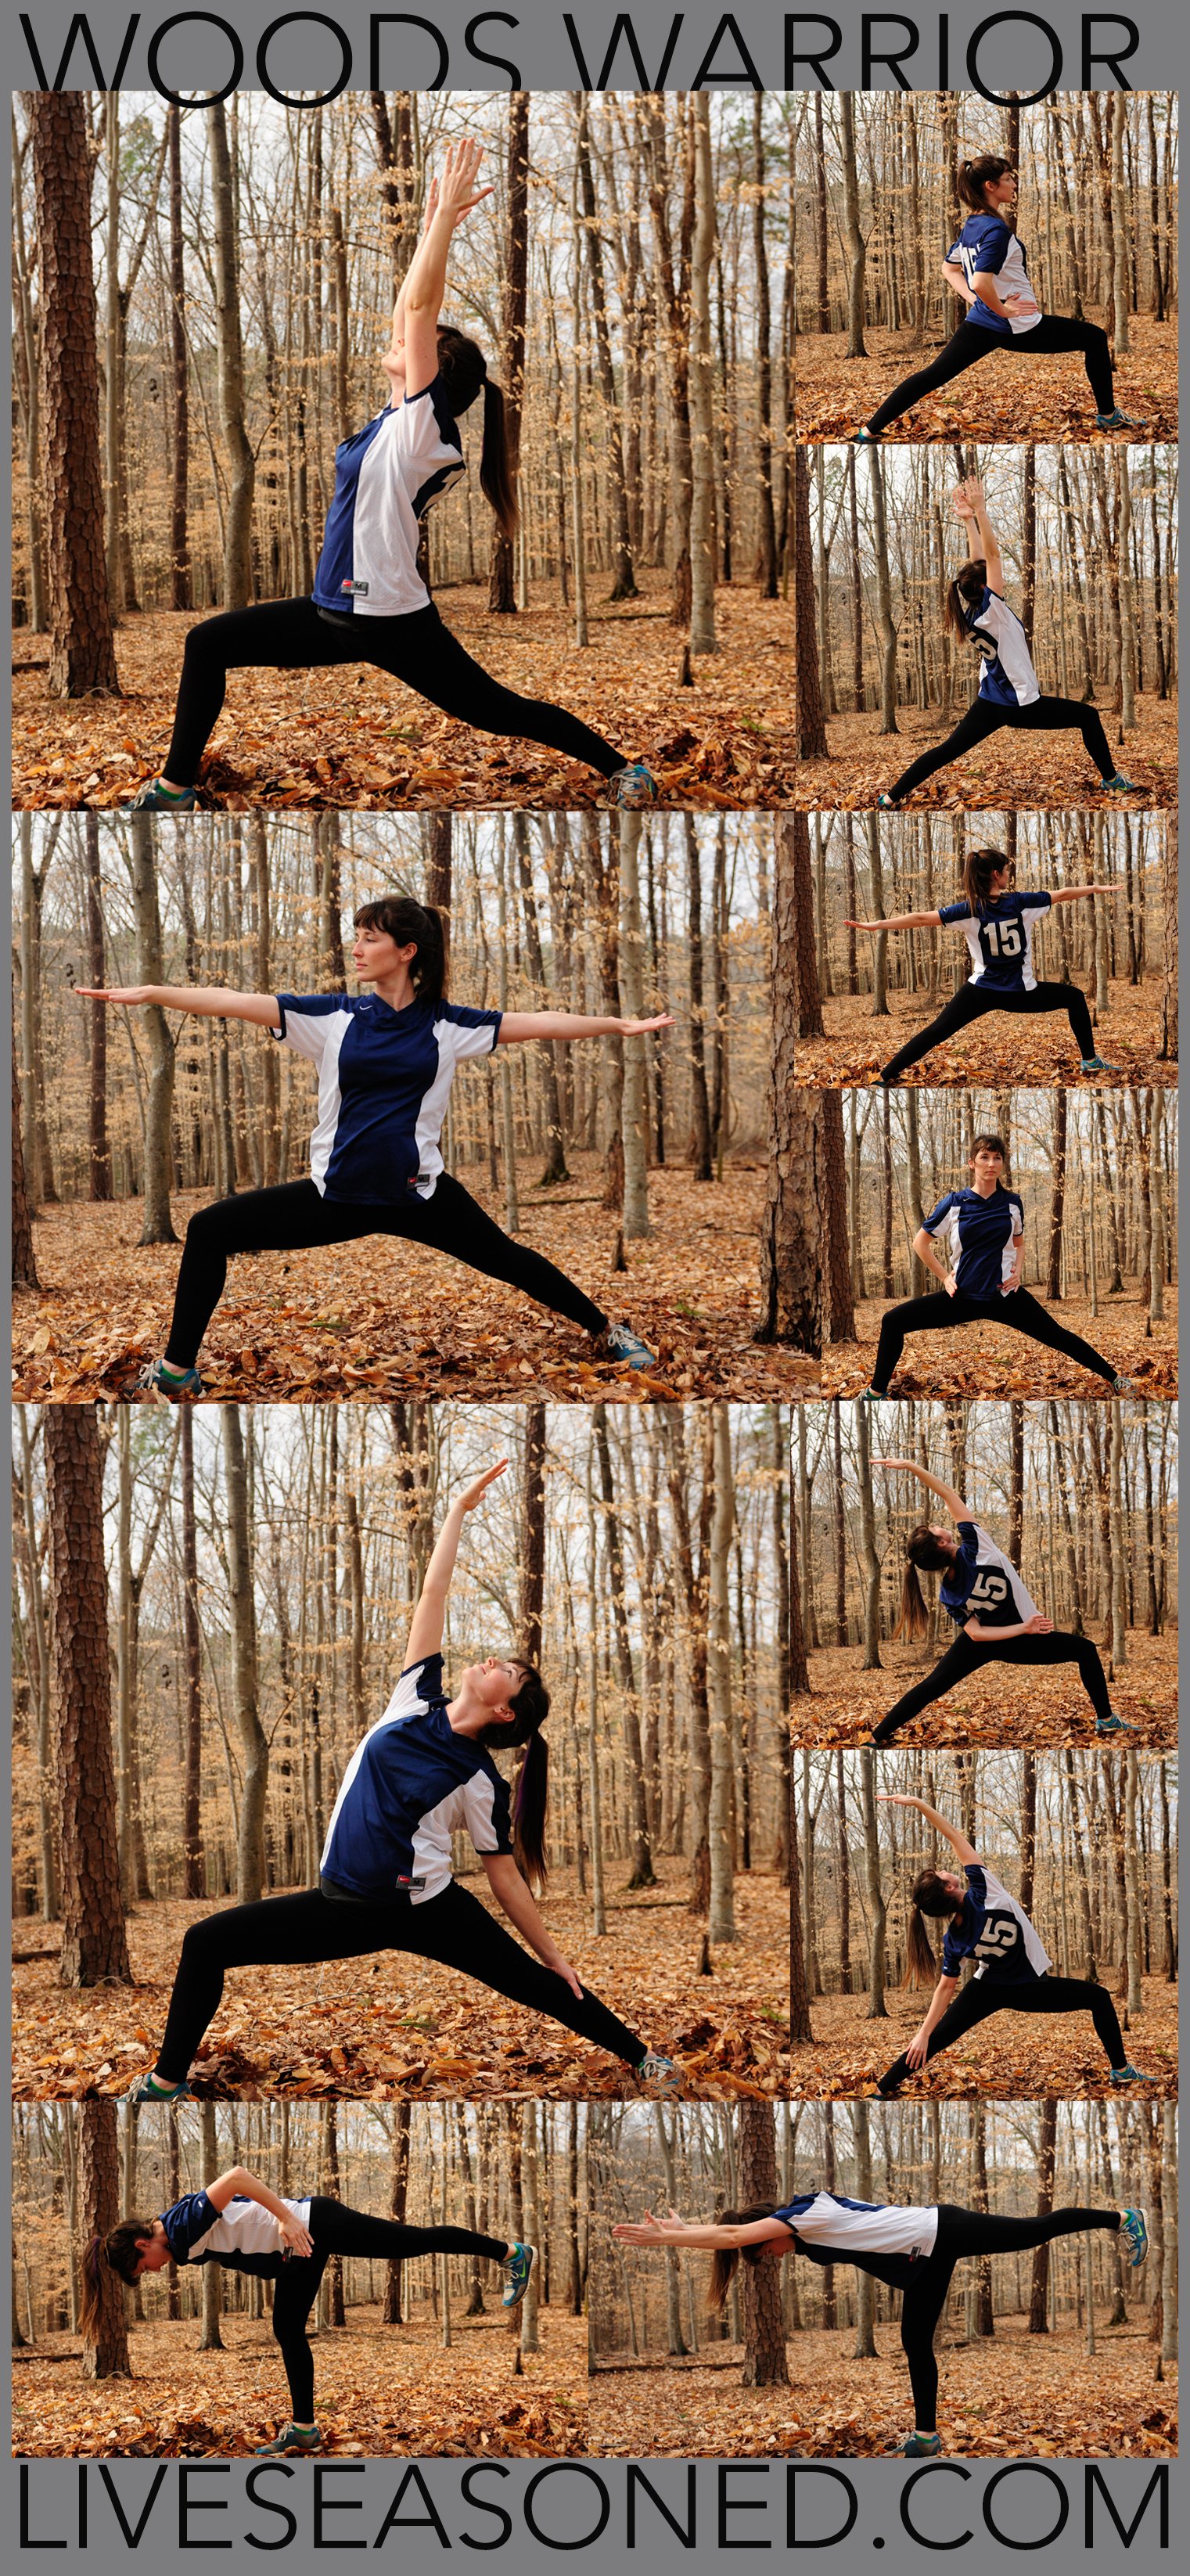
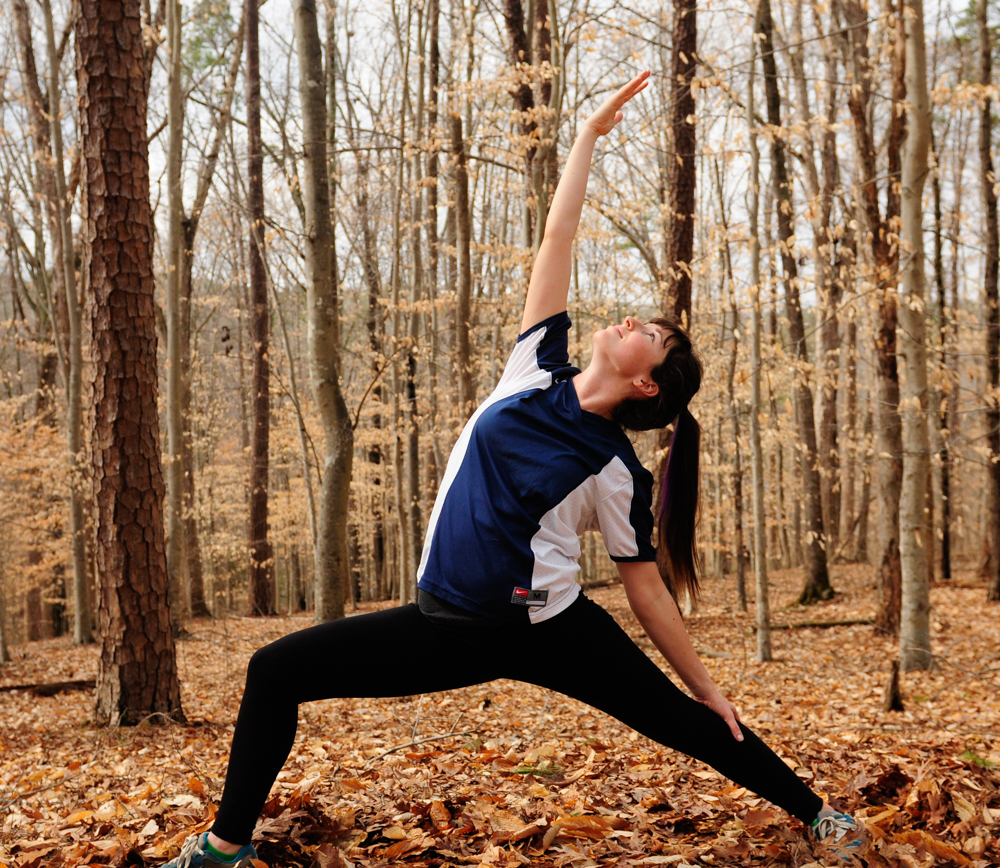
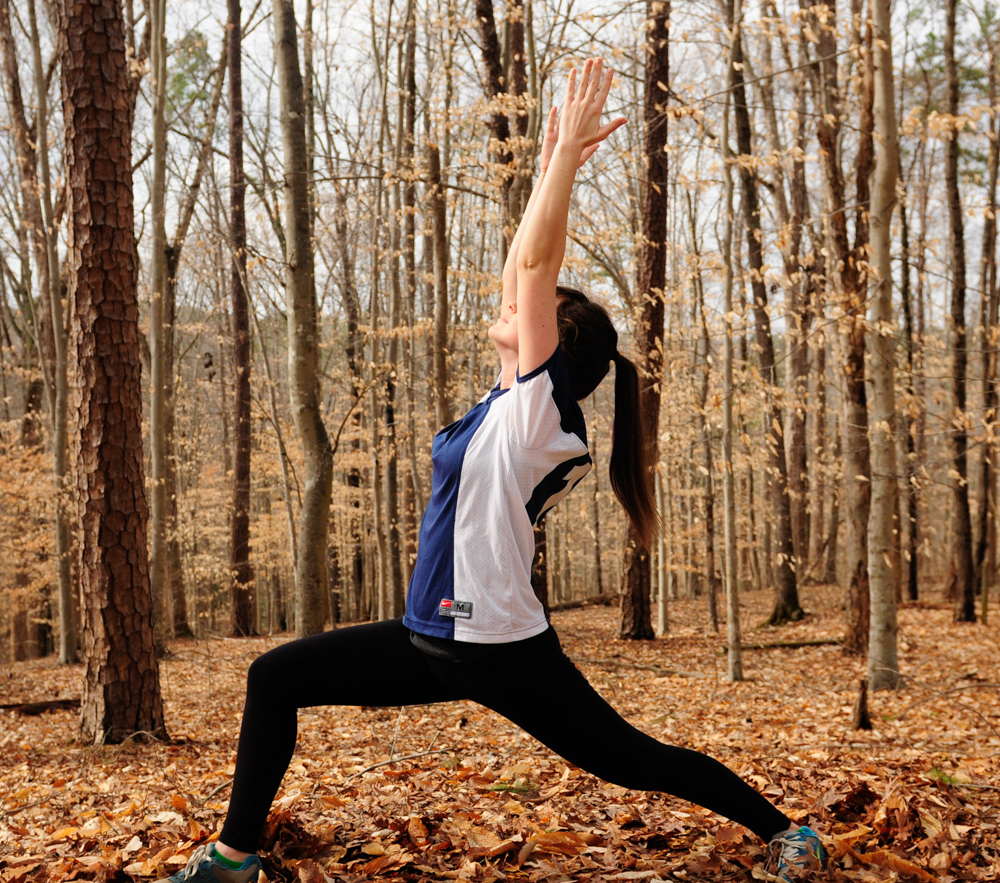
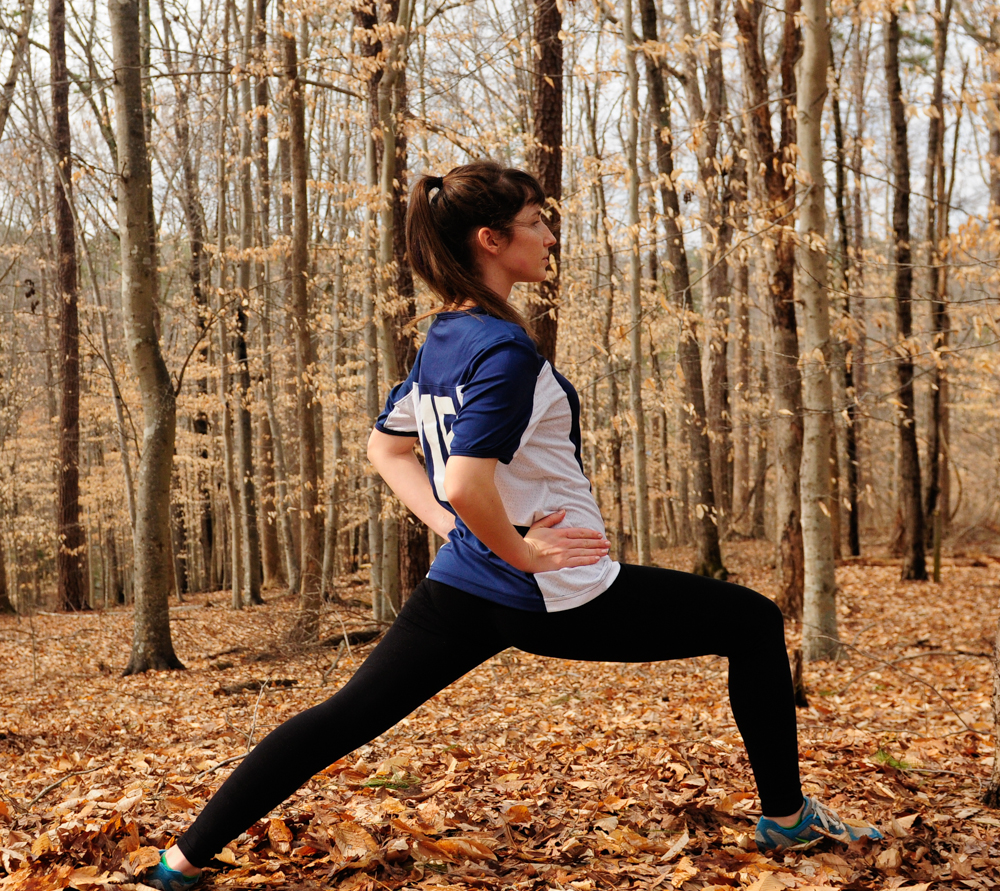
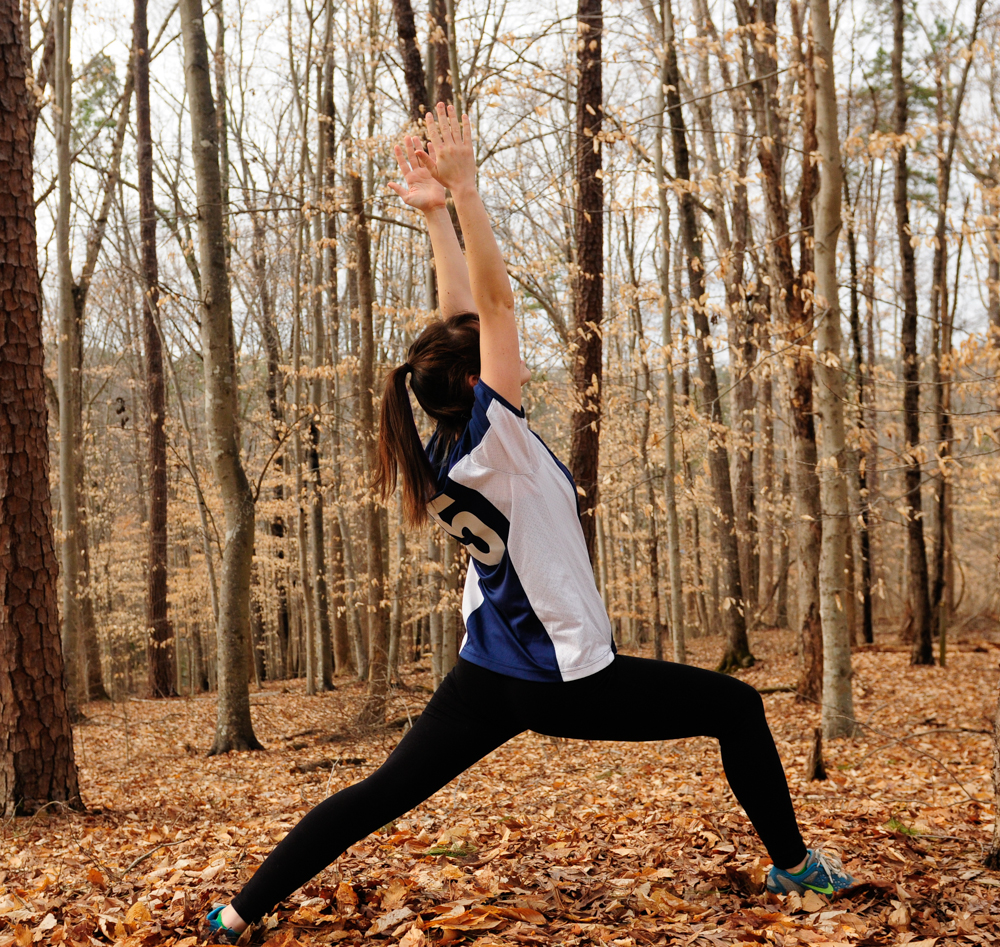
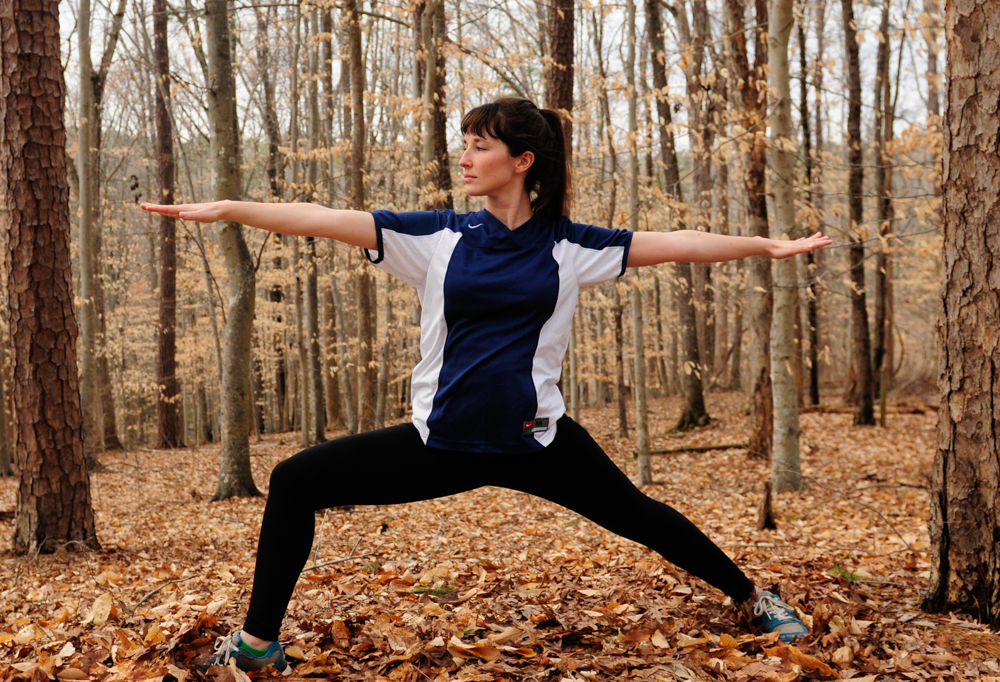
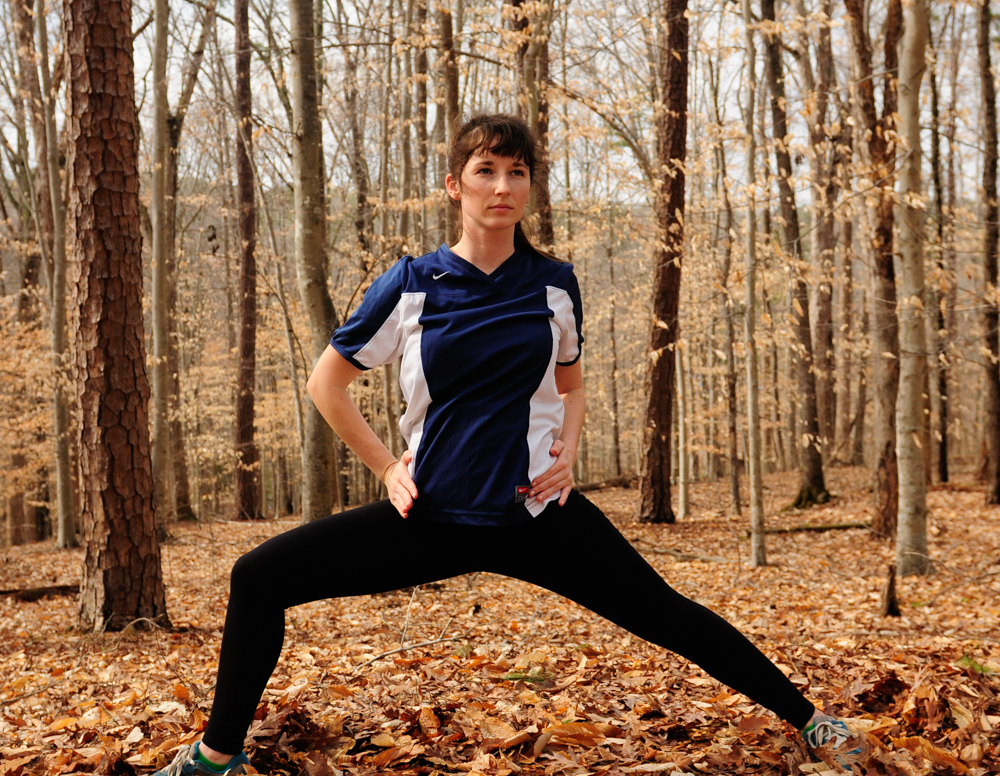
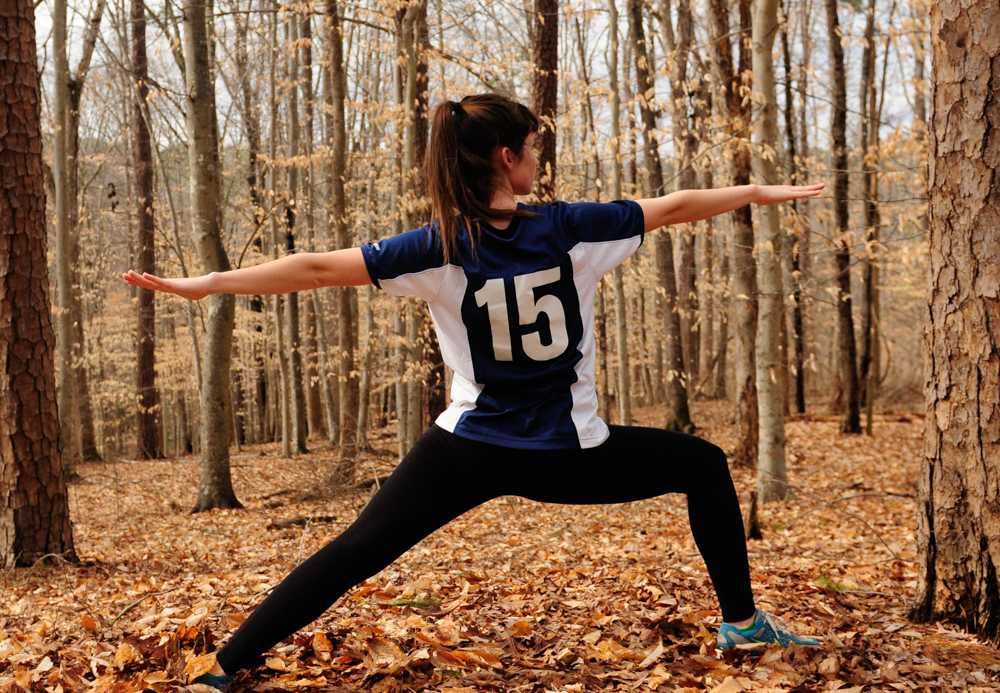
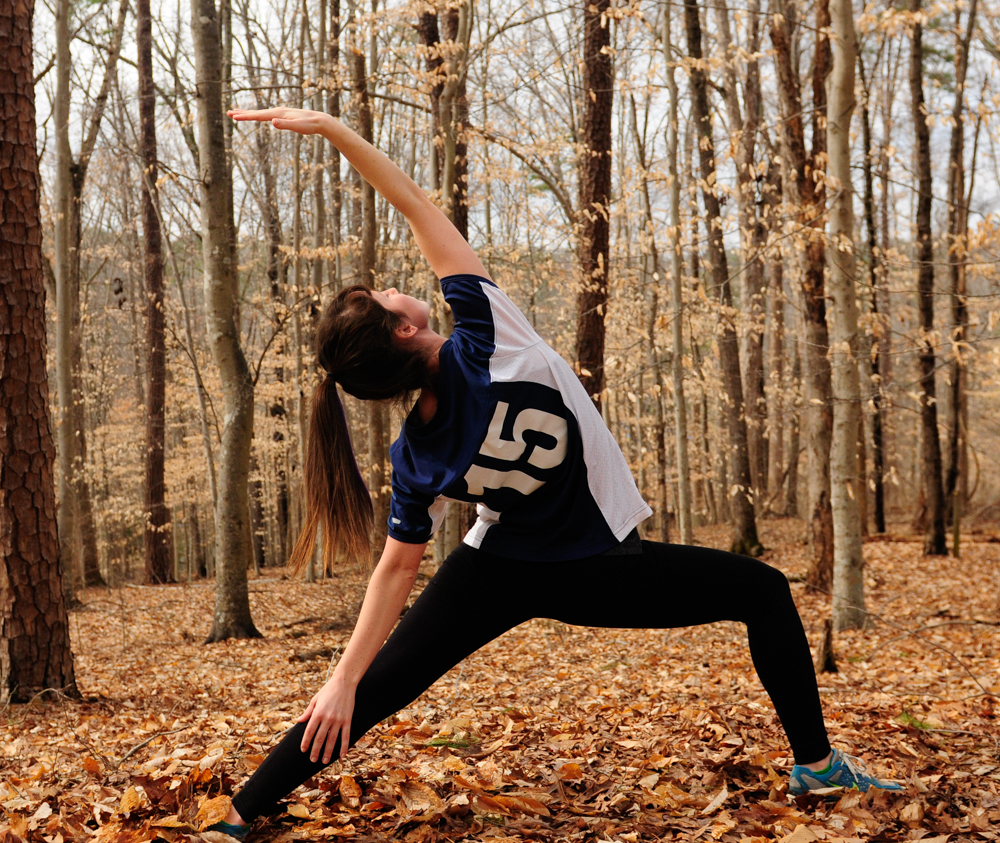
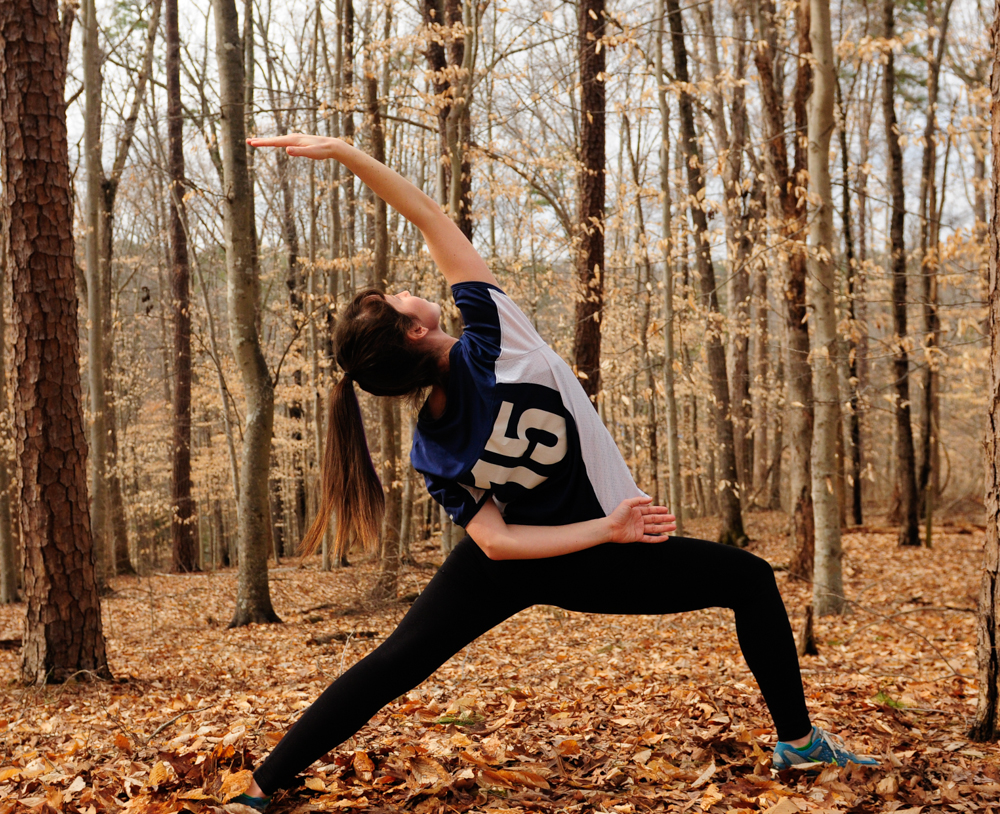
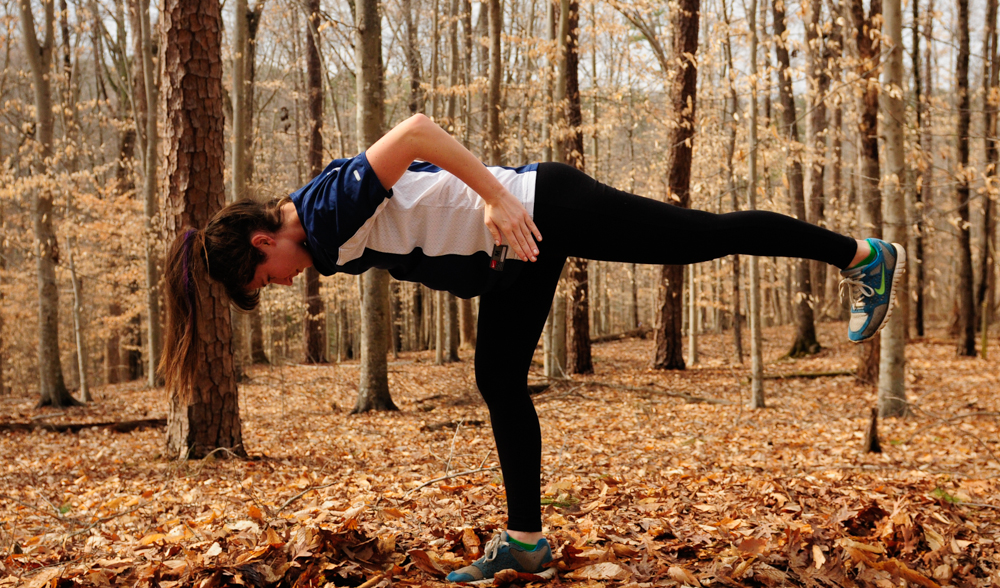
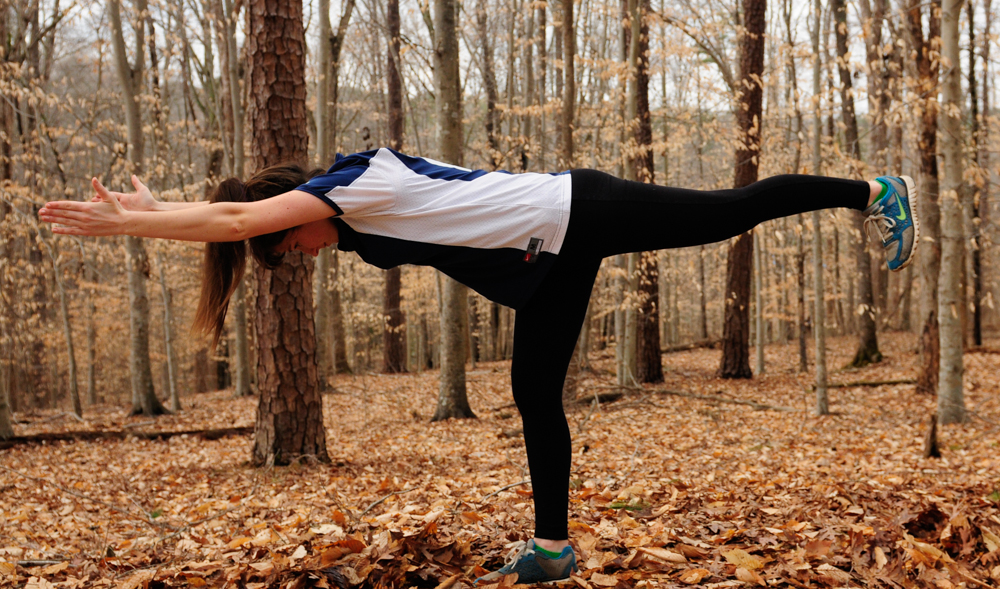
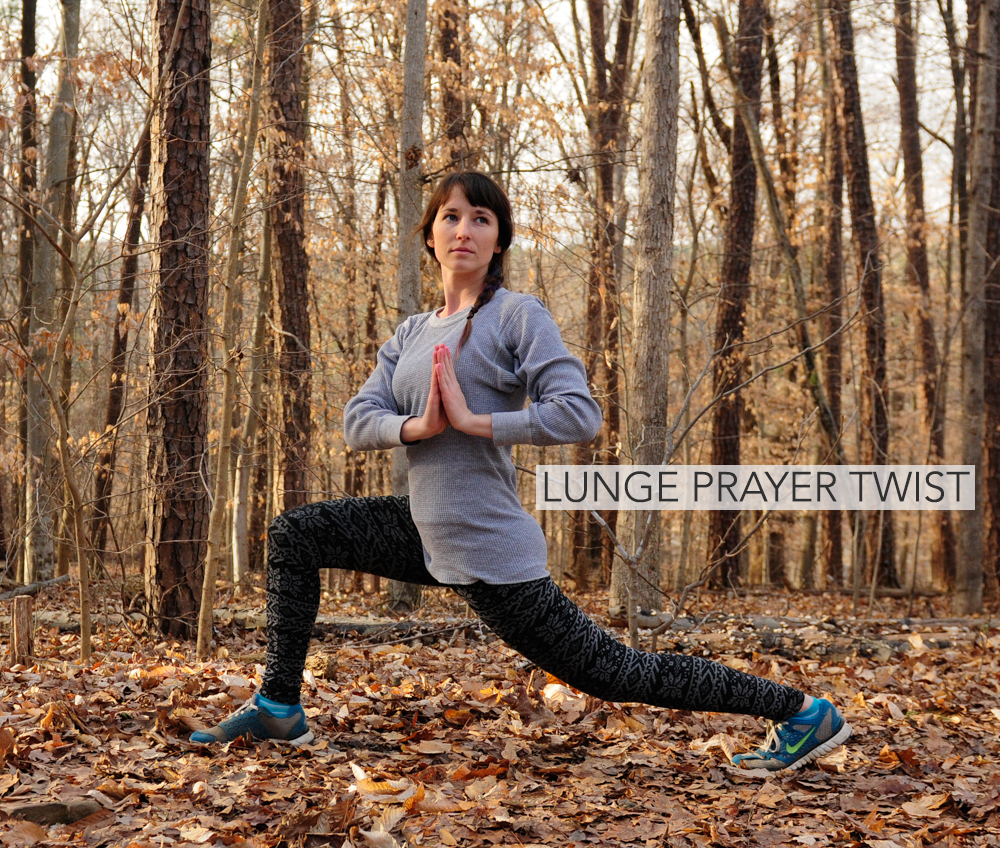
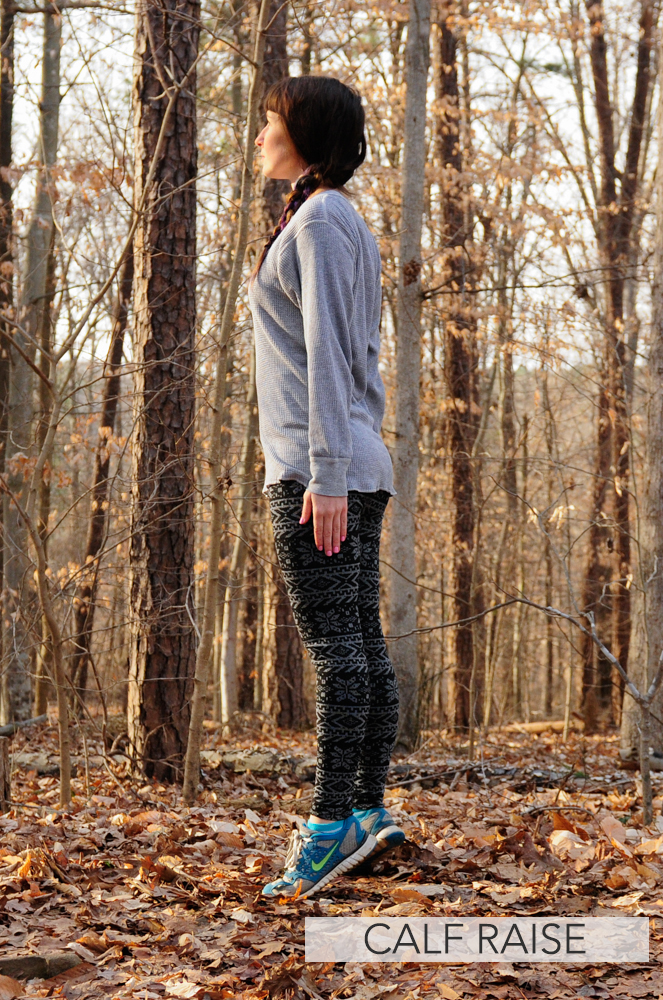
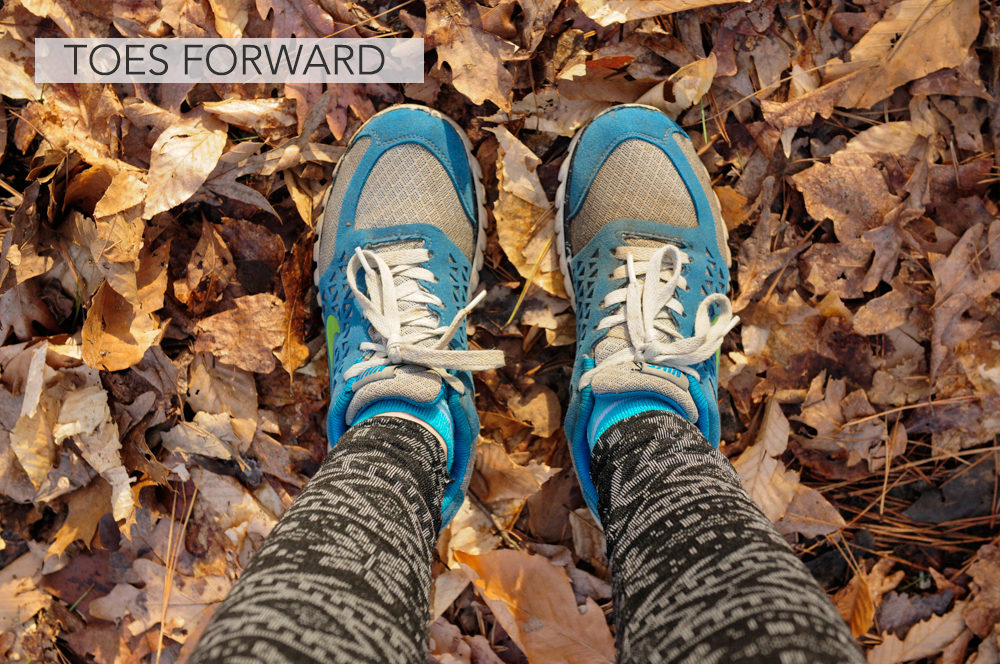
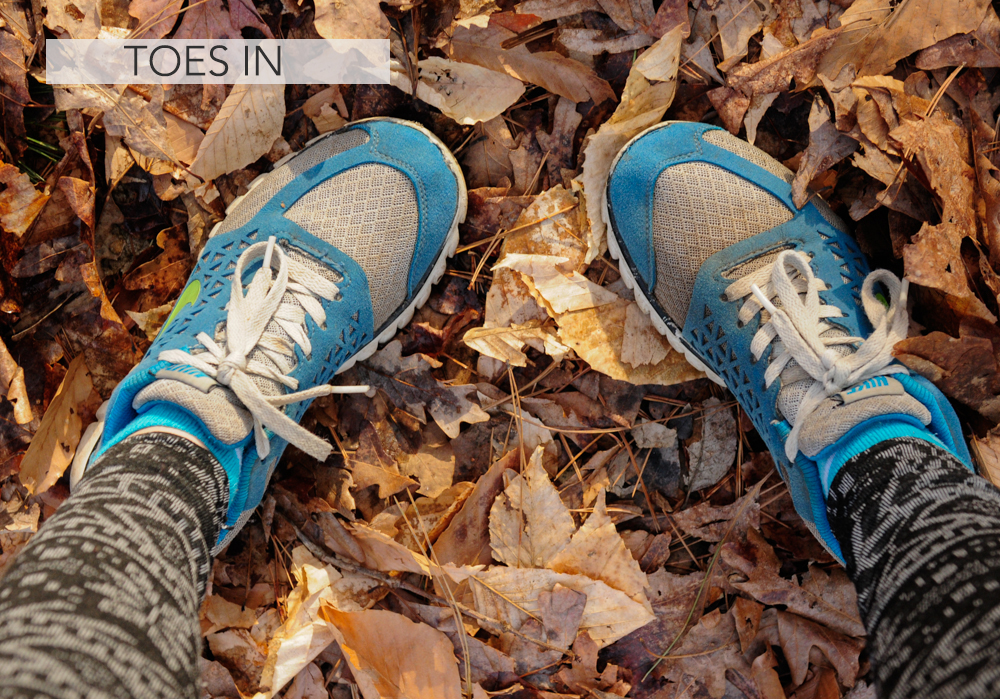
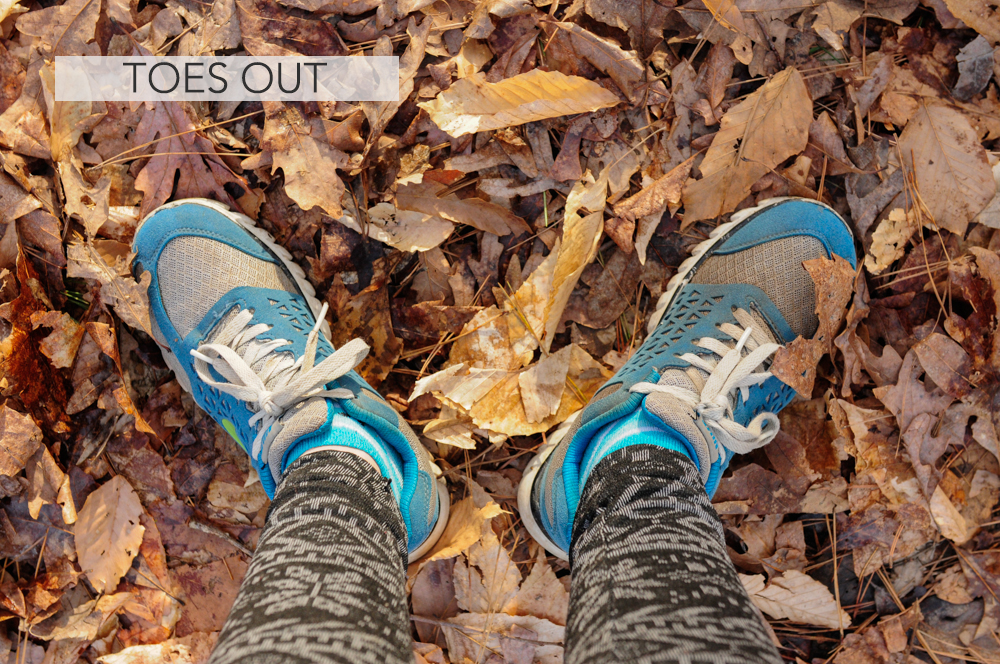
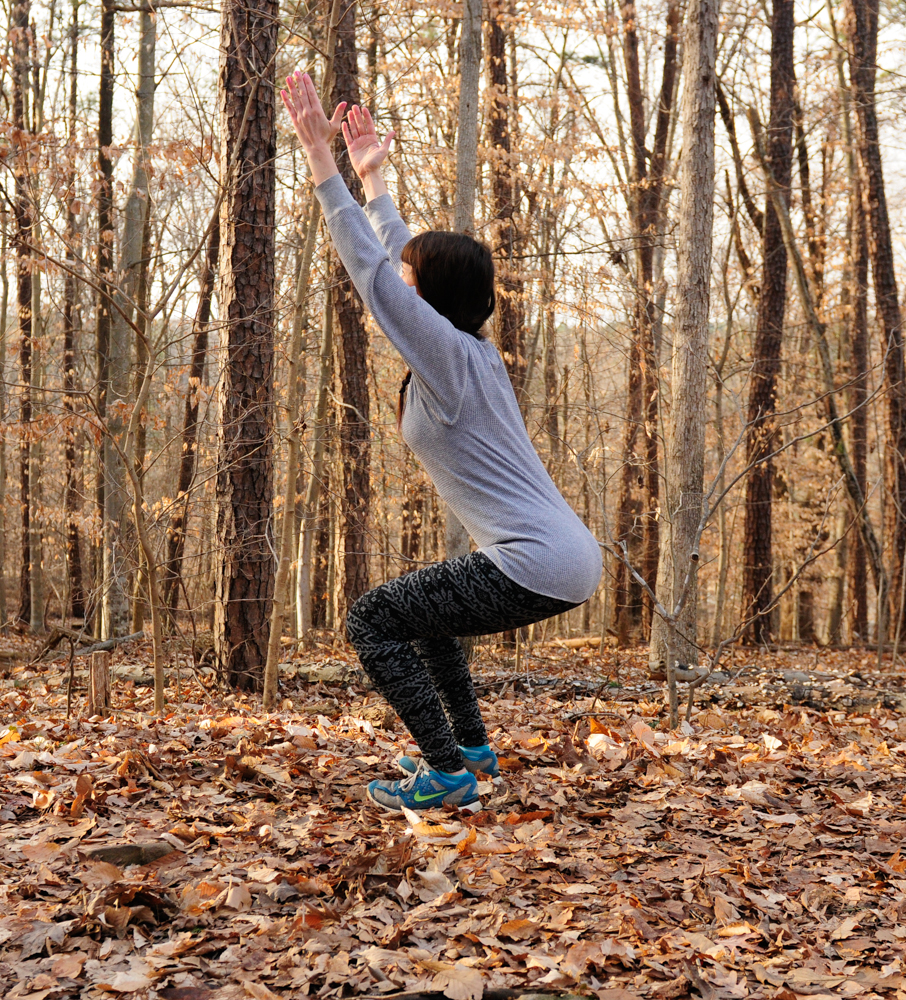
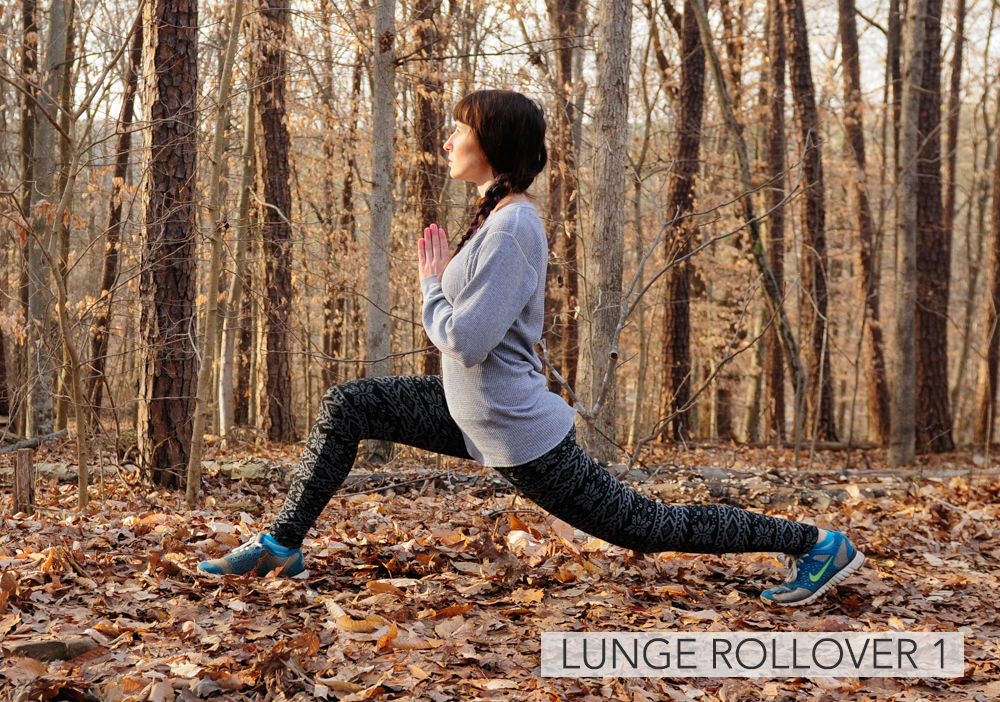
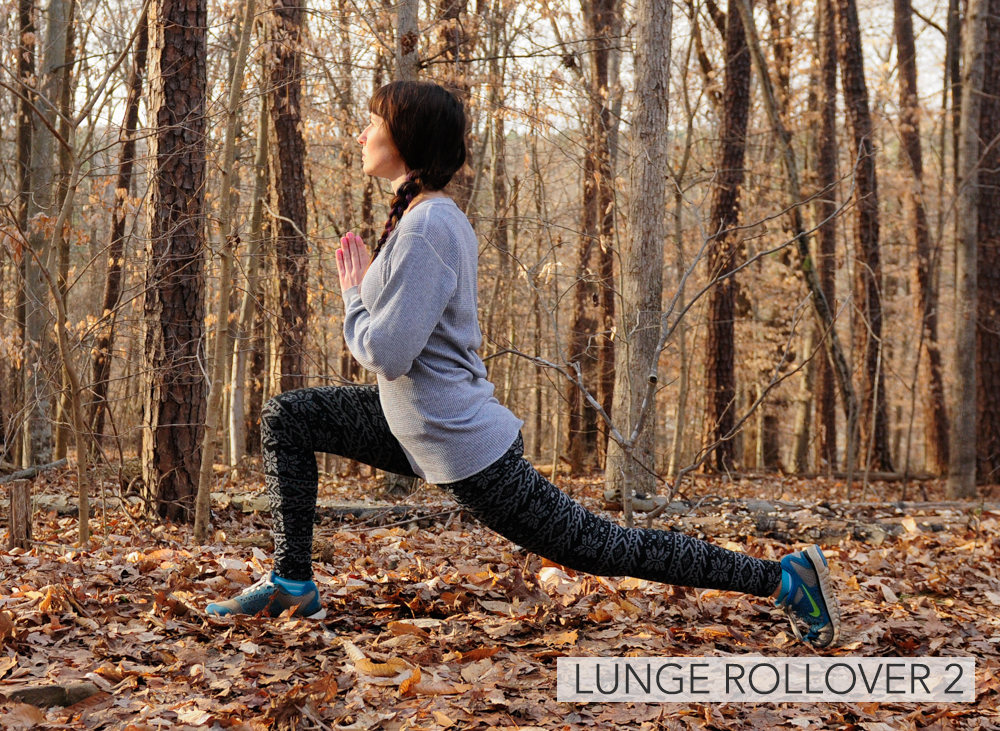
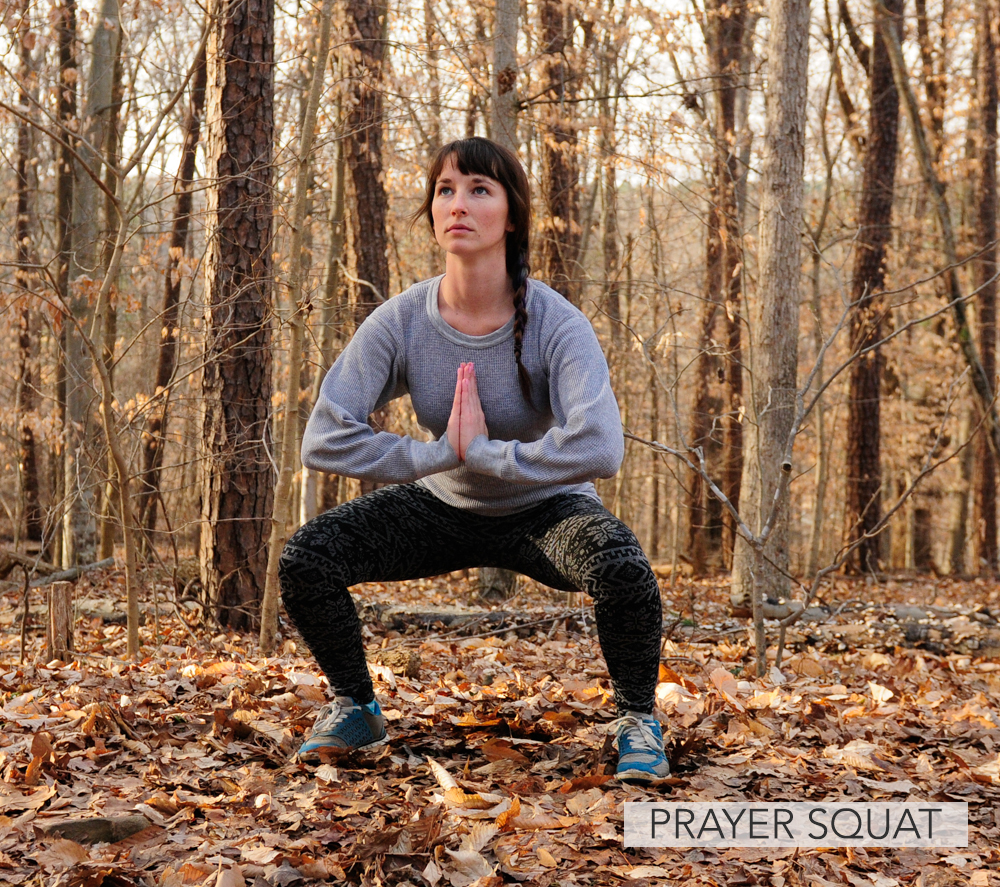
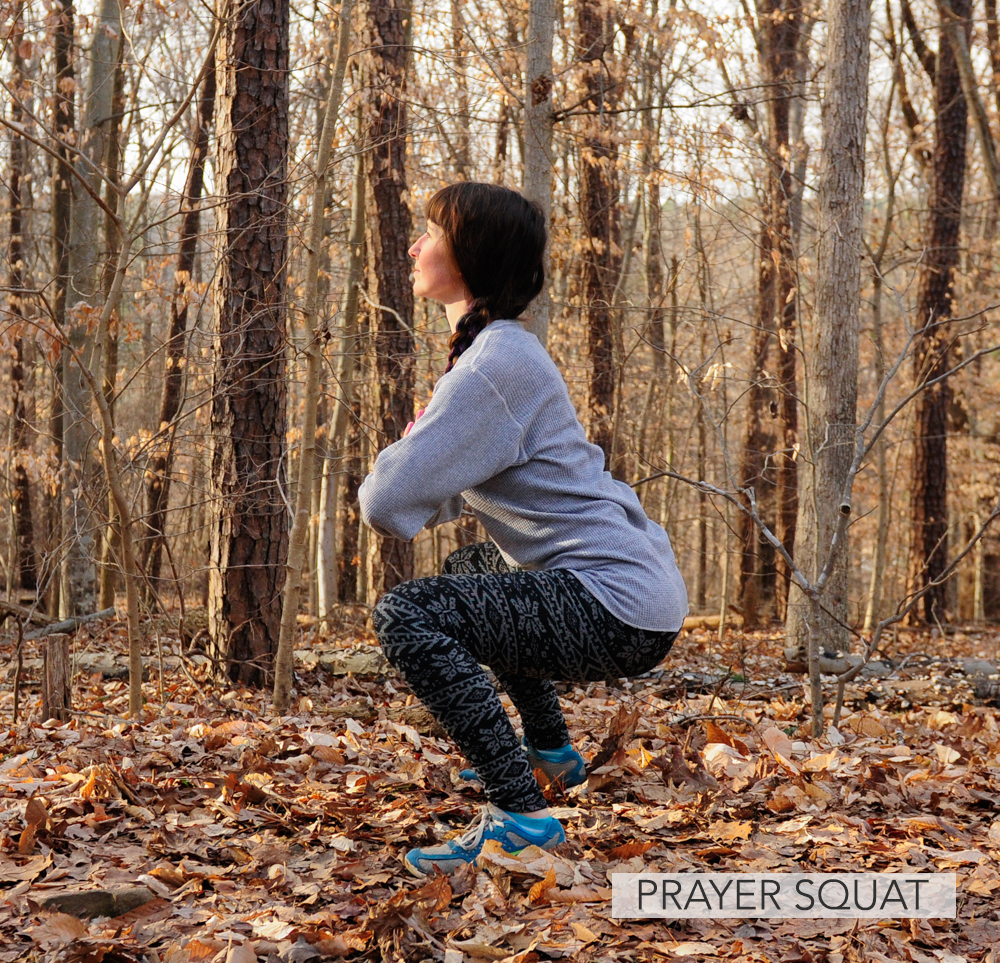
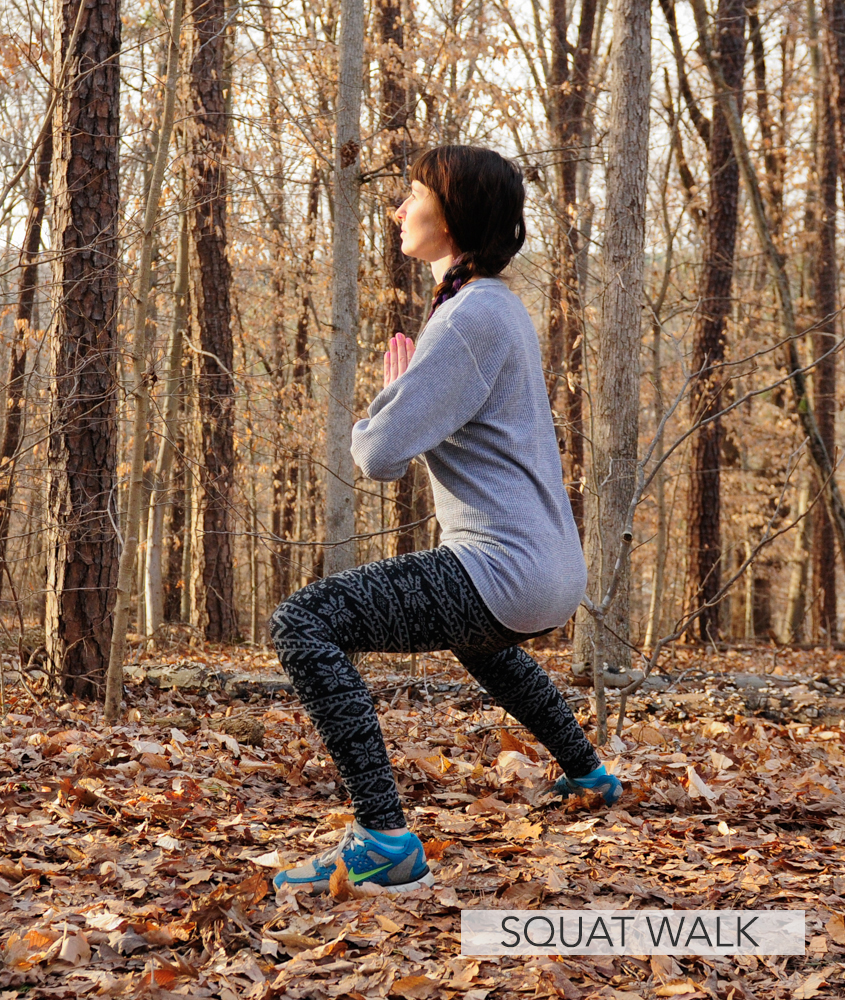
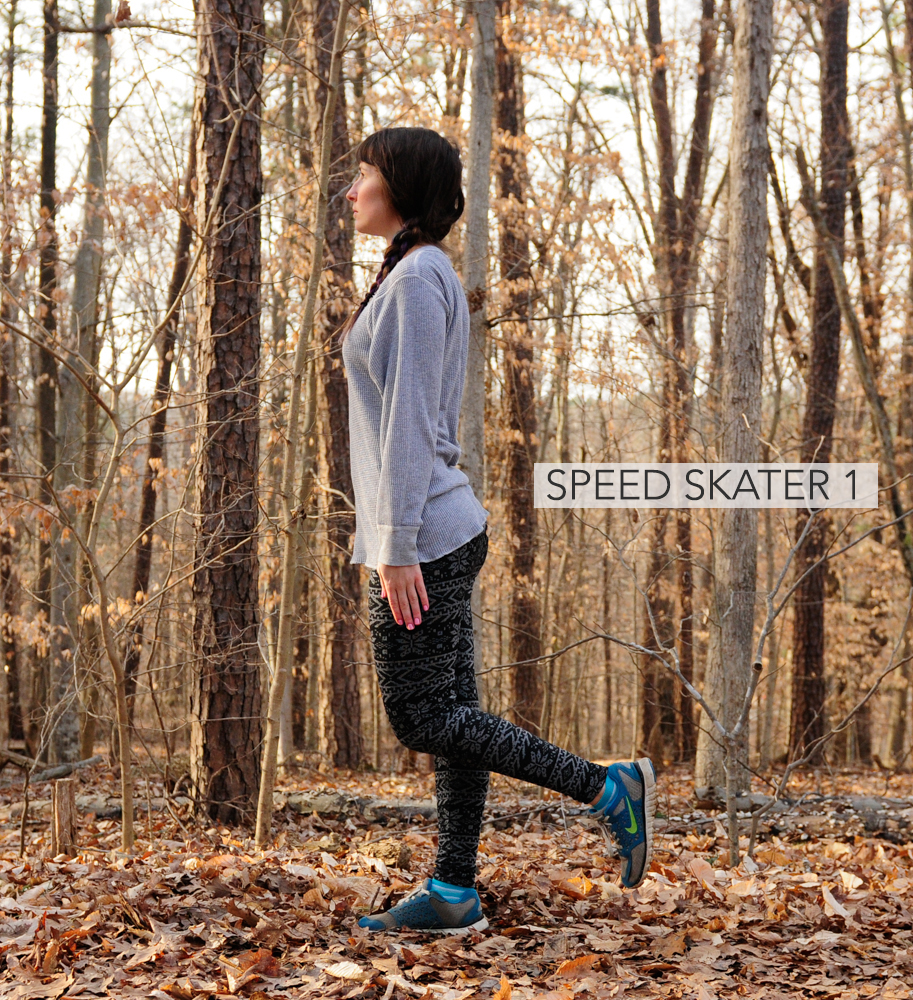
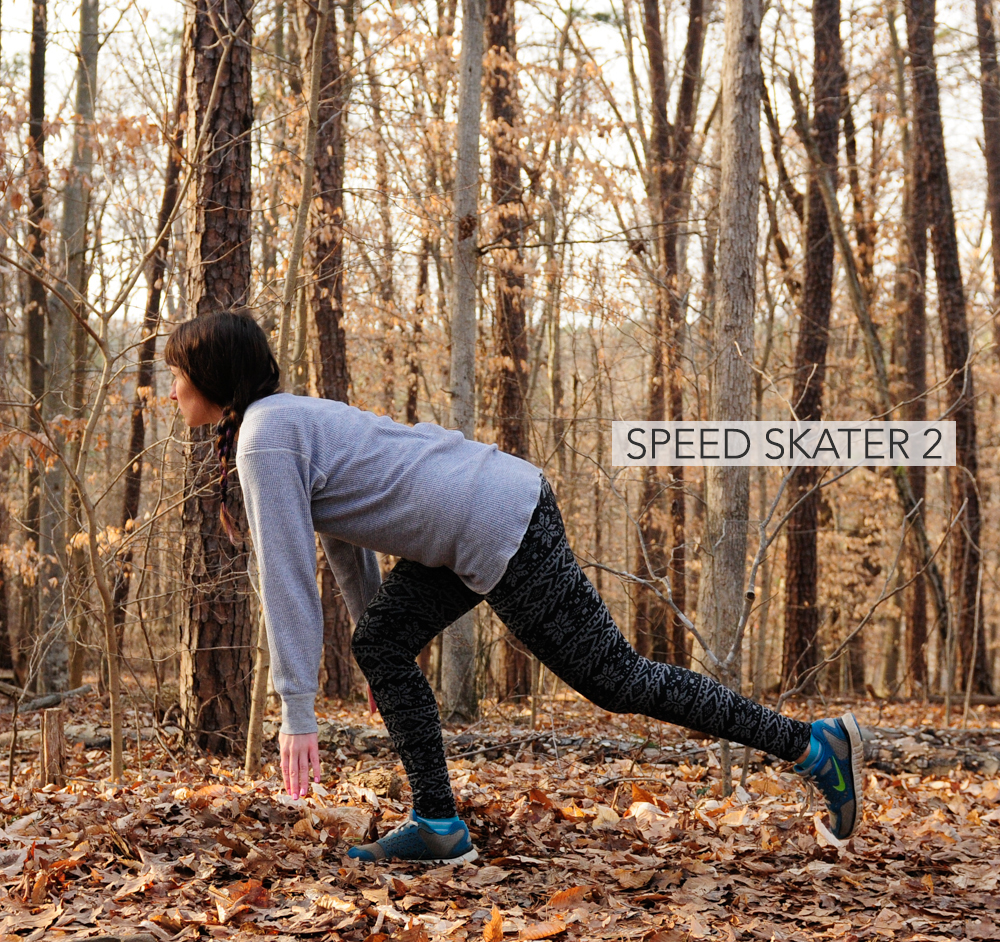
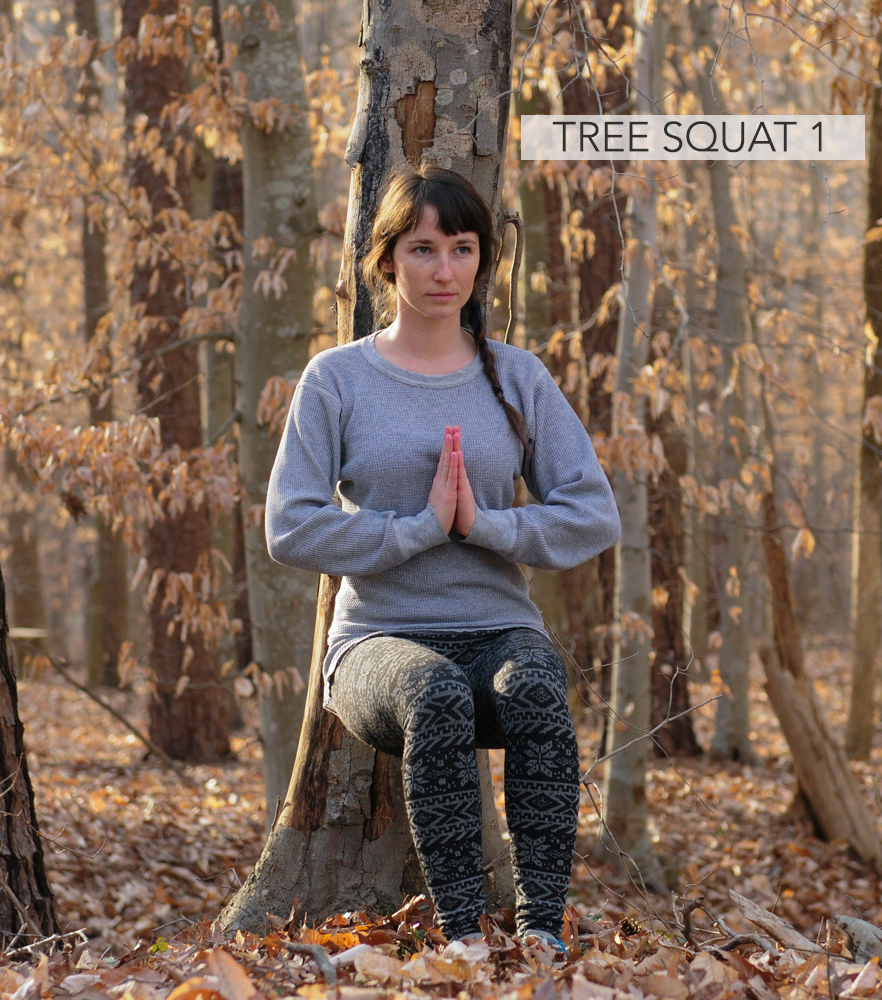
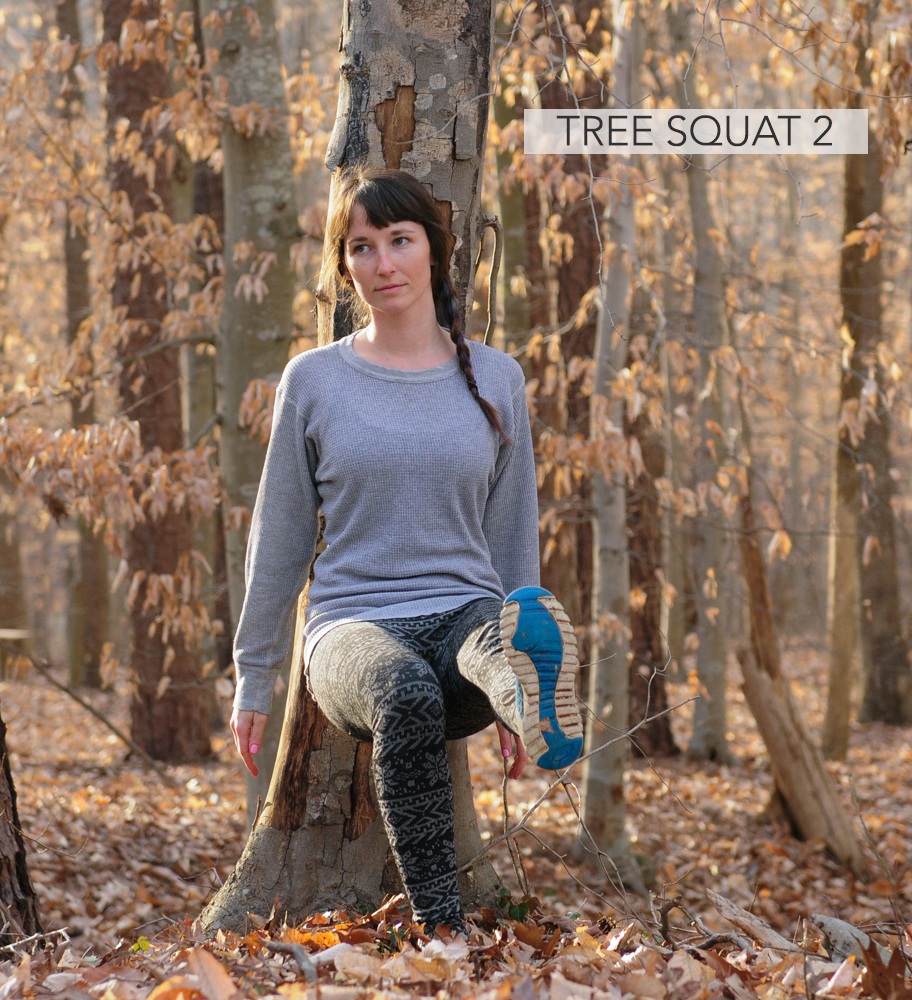
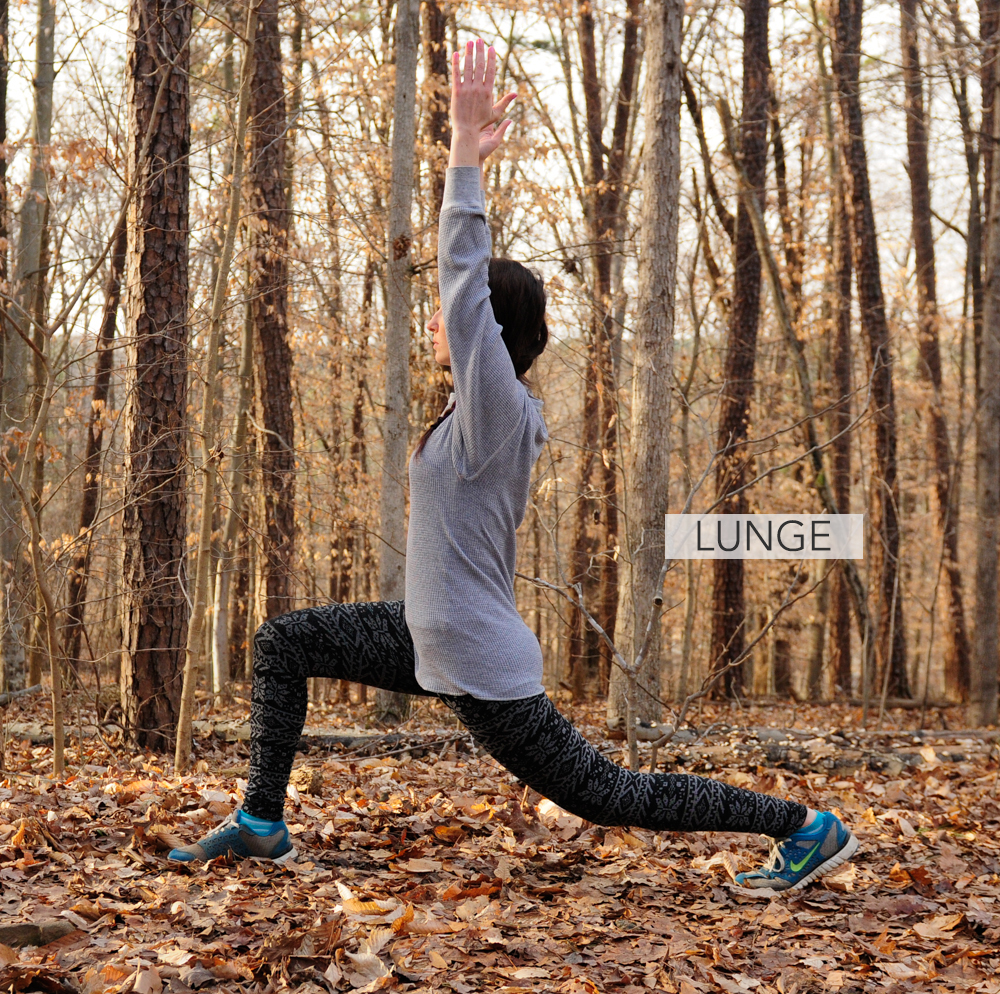
Growing up, I’ve always been involved in some type of activity, whether it was playing tag with my neighbors, going backpacking with my father or running around on the soccer field.  Because of this, my legs have always been the biggest part of my body and I admit, I used to feel a little insecure about it.  Struggling to squeeze into skirts and skinny jeans that my friends easily slipped on with their cute little bird legs and knobby knees.  Now that I’ve grown up a little bit and realized that Barbies and models are far from average, I love my muscular legs.  Are they proportionate to the rest of my body? Sometimes no, but it’s cool, thunder thighs are where it’s at.  They take me everywhere I need to go, even if it’s twenty miles from point A to B, I know they’ll carry me.  Climbing up a volcano? Yep, they were there. Walking three miles home from class carrying a twenty-pound camera lens? No biggie.  Taking dozens of photos while frozen in the same pose for an hour during this tutorial? No problem they say!  They even requested a yoga class afterwards. They’re that good.  So, after years of self-doubt and twirling in the mirror wishing they’d shrink up a bit, I decided it’s time to give my legs some love and some more exercise.  Time to cherish those limbs and treat them right.  This lower body workout is really basic, but can be easily modified if you’d like it to be a bit tougher.  I designed it to be easily remembered and equipment free that way you can add it to the end of a hike or a walk.  These moves target your thighs (especially the inner thighs), glutes, calves and even your abdominal muscles.  Read through all the exercises so you’re familiar with proper form.  You’ll find a concise workout routine at the bottom of the post.

live seasoned lower body woods workout-9 copylive seasoned lower body woods workout-10 copylive seasoned lower body woods workout-11 copy

A few quick tips:

  •             Wear sneakers or supportive shoes
  •             Stretch out for a couple minutes before you begin
  •             Breathe consistently throughout each exercise
  •             Engage your muscles, especially your abdominals
  •             You are your own trainer.  Do what feels best for you. Don’t push it unless that’s what your body wants.
  •             If you’re not accustomed to strenuous exercise, consult your physician before you begin.

lowerbodywoodsworkoutdesign

live seasoned lower body woods workout-1 copylive seasoned lower body woods workout-2 copy

Basic High Lunge

  • Stand up straight with your feet shoulder length apart.  Engage your abdominal muscles and step forward with your right foot until your knee is bent at a 90° angle.  Your thigh should be parallel to the ground or as close as you can get to parallel.  Your need should be directly over your ankle, never over your toe.  Your left heel will naturally rise off the ground.  There should be a slight bend in your left leg.   Stand up, bringing your back foot to meet the lead foot and switch legs.  Continue lunging forward for a total of 20 lunges.
  • Modification: Bring your hands in a prayer position and use your abdominal muscles to twist slowly to the left and then the right.  This strengthens your core and improves balance.

live seasoned lower body woods workout-7 copy

live seasoned lower body woods workout-16 copylive seasoned lower body woods workout-17 copylive seasoned lower body woods workout-18 copy

Calf Raise Three Ways

  • Super simple, but don’t let that fool you, these work and you’ll feel the effects instantly.  Stand up straight with your feet shoulder length apart.  Rise up onto your toes and count one Mississippi, two Mississippi and lower down.  Repeat twenty times and do a quick set of ten. Rise up, down, up, down as quickly as possible.  Make sure your rising up on your toes as high as is comfortable.  Now point your toes in towards each other and repeat, twenty slow, ten fast.  Finally, point your toes away from each other and repeat again, twenty slow, ten fast.  Your calves should be on fire at this point.  No need to wear heels to have defined calves anymore.

woods chair pose-100

Basic Chair Pose

  • If you’ve ever practiced yoga, you’ve probably done chair pose.  Stand up straight with your feet hip’s distance apart and your arms raised over your head.  Simply exhale and sit back as if you’re sitting down in an invisible chair.  The goal is to have your thighs parallel to the floor.  Your knees will protrude over your feet a little bit, but your weight should be in your heels.  I lifted my toes in the photo above to demonstrate that, but you should keep your feet flat on the ground. Keep your chest and arms lifted, look up and keep breathing.  Count to ten or twenty and stand up straight.  I like to sprinkle in chair pose between all of the other exercises.
  • Modification:  Instead of feet shoulder length apart stand with your feet together and challenge yourself to bring your thighs parallel to the floor all the while keeping your chest and arms lifted.

live seasoned lower body woods workout-5 copylive seasoned lower body woods workout-4

Lunge Rollover

  • This is very similar to a high lunge. Stand up straight with your feet shoulder length apart.  I like to hold my hands at my heart’s center in a prayer position, but you can also hold them overhead or down by your sides.  Engage your abdominal muscles and step forward with your right foot a little further than you would for a regular high lunge.  At this point, your knee should be behind your ankle.  You are balanced on the ball of your back foot.  Roll forward onto your toe, which propels your body forward so that your knee is now directly over your ankle.  Your knee should never be over your toe.  That is why you take a bigger step in the beginning. Rock back onto the ball of your foot, that’s one repetition.  Roll forward slowly onto your toe again and back, that’s two.  Complete 15 on each foot.

live seasoned lower body woods workout-3 copylive seasoned lower body woods workout-6 copy

Prayer Squat

  • Stand up straight with your feet a little wider than shoulder’s length.  Engage your abdominals and bring your hands in a prayer position at your heart’s center.  Lower down slowly until your thighs are parallel (or as close as you can get) with the ground and your elbows touch the insides of your knees.  Keep your weight in your heels and as you lower your knees will track outwards instead of forwards.  Your knees should never track out over your toes.  Slowly rise back up.  Repeat 15-20 times.

live seasoned lower body woods workout-8 copy

Squat Walk

  • First make sure there are no strangers around because this is one sure-fire way to creep them out.  Take a wide stance with your legs with your toes pointing outwards; I like to pretend I’m making the letter A.  Then squat down so your thighs are parallel with the earth.  Keep your head and chest lifted and take 6 small steps forward and 6 small steps backward.  You should feel it in your inner thighs.  Continue six-steppin’ for about a minute.

live seasoned lower body woods workout-14 copylive seasoned lower body woods workout-15 copy

Speed Skater

  • Stand up tall with your arms at your sides.  Bend your left knee with your toe pointed towards the ground.  Keeping your back straight, lean forward bend your right knee and kick your left leg out behind you.  Your fingertips should be pointing towards the earth and your right knee will track over your foot a little bit, but never past your toes.  Pretend you’re speed skating in place.  Do 15 reps without letting your left leg touch the ground and repeat on the other side.

live seasoned lower body woods workout-12 copylive seasoned lower body woods workout-13 copy

Tree Squat

  • Find a tree with a smooth surface.  Make sure there aren’t any poison vines growing on it and lean with you back against it, thighs parallel to the earth.  Sit up tall and count to thirty.
  • Modification: Try lifting one leg for 15 seconds and then the opposite for 15 more.

Lower Body Woods Walk Workout      1-3 sets

  • Basic High Lunge x20
  • Basic Chair Pose 10-20 seconds
  • Calf Raise Three Ways: Slow x20 Quick x10
  • Lunge Rollover x15 each leg
  • Prayer Squat x20
  • Squat Walk 40-60 seconds
  • Speed Skater x15 each leg
  • Tree Squat 30 seconds


There are dozens of modifications for each of these moves, but rather than overwhelm you I thought it’d be great to start simple and go from there. You’ll see these basic exercises being built upon in future posts.  Exercise doesn’t always mean putting on bright workout clothes, paying for a gym membership and fumbling around with machines.  Sometimes the most effective workouts are the simplest because we’re more likely to be consistent.  I hope you’ll try out some of these moves this week while you’re out walking around or hanging out at home.